Tuesday Morning Sketch Challenge #131: Squeaking By

Tuesday, January 31, 2012


[If you are looking for my Flourishes Timeless Tuesday Challenge 154, click here.]

Good Morning!  See anything different on my blog? I'm on Pinterest now! If you'd like to follow me, you can click on the Pinterest button at the top of my sidebar. Am I the last person to get on Pinterest? That site is so addicting! :)

Also, before I get to the sketch and my card, I have an exciting announcement.  Theresa, after many hours, has gotten Tuesday Morning Sketches up on Facebook.  Isn't that great! Please "like" us on Facebook!

Now it's time for another exciting challenge at Tuesday Morning Sketches!  We have a fun sketch and, of course, a fabulous sponsor - Laurie Wilson of Doodle Pantry.  Yay!!


Here's Theresa's sketch for the week:


And, here's my interpretation:

I am loving that digital Quirky Mouse. He looks so satisfied and happy. This stamp also comes with some cute sentiments, but for this card, I typed my sentiments in Word, to customize them a bit, then printed them on a transparency and rubbed them onto the cardstock.

The inside is very plain, with just the second half of the sentiment.


That's my card for today! Now, head on over to Tuesday Morning Sketches and see what the other Design Team members have to share with you today. Awesome stuff, I promise.

Doodle Pantry has some of the cutest digi stamps. :D Wouldn't it be great to snag something from there for free? Well, to have the chance, you have to play along with us! So, what are you waiting for? You have until Sunday at 8:00 PM EST to link your creation up on the TMS blog.

Lily Pad has a Patterned Paper Challenge running until February 23, so I'll be entering this card in that challenge, as well. 

This was supposed to be my last week as a Guest Designer at Tuesday Morning Sketches, but Melissa invited me to guest design for February, too, so you'll be seeing me there for a few more weeks! Oh, Yay-uh!!!

Thanks for visiting my blog today! Have a wonderful week! 

~Hugs, 
 
Stamps: Quirky Mouse--digi (Doodle Pantry); Moments in Time (Flourishes)
Paper: Circa 1934 (Cosmo Cricket); Classic White cs (Flourishes)
Ink: Copic markers; Distress Ink
Dies: Ribbon Tag Trio, Std. Circles Lg (Spellbinders)
Accessories: Clockworks embossing folder (Cuttlebug); Distress Embossing Powder (Tim Holtz); ribbon (Offray); Sprocket Gears (Tim Holtz); Corner Chomper; rhinestones; sewing thread; foam dots; sentiments (MS Word)
Size: A2 (4.25" x 5.5")
Thanks for visiting my blog!
To have Ink Up delivered to your inbox,
subscribe in the box at the top right of the page.

Flourishes Timeless Tuesday--FTTC154: Peaches


[If you are looking for my Tuesday Morning Sketches #131 post, click here]

Hi Blog Friends! Happy Tuesday!!! It's that time again...Flourishes Timeless Tuesday Challenge! This is my last week as a Guest Designer for this challenge, :( and I want to thank the super talented Timeless Tuesday Design Team for allowing me to hang out with them for the past few weeks. I've had a blast, Ladies! :~D

Before I get to the challenge and my card today, I also want to thank the ladies at Lily Pad for choosing my card as the winner in Kathy's Lily Pad Palette Challenge. What a great way to start the week!!!

Now, for this week's Timeless Tuesday challenge, Silke has given us an awesome sketch. Check it out...


And, here's my card:


I stamped the peaches stamp, from the Cherries & Peaches stamp set, in Rich Cocoa Memento ink, colored the image with Copics and cut it out using the out of the box technique. It's mounted onto a Parisian Motif Spellbinders die cut.


The four dp panels behind the peaches are each sewn to a layer of black cs, then rather than stack them, I wove them together because I just couldn't decide which dp I wanted to be most prominent. This way, they get equal billing. :)


The front of the card, while simple, is a little busy, so I wanted to keep the inside fairly plain. I used a sentiment from the Pears stamp set, attached dp triangles to each of the sides of the white cs, then attached that to black cs. 


I really enjoyed working on this card. The sketch gave me an opportunity to play with mixing patterned papers, which I love to do (Lily Pad Patterned Paper Challenge, here I come!). But, also, I recently acquired some of Flourishes' Classic White cardstock for using when I color with my Copics, and, Oh My Gosh...if you use Copics you need to try this cardstock! I was able to blend my colors so much better on it, and bleeding beyond the lines was almost totally non-existent--even with reds. I am by no means an artist, but using this cs sure makes me feel like one! :D

Now, it's your turn. Show us your style with Silke's sketch and link your creation using the Inlinkz widget on Flourishes' Timeless Tuesday FTTC154 blog post by Monday at 6:00 PM EST. One lucky person is going to win a $10 Flourishes gift code! 

It's no longer a challenge requirement to leave comments on all the designers blogs, but you're not going to want to miss their creations this week. Take a gander at what they've created, then grab a big bucket--your creative juices are going to be flowing! ;)


Thanks again, to the ladies of the Timeless Tuesday Design Team, for letting me join you this month! Your talent is inspiring, your enthusiasm, infectious!

And, thanks to YOU, friends, for stopping by today! I hope you have a "peachy" week!

~Hugs,
 
Stamps: Cherries & Peaches, Pears (Flourishes)
Paper: Splendid (Authentique); This & That (Lily Bee Designs); Classic White (Flourishes)
Ink: Copic markers; Distress Ink; Staz-On
Dies: Std Circles Lg, Parisian Motifs (Spellbinders)
Accessories: Rhinestones; sewing thread
Size: 5" Square
Thanks for visiting my blog!
To have Ink Up delivered to your inbox,
subscribe in the box at the top right of the page.

My Craft Space--Clean for a Few Minutes :)

Thursday, January 26, 2012

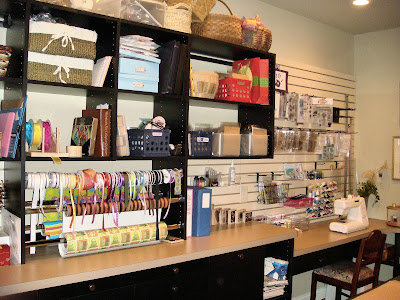
Hi Friends! If you saw either of my previous two posts, then you know that I've been doing some cleaning and organization in my craft room. So, while I have this short window of time where it's actually not a complete embarrassment to show you, I thought I'd share it with you. It's in the basement, so there aren't any windows, and it was originally set up as a knitting room, so the shelves and drawers are much larger than I prefer for papercrafting, but I'm making it work. I have plenty of lighting with 12 canned lights in the ceiling. I took quite a few photos, so I'll keep the commentary to a minimum. Hope you enjoy!

View from the door, including the sewing area

View from the door, including back wall

Cubed shelves at each end of craft table. Misc tools, dies

Other end of table. Distress Inks, Stickles in the floral box, white card stock, scrap paper


3-Tier basket-yarn that needs to go, and receipts
Wood Mounted Stamps


Stamps stored in clear plastic boxes and hung on slat wall

Embossing pwdrs, glitter

Sewing area

View from sewing area--this is where I spend most of my time--I prefer to stand rather than sit.
The table is bar height--comfortable for standing.

Craft table--tape and craft knives in pink drawers

Boxes of finished cards--divided by occasion
Wrapping station, ribbon--see all those baskets on top of shelves--full of yarn.
The blue binder holds my Spellbinders dies 

View of sewing area from back wall. The bookcase with orange bins holds my DDs craft supplies

From my counted needlework days
Embossing folders & various tools on these shelves
Rhinestones, pearls in blue drawers, scissors, weather radio
(The craft room doubles as our tornado room--completely underground & no windows)

Back wall. Everything on the upper shelves and up top is from my knitting days and needs to go.

Cutting & Scoring area--DDs art work on wall :D
Scrapbook paper & scraps. The little boxes in the left of the photo are all 6x6 pads.

Drawers are under the scrapbook paper area.
Top drawer--Ribbon, reinkers, buttons, etc.

2nd drawer--Sizzix dies, flowers, small embossing folders, misc embellies.

3rd drawer: punches, misc tools, ribbon

Covered shelves underneath countertop: Solid cardstock, felt, old knitting magazines.

DDs craft area--messy, like her Mom! :)

So, now you know where I am most of the time. I'm still trying to figure out the best way to organize everything, so I imagine in 6 months it will look completely different. If you have any suggestions for ways I can improve my set up, I'd love to know them. And, if you've got photos of your craft space on your blog, leave a link in your comment so I can see where you work, too!

And, if you are a knitter, or know one, who might be interested in buying any of my yarn, knitting books, etc., I'm Passioknitgirl on www.ravelry.com. You can see most everything I have there.

Thanks for visiting me in my craft room! Have a fabulous weekend!

~Hugs,
 
Thanks for visiting my blog!
To have Ink Up delivered to your inbox,
subscribe in the box at the top right of the page.

A Little Card Break


Hi Friends! I finally got my craft room semi-organized! I'm slowly converting it from a knitting space to a stamping/paper crafting space and it's a slow process. Once I get all my yarn and knitting paraphernalia sold, I can get really settled in, but for now, I just shift things around as more space opens up. (I'll have some photos of my craft room up tomorrow, since it's finally presentable!)

While I had my craft table completely cleared off, I got out my large self-healing mat, my rotary cutter, some gorgeous fabric, and my sewing machine and did a little sewing. I've been sewing for as long as I can remember, and for years made almost everything I wore, but now it's just for fun, and this bag was definitely fun to make.


I love the coral, aqua, and brown colors. They can easily work year-round, I think. I used my Big Shot for the flowers. Wow, that was so much easier than cutting them by hand!

The bag has a box bottom. Here's a side view:

And, here's a look at the inside. I wish I'd used French seams so there wouldn't have been any exposed seams on the inside, but I didn't think about that until later.


This pattern is simple--and free! If you'd like to make this tote, you can find the pattern here.

Thanks for stopping by! Have a wonderful day!

~Hugs, Cheryl
 
Thanks for visiting my blog!
To have Ink Up delivered to your inbox,
subscribe in the box at the top right of the page.

Copics in a Can, Black & the Entire Set...Finally

It's been awhile since I posted any of my Copic cans, but this is the last one--Black:

And, here's a shot of the entire set:
Right now, they are sitting on my craft table, but I'm doing some cleaning and re-organization in the craft room, so that may change soon. 

If you'd like to see all the cans individually, just click on the label, "organization," down below.

Thanks for stopping by, and have a great day!

~Hugs, 
 
For a materials list, see my Blue Copic Can Post.
Thanks for visiting my blog!
To have Ink Up delivered to your inbox,
subscribe in the box at the top right of the page.

Tuesday Morning Sketch Challenge #130: Teddy Bear Love

Tuesday, January 24, 2012

[If you are looking for my Timeless Tuesday #153 post, click here.]


Hi Friends! It's Tuesday Morning Sketch Challenge time! Jessica George has given us a fab sketch to follow this week, and our sponsor is Stamp Fairy. They have the most adorable digital stamps. You really should check them out. And, if you've never used digital stamps before, they have some great freebies that you could practice on to get an idea of how it works. :)

I've got a Valentine's card this week, and I'm using the sweetest little digi stamp--Donna & Donny Love. I colored them with Copics and used Distress Ink for the blue background.


The red hearts on their chests were what popped out of the Heart Circles die cut. I glued them on, then coated them with Glossy Accents. The two glittery hearts over Donna's head are part of the digi stamp. I colored them with Copics, then covered them with several thick layers of Stickles. Donna and Donny have Glossy Accents on their noses.


The Love stamp is a dollar bin stamp from Michaels. I stamped it with Aged Mahogany Distress Ink, and colored inside the letters and heart with a red Copic. Then, I used Glossy Accents on the letters and heart, and put Burgundy Stickles in the center of the heart.

There are Stickles dots on the Heart Circle die cut and Pearl Pen dots on the Scalloped Circle.

The inside is stamped with several stamps from the Hero Arts Valentine Sayings set.

So, that's my card for today. Be sure to go to the Tuesday Morning Sketches site and take a peek at what the rest of the Design Team has to inspire you for this week's challenge. Then, link your creation up for a chance to win something fun from Stamp Fairy!

I'm entering this card into the Paper Pretties Monday Challenge--make a Valentine card (PPMC23), and the Paper Pretties Wednesday Challenge--use glitter (PWC189).

Thanks for stopping by my blog, and have a crafty week!

~Hugs,
 
Stamps: Donna & Donny Love-digi stamp (Stampfairy.com); Valentine Sayings (Hero Arts); Love (Michaels)
Paper: Happily Lost (Lily Bee Design); Life's Journey (K&Co); Classic White cs (Flourishes)
Ink: Distress Ink; Copic markers
Dies: Std Circles Lg, Classic Scalloped Circles Lg, Heart Circles (Spellbinders)
Accessories: Seam binding (Hug Snug); lace (Fancy Pants Designs); eyelets; Glossy Accents; Stickles; Enamel Accents; Pearl Pen
Size: A2 (4.25" x 5.5")
Thanks for visiting my blog!
To have Ink Up delivered to your inbox,
subscribe in the box at the top right of the page.