Showing posts with label blog hop. Show all posts

Look What's New--Blog Hop at Your Next Stamp!!!

Sunday, October 19, 2014

Your Next Stamp is Celebrating their New Website Launch with a New Release and a Fun Blog Hop!

Karen started Your Next Stamp 5 years ago, and she's celebrating, not only with some sweet new stamps, dies, and Gumdrops, but also with a super fun blog hop, and she is giving away 5, yes 5, $20 YNS Gift Certificates! Whoo Hoo!

Here's what I did with one of the newest stamp sets:
I was so excited when Karen contacted me about being a Guest Designer for a Special Blog Hop for Your Next Stamp, and when this adorable stamp, Seasonal Sweeties, arrived, I couldn't wait to color it up with my Copics! The little critters are super sweet and it was lots of fun "decorating" their personal stockings. The image is stamped with Memento Tuxedo Black onto X-Press It Blending Card. After coloring, I die cut the image with a Labels 30 Spellbinders die, trimming the ends off. To make the red borders along the top and bottom, I just cut pieces of the dp with the same die and glued them behind the image. The card base is cut from a Labels 28 die, and I dry embossed the snowflake image with a Snowflake Swirl embossing folder. The rounded strip of red dp is a smaller Labels 28 die, of which I trimmed the top and bottom from. Karen also sent me a package of Green Apple Glittered Gumdrops. How'd she know that's my favorite color??? ;) I used two of the larger ones on the red dp and two tiny ones on the top and bottom of the image.
This stamp set comes with a sentiment, too! I love the elegant font.

Now, about that Blog Hop. 5 random winners will receive $20 to spend in the YNS Store – prizes are randomly placed amongst all the blogs, and all you have to do to be eligible is comment, and the more blogs you visit and comment on, the more chances you have to WIN!
And, that's not all! If you create an account in the new store, you will get a code for 10% off your entire purchase in the new store, plus Karen has marked the new releases down 15%! So, really, everyone is a winner! ;) 

So, what are you waiting for? Leave a comment here, and get hopping! And, once you've finished the hop, create an account in the store and go shopping. You are going to LOVE all the new products!

I'm entering this card in the following challenges:
Simon Says Stamp Monday: O is for... (Owl)
Kit and Clowder October Challenge: Anything Goes
The Stamping Chef Challenge #51: Anything Goes

~Hugs,

Supplies Used:

Thanks for visiting my blog!
To have Ink Up delivered to your inbox,
subscribe in the box at the top right of the page.

Tiddly Inks Baby Blog Hop: Brennan's Bits Baby Book

Tuesday, October 7, 2014


***Tiddly Inks also has a New Release today! Click here to go to that post!***
We, at Tiddly Inks, are here today to celebrate the upcoming birth of Brennan, whose mom is our dear fellow team member Melissa. Melissa has been on the Tiddly Inks team since close to the beginning and although she has had to take some time off to deliver Brennan, we want her to know she is missed and that we are excited Brennan is almost here. Please join us in celebrating this happy occasion by hopping along...or even better, by linking your own card to say hi to Melissa. 

My project is shown below but if you want to see more delightful cards, all the details for the blog hop can be found on the Tiddlyinks Challenge blog and there is a LINKY tool for you to add your card there as well. We kept this blog hop simple....all the links will open in a new window from Christy's blog. 

Instead of a card for Melissa, I made a blank baby book, that I envisioned Melissa using to jot down all the cute "bits" Brennan does as he grows up that Melissa will want to remember--funny expressions, comments, etc.--those things you think you'll remember, but that invariably end up being forgotten. :) Whatever Melissa decides to use it for, I hope she enjoys it! It was certainly enjoyable to make!

I used another sheet of that beautiful Mulberry paper from my friend, Deborah, for the cover of the book, which I cut from a sheet of framer's matboard. I added blue and green eyelets in the cover before stitching it together with waxed pearl cotton. The image is the adorable Sleep Tight Baby image from Tiddly Inks, and I added a dark blue digital paper (it's from a digi paper pack called Renewed Spirit, by Agnes Biro, but I can't find it on-line anymore) to the background before printing onto X-Press It Blending card, and coloring with Copics. I colored the stars with a silver Wink of Stella pen and used a black, and then a gold Spica pen for the lines attached to the stars. A silver glitter scalloped circle die cut backs the circle die cut image, and that is popped up with foam tape over a white glitter lotus pendant die cut. I ran a silver metallic ribbon through the lotus die cut and tied a little bow, then glued that to the front of the book. The "Brennan's Bits" text was die cut out of navy shimmer cardstock and glued on.

The book cover measures 4-1/2" x 6". The signatures are 24 lb colored paper. There are 9 signatures in four different shades of blue and green, with the center signature being white. Each signature has four sheets, which, when folded, result in a book of 144 sheets. I stitched the signatures together using a Coptic stitch, and left the spine exposed by incorporating the covers into the signature stitching. (There is a link in my supply list to the book I used for the instructions for making this book.)
I used a cute dp with clouds on it for the inside of the covers.

This is what the stitching looks like in the center of each signature.
Here is a look at the Coptic chain that is visible between signatures. I love these two colors together! :)

Come on over to the Tiddly Ink Challenge blog to hop along and celebrate this happy birth and please join in with your own card. There will be a random winner selected from those who link their own card.

Thanks for hopping by, have a wonderful week, and don't forget to check out the New Releases at Tiddly Inks, too!

I'm entering this project in the following challenges:
Kit and Clowder October Challenge: Anything Goes
613 Avenue Create Challenge #92: Anything Goes
Paper Issues: You're Sew Cute, You Keep Me In Stitches With May Arts Ribbon
The Stamping Chef Challenge #49: Anything Goes

~Hugs,

Supplies Used:

Thanks for visiting my blog!
To have Ink Up delivered to your inbox,
subscribe in the box at the top right of the page.

Flourishes' Princess Birthday Blog Hop

Wednesday, November 20, 2013

Today is a special day for the Flourishes Family to celebrate our Birthday Girl - Julie Koerber! And Julie is definitely worth celebrating!  She's the right hand on so many levels of what's beautiful about Flourishes, and we're so grateful for her and blessed to also call this lovely lady friend.  


This summer a number of the Flourishes Senior Design Team girls gathered for a weekend in Yellowstone National Park.  It was a fantastic time of fun!  One of the great things some of the girls did was go Whitewater Rafting.  Because there were family members along, Julie graciously said she'd sit in the middle of the raft so the kids could get the most out of the experience.  
The raft guide however thought that would be a fun opportunity to tease Julie about her "Princess" status. She gracefully took it and we love to tease her about it - and so the idea for this Princess Birthday Hop was born!  Julie we love you and your fun, spunky spirit, and also the warmth and grace you live your life with!  Happy Birthday from all of us at Flourishes!

Happy Birthday, Julie!
I hope your Birthday is Spectacular!

Here's a look at my princess card, that's on it's way to Julie...
To go along with the fun princess theme, I used Flourishes' Make a Wish stamp set for Julie's card, and used every image in the set! The card base and bg layer are both Flourishes' Classic Ivory cs. I dry embossed the bg, heat embossed the princess-y images in light pink onto a piece of shimmer cardstock, added Diamond Stickles for jewel-like sparkle, and cut the embossed cs into three rectangles. The glitter border around each panel was scrap cs that I edged with Scor-Tape, then coated with pink glitter. The main image was stamped with Memento Toffee Crunch ink and colored with Copics. For the glittery mat behind the image, I die cut a piece of scrap cs, then ran it through my Xyron upside down to get the adhesive on the front of the die cut, then coated the edges of it with pink glitter. For a little regal touch, I added purple velvet ribbon, a fleur de lis embellie, and a few Swarovski crystals.

On the inside, I used sentiments from both the Make a Wish and the Winter Blossoms stamp sets. They are stamped in Memento Toffee Crunch. The rose scepter was stamped in Spun Sugar Distress Ink, and I sponged Tattered Rose Distress Ink around the edge while the cs was still in the die.

We invite you to hop along today with many of our Flourishes Family to see our pretty Princess and Birthday inspiration, and join in on our wishes for Julie!

Comment along the way and you could be entered to win any Birthday set of your choice from the Flourishes Store!  Winners will be chosen and announced on Saturday November 23rd on the Flourishes Blog.

And don't forgot to drop by Julie's place to send her your Happy Birthday wishes too!

Allison Cope
Christine Okken
Cindy Lawrence
Heather Jensen
Silke Ledlow
Stacy Morgan
Tosha Leyendekker (Today is Tosha's birthday, too...Happy Birthday, Tosh!)
Cheryl Lea
Deborah Anton
Jenny Gropp
Judy Rozema
Katie Sims
Aleksandra Mihelič
Kathy Jones
Meredith MacRitchie
Naomi Gong

I'm entering this card in the following challenges:
Viva la Verve November 2013 Week 3 Sketch Challenge
Simon Says Stamp Monday Challenge: It's a Mystery (I made the glitter paper with Scor-Tape & glitter)
613 Avenue Create Challenge #46: Anything Goes
Challenges 4 Everybody #33: Anything Goes

~Hugs,
 
Supplies:
PLUS: Copic Marker RV63
Thanks for visiting my blog!
To have Ink Up delivered to your inbox,
subscribe in the box at the top right of the page.

A Prickley Pear New Release Party Blog Hop!

Saturday, January 14, 2012

Welcome to Day Three of Prickley Pear's new release of Valentines and Steampunk themed Red Rubber Stamps!

To celebrate this new release we are having a three day long Blog Party with loads of inspirations by the Design Team and a give away! One happy participant will win a $15 gift certificate to the web shop. All you have to do is leave a comment on each of the participating blogs and tell us what you think about the new release. The last day to enter is Sunday, January 15th, at Midnight EST. The winner will be drawn randomly from one of the particpating blogs, and will be presented on the Prickley Pear Blog on Monday, January 16th.

For my blog hop card, I'm using the Mojo Monday 223 sketch and the January color palette from Kathy's Lily Pad Palette Challenge.


I chose the new Hearts ATC stamp and the True Love stamp for the front of my card.
  

I heat embossed the True Love sentiment with silver metallic embossing powder, however, it was difficult to see on the patterned paper. I really wanted it on that part of the card, so I took two different purple Copic markers and colored the embossed area. I like the result and it's nice to know I can match my embossing to just about anything this way, now. :)
I did a lot to the Hearts ATC stamp, but the photo doesn't do it justice. In person, it has an irridescent, almost translucent, dimensional look to it. To achieve that look, I first stamped it with a purple Colorbox pigment ink. Then, I colored the hearts randomly with Prismacolor pencils that matched the dp and used Gamsol and a blending stump to blend and soften the colors. Next, I spritzed it with silver Shimmer Spritz. After that dried, I saturated the entire thing with mineral spirits. (I'm not sure if that step actually did anything, but I gave it a try). Once the mineral spirits dried, I re-stamped the image with silver Colorbox ink, and again with Chipped Sapphire Distress Ink. I also sponged the Chipped Sapphire ink along the edges of the rectangle. I attached it to the main panel of the card with shiny silver eyelets. That's Crystal Stickles on the little white dots of the lavender circle die cut.

Here's a shot from another angle so you can see the layers and the dry embossed panel better. There is actually a fairly large heart embossed on the white layer, but the circles ended up covering it up.


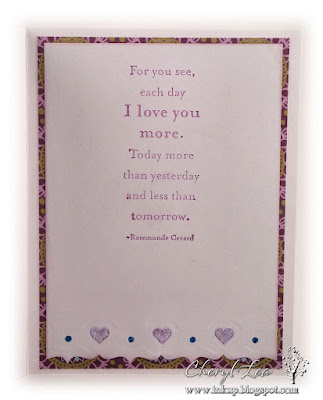
For the inside of my card, I used a sentiment stamp called "Each Day." I used Spellbinders Edgeabilities to cut the brackets and hearts at the bottom of the sentiment panel.
Here's a close up of the decorative edge. I filled the open circles with peacock blue Stickles, and the open hearts with lavender Liquid Pearls.


And, that's it for my card. What do you think about the new stamps? Me? I love them! I'm going to take that Hearts ATC stamp and do some experimenting. It's so pretty just stamped and left uncolored, but I liked how much the image changed every time I did something else to it. Now, I want to try other things--maybe my Copics, some paint, chalk, nail polish...anything I can find. If I come up with something fun and funky, I'll be sure to share it with you. :D

In the meantime, don't forget to leave a comment on my blog about the new stamps, then be sure to visit the others on the Design Team to see what they've got to show you and leave comments on their blogs, too.

Cheryl (that's Me!)

Remember, you have until Sunday at midnight to comment on everyone's blogs for maximum entries in the drawing. 

Thanks for stopping by today, and Happy Hopping! Good Luck!!!
 
Stamps: Hearts ATC, True Love, Each Day (Prickley Pear Rubber Stamps)
Paper: Violet Garden-Digital paper pack (Print Candee); Cafe Mediterranean (DCWV)
Ink: Colorbox; Distress Ink; Copic markers 
Dies: Std Circles Lg, Classic Scalloped Circles Lg, Classic Rectangle, Classic Bracket Edgeabilitiese (Spellbinders); Brackets (Tim Holtz & Sizzix)
Accessories: Love Is In the Air embossing folder (Cuttlebug); Zing silver metallic embossing powder; Prismacolor pencils; Gamsol; mineral spirits; ribbon; pearls; eyelets; sewing thread; Stickles; Liquid Pearls; Shimmer Spritz; foam dots
Size: A2 (4.25" x 5.5")
Thanks for visiting my blog!
To have Ink Up delivered to your inbox,
subscribe in the box at the top right of the page.

Happy Birthday, Flourishes!

Wednesday, August 24, 2011


Flourishes is lighting the candles and getting ready to sing to honor their fourth birthday! And, as a way to celebrate, I’m happy to say I was hand-picked to help them have a bit of a party as a designer for their customer appreciation hop! The only challenge here was to create a card or project using my favorite Flourishes stamp set. Read on – I’ll tell you how you can win some Flourishes goodies too!

All of Flourishes' stamp sets are fabulous. With the beautifully drawn images and sentiments, I love them all, and choosing one as a favorite was a little difficult for me. But, I finally decided to focus on Flourishes' From the Desk of stamp set.


The floral, letter-writing, and book images in this set are classic. It lets me combine my love of cardmaking, writing, and books all at the same time, and the elegantly scripted sentiments in it are perfect for just about any occasion. And, since we're celebrating Flourishes 4th birthday, I chose to use another favorite stamp set, Kids Play, for the "Happy Birthday" sentiment on this card.

I love all the crisp detail in Flourishes' stamps.


Now, back to the hop.... 

What can you win? Take a peek at this fun and festive blog candy! Isn't it yummy!


If you’d like to learn more about how you can win all of these stamp sets, just click HERE to read up on today’s hop and challenge!

If you arrived here by way of Debbie Marcinkiewicz, then you are on the right path! If I was your first stop, you’ll want to go back to the Flourishes Blog and start this hop from the very beginning! You have until September 1st at 5PM CST to enter!

Be sure to leave a comment on each of the designers' posts participating in today’s hop for an extra chance to win!  Next up on the hop…Linda Carson.

Thanks so much for visiting, and have a wonderful day!
 
Stamps: From the Desk of, Kids Play (Flourishes)
Paper: Floriade 2 DigiKit (Design by Anita, Two Peas in a Bucket); Best of Brenda Walton (K&Co); Life's Journey (K&Co); The Paper Studio; Recollections
Ink: Tim Holtz Distress Ink; Memento; Copic markers
Dies: Small Labels, Large Labels (Spellbinders)
Accessories: Textile Texture embossing folder (Cuttlebug); seam binding (Hug Snug); lace (dyed with Distress Ink)
Size: A2 (4.25" x 5.5")
Thanks for visiting my blog!
To have Ink Up delivered to your inbox,
subscribe in the box at the top right of the page.