Showing posts with label Simon Says Monday Challenge. Show all posts

Happy "Bee" Day

Friday, January 17, 2014

I had so much fun making this little project today! You're probably thinking this is for a birthday, and it could be, but it's not. A friend's son is in a spelling bee next week, so I made a tag for her to use on a bee-themed gift package that she put together for him.
I embossed a Honeycomb background stamp with Distress embossing powder, then spritzed with several colors of Dylusions Ink Spray. After drying the ink with my heat gun, I spritzed gold Perfect Pearls Mist over it so it would glisten like honey. "Happy" was stamped with the Inside & Out Happy stamp set from Flourishes, using Versamark Ink, then heat embossed with black ep, and the letters in "day" are die cuts. The bee was made by punching out yellow and black circles, folding them in half, and gluing them together. The bee face (stamped on cs and colored with a Copic marker) and wings (stamped on vellum and coated with Diamond Stickles) were stamped with a Recollections stamp set called Don't Bug Me, and fussy cut. A strip of Washi tape and some ribbons and jute finished it off. (I thought about adding more, but since it's for a boy, I figured less IS more!) I didn't take a pic of the back, but it is white with the honeycomb bg stamped in Scattered Straw Distress Ink. My friend has plenty of room to personalize it.

Thanks for stopping by, and have a great weekend!

I'm entering this tag in the following challenges:

~Hugs,
 
Supplies:

Thanks for visiting my blog!
To have Ink Up delivered to your inbox,
subscribe in the box at the top right of the page.

Timeless Tuesday #254: Button It Up!

Tuesday, January 14, 2014


Wherever you are right now, I hope you are warm! We had some unusually cold weather blow through Georgia recently, and I don't fare well when the wind chill dips below zero! Thank goodness we're back into our normal temperature range...for now! Well, our Timeless Tuesday hostess this week is Jenny Gropp, and her challenge for us is right in step with the weather. It's cold outside, so she is challenging us to "Button It Up!" and use at least one button as an embellishment on a winter card.

I used Flourishes' Snow Wonderful stamp set for my winter scene, colored it with Copic markers, and cut it with the Classic Keyhole Die. It's a little hard to see in the photo, but I used Copic Opaque White Pigment on the image for a little textured snow and Diamond Stickles for the sparkly ice crystals. The sentiment is from the same stamp set, and was heat embossed onto vellum with silver embossing powder, then "buttoned" to the image with a couple of tiny buttons. Behind the image are several layers of die cuts and some gray satin ribbon.
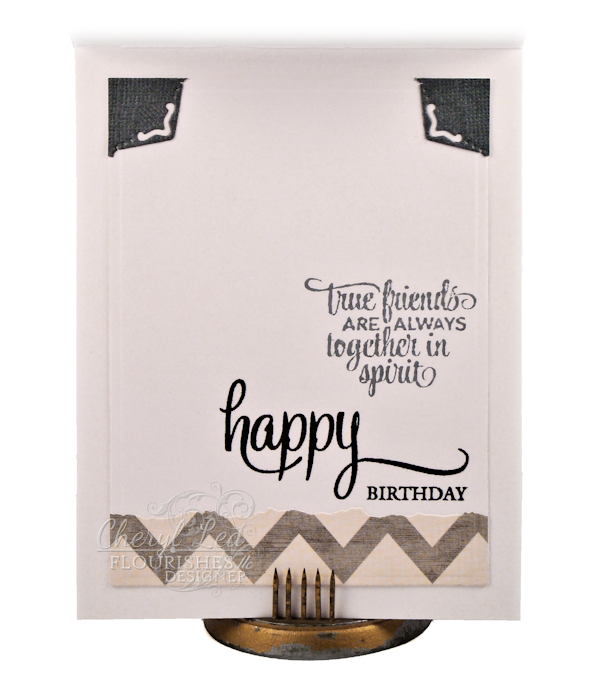
This birthday card is for a friend I don't get to see often, and the "true friends" sentiment, from the Friendship & Flowers stamp set was perfect for the inside of the card.

Stop by my teammates' blogs to see their take on this week's challenge, then link up your own creation on the Flourishes' blog, here..
I hope you are able to play along with us this week. And, remember, you don't have to use Flourishes stamps, but if you do, you get two ballots toward the weekly prize!

Thanks for stopping by, and be sure to "Button Up!" this week! ;)

I'm entering this in the following challenges:
Viva la Verve January 2014 Week 2 Challenge
Simon Says Wednesday Challenge: Ice Inspiration
Simon Says Monday Challenge: Anything Goes
613 Avenue Create Challenge #54: Anything Goes/Optional Theme: Party/Celebrate
Challenges 4 Everybody #37: Anything Goes

~Hugs,

Supplies Used:

Thanks for visiting my blog!
To have Ink Up delivered to your inbox,
subscribe in the box at the top right of the page.

It's Your Day...Smile!

Sunday, January 12, 2014

I saw a pretty color palette today over at Designs by Dragonfly, and used it to make a birthday card for a friend.
I used this week's Mojo Monday sketch (#327) for the card layout, and used a mix of stamps and dies from several different companies.
On the inside, I used a Sizzix diffuser when I embossed the white panel, to keep the center flat. Also, the yellow ink that I sponged inside the oval isn't nearly as vivid IRL as it is in the photo, but for the life of me, I couldn't get it toned down in the pic!

Thanks for stopping by, and enjoy the rest of your weekend!

I'm entering this card in the following challenges:
Mojo Monday #327
Simon Says Monday Challenge: Blues
613 Avenue Create: Anything Goes/Optional Theme: Party/Celebrate
Challenges 4 Everybody #37: Anything Goes

~Hugs,
 
Supplies:

Thanks for visiting my blog!
To have Ink Up delivered to your inbox,
subscribe in the box at the top right of the page.

Ferns & Fiddles Note Card Set & Box

Sunday, December 22, 2013

Hello Fellow Bloggers! I know you are probably incredibly busy, here, just 3 days before Christmas, so I won't keep you but a sec, however, I do have a few photos that you can scroll through.
I saw this post on Leslie Miller's Running With Scissors blog, and I loved how she got so much out of one stamp set. It inspired me to choose one stamp set and make a set of cards with it. I also made a magazine-style box and sleeve to hold the set. I used Flourishes' Ferns and Fiddles stamp set and Viva la Verve's December 2013 Week 1 Sketch Challenge for the layout.

pic name pic name
I used Lori Whitlock's A2 Card & Magazine Holder with Sleeve cut file to make this box, and rather than cover the outside of the sleeve with dp, I opted for an embossed look, to match the cards.

pic name pic name
pic name pic name
Everything I did is fairly evident. I edged the fishtail banners in a gold leaf pen, cut the Award Banner from a gold shimmer cs, added sequins to every card, and on the blue and yellow card, I used Nautical Dark Blue cs from Flourishes' True Blue Color Made Easy Paper Collection, stamped several smaller fern images with Versamark, then heat embossed them with clear ep. I sprinkled a sparkly ep and a yellow ep across the cs and heat embossed that, too.  You may have noticed that I used the same image on two of the cards, but with two different names. A botanist, I am not! :)

Thank you for stopping by, and I hope you have a Merry, Merry Christmas!

I'm entering this project in the following challenges:
Viva la Verve's December 2013 Week 1 Sketch Challenge
Simon Says Stamp Monday Challenge: Stamp Out 2013!
Simon Says Stamp Wednesday Challenge: Bling it On!
613 Avenue Create Challenge #51: Anything Goes--No Twist

~Hugs,
 
Supplies:

Thanks for visiting my blog!
To have Ink Up delivered to your inbox,
subscribe in the box at the top right of the page.

Just a Note: Desk Notes & Box

Tuesday, December 17, 2013

This is my last post today...I Promise! This is not a Silhouette project, but one that I designed myself.

I recently saw a pretty box of desk notes, and wanted to see if I could replicate it for one of my DD's teachers. This box is made of very heavy, doubled chipboard. Each part is cut separately, rather than creasing and folding the corners and joints. Because of the design on the dp that I positioned to be on the top of the box, I could have left the top unadorned, however, to help the top stay closed, I wanted to add something to it, to help weigh it down. So, I made a large Tattered Blossom flower rimmed with Stickles, and flanked it with leaf die cuts and smaller flowers. And, of course, shiny sequins, for sparkle. :)

The small opening in the front is to allow you to pick up a sheet easily.


For the notes, I filled the box with squares cut from nice, linen textured writing paper, and stamped 1 of 6 different butterfly designs in the corner of every sheet, in different colors. I wrapped them with a belly band and topped that with a decorative die cut. The text is a Flourishes stamp, and the butterflies are Stampin Up!

Thank you SO much for visiting my blog--especially if you popped in for all 5 of my posts today! And, may you and your family have a Merry and Blessed Christmas!

I'm entering this project in the following challenge:

~Hugs,
 
Supplies:

Thanks for visiting my blog!
To have Ink Up delivered to your inbox,
subscribe in the box at the top right of the page.

Christmas 3-D Book Box

I'm back with another Silhouette project!  I used the Viva la Verve December 2013 Week 3 sketch to decorate a Silhouette 3-D Book Box. My DD specifically asked for this one for the media specialist at her school.
The pretty pine cone image and sentiment is from Flourishes. I colored the pine cone with Copics, then used Distress Inks to color the background so it would match the dp behind it. I used a gold leafing pen around the edge of the Gold Majestic Circle die cut. And, since every card looks better with sparkle, I added a few randomly placed sequins (that took 20 minutes to get just right!) ;) 
Here's a side view so you can see the "book" part. Isn't this just perfect for a librarian!

I lined the inside with a Christmas dp, and added a personalization panel for my DD to sign, then she filled it with chocolate.

Thanks for stopping by...again! I'll have one more post sometime today. It won't be a Silhouette project, but is a 3-D project.

I'm entering this card in the following challenges:
613 Avenue Create Challenge #50: Anything Goes/Optional Twist: CAS
~Hugs,
 
Supplies:

Thanks for visiting my blog!
To have Ink Up delivered to your inbox,
subscribe in the box at the top right of the page.

Timeless Tuesday #251: Vellum


Christmas is only a week away! I hope you're all ready and can take some time to really enjoy the holiday. And, we've got one more Timeless Tuesday Challenge for you, before we get into the hustle and bustle of next week's festivities!


Our newest Timeless Tuesday Guest Hostess is Greta Hess, and she is challenging us to...


Well, this challenge couldn't have come at a better time for me! I had made a gift box for an ornament exchange that needed a little decoration, and I wanted to use snowflakes, but the dp I used on the box top was heavily glittered already, so stamping directly on it didn't seem like a good option. Vellum, however, was perfect!
I made the box using a Silhouette cut file, then I used Flourishes cut file for the Handmade Snowflakes stamp set and cut all the flakes and the "Joy" sentiment out of vellum. I stamped the images onto the vellum with VersaMark ink, then heat embossed the snowflakes with a silver glitter embossing powder, and the sentiment with a red glitter embossing powder. I attached them to the box by applying glue directly underneath the embossed areas so it wouldn't show through the vellum. Then I randomly added clear and white sequins.
Here's a slightly different angle, so you can see the top better.
When I placed the snowflakes, I opened the lid and treated the top and the front as one piece. I wanted the flakes to look as though they were falling off the top onto the side. I'm not sure how well that comes across, but I like how it turned out.

This was such a fun project! I am totally loving my new Silhouette!!! Flourishes cut files make projects like this super easy!

I hope you'll come play along this week! Vellum is such a fun addition to a card or project. I'd love to see what you do with it! You can find all the details for the challenge here.

And, you won't want to miss the inspiring creations from the rest of the team! Leave them a little blog love, too! :)

~Hugs,

Supplies Used:

Thanks for visiting my blog!
To have Ink Up delivered to your inbox,
subscribe in the box at the top right of the page.

Flip It Sketch Challenge: FLLCDEC13

Friday, December 6, 2013


Welcome to the kick-off of Flourishes December releases! Today two of the Flourishes Design Teams are ushering in a challenge and YOU could walk away winning all of our new sets for December! Here’s how to get in on the fun. All you need to do is play in the…..Flip it Sketch Challenge!

Dec-Sketch1


Dec-Sketch2
   
Next week we’ll be bringing you our December edition of new Flourishes Stamps, that we know you’ll love! Because we know you want a chance to win these great sets, We have two fantastic angled sketches for you to play with. All you need to do is pick one of them and create! Play in the challenge and you could win our whole December Release! THE OFFICIAL RULES:
  • Simply create a card or project inspired by either of the sketches above.
  • Entries need to be in by Friday December 13 at 5 PM EST
  • Those entries using Flourishes Stamps will be counted twice
  • You must link your creation on our InLinkz Widgit to be counted
  • You must have a link to our challenge in your blog post or gallery post
  • Please DO NOT combine challenges from other sites or locations. Only those entries that don’t combine will be in the running. Because this challenge means winning new Flourishes sets we want to see your beautiful creations made specifically for this challenge.
  • If you upload to SCS please use the keyword FLLCDEC13A or FLLCDEC13B
  • We’ll announce the winners on Saturday in our Winner’s Circle Post here on the blog on Saturday December 14th, so check back then to find out if you are a winner!
I chose sketch "B" for my card:
I used the beautiful Peace & Joy stamp set, colored it with Copics, and added Stickles for some festive sparkle on the ornament (which I cut using Flourishes' handy dandy Silhouette cut file!) I used a score board to make the scored lines on the white cs, embossed the front of the Sea Salt card base, from the Emerald Coast Paper Collection, and layered everything up.
After coloring the holly leaf, I covered it with Glossy Accents, then added some sequin berries.

Thanks for stopping by today and we look forward to seeing what you create! We’ll see you on Wednesday December 11th when our beautiful December Sneak Peeks start! Have fun creating! And now for some wonderful Sketchy Inspiration, our Design Teams have some great angles to show off to you:
I'm entering this card in the following challenges: 

Supplies Used:
PLUS these individual Copics: BG49, G02, G05, G07, YG00
Thanks for visiting my blog!
To have Ink Up delivered to your inbox,
subscribe in the box at the top right of the page.

Timeless Tuesday #248: Score It, Pierce It, Color It

Tuesday, November 26, 2013


I can hardly believe it's the last Tuesday in November! Just 29 days until Christmas!!! So the holiday frenzy officially begins this Friday. Just sayin', ya know. ;~)


In the meantime, ready for a little Timeless Tuesday challenge? Connie MacFarlane is our Guest Hostess this week, and you're going to love her challenge. It's one that can be incorporated into just about any card or project you have in mind:

Here's my take:
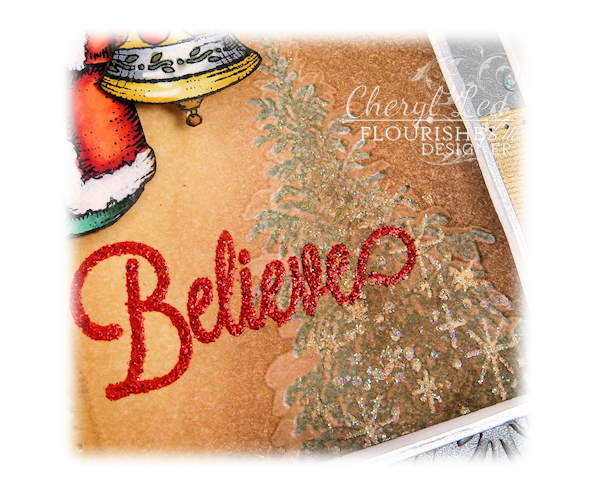
I used the Viva la Verve November 2013 Week 1 sketch for this card, substituting cute ornament images, from Flourishes' Holiday Sparkle stamp set, for the fishtail banners. After coloring them with Copics, I did some fussy cutting and glued twine to the back so I could "hang" them from the top of the card. For the next layer, I die cut a square from Classic White Cardstock, then sponged Vintage Photo and Scattered Straw Distress Inks over the entire square. Next, I spritzed water onto the pine tree stamp from the Forest of Trees stamp set, and stamped on top of the sponged ink, giving me a light colored silhouette of the image. After drying the water, I stamped the tree in a white pigment ink, then again, offsetting the stamp just a little for a hint of frost, using Memento Bamboo Leaves ink. I gave it some sparkle by stamping the little snowflake images from the Snow Scenes stamp set onto the tree with Versamark Ink and heat embossed with a glitter embossing powder. I then stamped "Believe," from the Handmade Snowflakes stamp set, and heat embossed it with red glitter embossing powder. To finish off the layer, I scored two parallel lines down the left side of the square and across the top and did some paper piercing between the lines. I matted that layer onto a square of white cs, which I edged with a Krylon silver leafing pen. The gold horizontal strip is a piece of textured white cs which I pierced along the top and bottom, then colored with a Krylon gold leafing pen. Finally, for the bg, I dry embossed snowflakes on a piece of shimmer cs and added Diamond Stickles for sparkle. To hang the ornaments, I first attached them to the front of the card, then taped the twine to the back of the bg layer before adhering it to the card base. 
Here's a better look at the sparkle on the tree.
On the inside, I embossed the same snowflake embossing folder on shimmer paper, but left the Stickles off. After die cutting a rectangle of classic white cardstock, I sponged Scattered Straw Distress Ink inside the die, then added two sentiments from the Sentimental Christmas and Star of Bethlehem stamp sets.

Did you happen to notice how many different stamp sets I used on this simple card? I was certainly surprised when I realized how many there were. When I make a card, I often just pile up stamps, dies, and all the other supplies as I use them, so I can remember what I used when it comes time to write up my supply list. So, when I went through the pile for this card, I did a double take when I saw that there were six--yes, that's right, SIX--stamp sets used on this one simple card. But, I shouldn't have been surprised at all. One of the things I've always liked about Flourishes' stamps is that they work so well together. 

And, speaking of working well together, you have got to check out what the rest of the Design Team has for your viewing pleasure! Visit their blogs, leave a little blog love, then put all that juicy inspiration into your own creation and play along with us. You don't have to use Flourishes stamps, but if you do, you get two ballots toward the weekly prize! You can find all the details for the challenge here.
Thanks for stopping by, have a wonderful week, and for those in the U.S., Happy Thanksgiving! Gobble, Gobble! :)

I'm entering this card in the following challenges:
Viva la Verve November 2013 Week 1 Sketch Challenge
Simon Says Monday Challenge: Countdown to the Holidays
Corrosive Challenge #188: Happy Holidays
Paper Issues: It's Beginning to Look a Lot Like Christmas

~Hugs,
 
Supplies:
PLUS these individual Copics: R21, R22, G17, YG03
Thanks for visiting my blog!
To have Ink Up delivered to your inbox,
subscribe in the box at the top right of the page.