Showing posts with label Paper Shelter Challenge. Show all posts

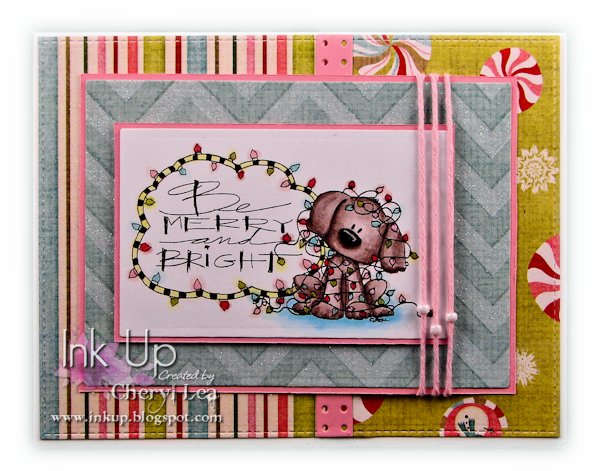
Be Merry and Bright Card Set

Friday, November 27, 2015

I hope everyone had a Happy Thanksgiving yesterday. Are you still sleeping off all the turkey and trimmings? I definitely ate way too much! ;)

A friend saw a card I made last year and asked me to duplicate it as a card set. I'm not good with making multiple cards exactly alike, and I have almost completely lost my cardmaking mojo since saying goodbye to my little Silkie, Ozzy, 2 weeks ago, so I wasn't sure I would be able to do it. Ozzy was always underfoot when I worked in my craftroom in the middle of the night, and it's just not the same without him around. Since I haven't been able to find my get-up-and-go to design any cards at all, I thought CASing my own card a few times might help me get back in the groove again. 
Here's the entire set. I basically just chose four different groupings of paper, twine, and beads, then colored the image to match it's card. I like how they turned out. You can't tell in the pics, but all the Christmas lights have clear Wink of Stella sparkling on them, and the little puppies' noses are all dimensional with Glossy Accents. Close ups of each one follow:
I didn't take pics of the insides, but they all have the same sentiment and 3 flags in the corresponding papers either sewn or stapled to the card. If you want to see an example of what I did, I do have a pic of the inside of my original card here.

While I haven't made any cards in a few weeks, I have been busy making books. Now that I don't have to reference a book or video every time I want to make a book, I can make them without having to concentrate a lot, for most of the process. I'll post pics of them soon.

In the meantime, thank you for visiting my blog today, and BIG HUGS to all my Paper Sweeties Design Teammates, Facebook friends, and real life friends who have sent me such wonderful messages of condolence. I know Ozzy was "only" a pet, but, to me he was as much a part of my family as anyone else in it, and if you've ever lost a beloved pet, I know you understand how devastating it can be. :'‑(

Have a wonderful weekend!

I'm entering this card in the following challenges:
Simon Says Wednesday Challenge: Anything Goes
Your Next Stamp Color Challenge #28 (the first card fits the challenge)
Sugar Pea Color Challenge #7: CCC7 (the first card fits the challenge)
TCP Tuesday 304: Anything Goes
Tiddly Inks Challenge #171: Anything Goes!
The Paper Shelter Challenge #229: A Christmas Card
DoubleClick Skittles Challenge: Christmas Holiday Challenge
Sweet Stamps November Anything Goes Challenge

~Hugs,

Supplies Used:

Thanks for visiting my blog!
To have Ink Up delivered to your inbox,
subscribe in the box at the top right of the page.

Gardening Tools in Pencil

Tuesday, July 8, 2014

I used the Gardening Tools image on a card a few days ago, but I wanted to try coloring it with Prismacolor pencils, too. I love my Copics, but I have to say, this turned out much better in pencil. Of course, with Impression Obsession images, you can hardly go wrong in any medium. :D 
The entire image is colored with Prismacolor pencils. I added a black line around the image with a .01 Micron marker, and some clear Wink of Stella on the butterfly. And, I used this week's Mojo Monday sketch again, altering it just a bit by moving the image to the top of the card and adding the birthday tag (or is that a flag???) ;-) The birthday sentiment is embossed with black so it would show up on the busy paper it's on.
On the inside, I cut a few images from the Enchanted Garden paper and distressed the edges. The sentiment was stamped with Teal Zeal Memento ink and Pear Tart Ink, for a shadow effect.

Thanks for stopping by!

I'm entering this card in the following challenges:
Paper Shelter Challenge #165: Photo Inspiration
Mojo Monday #353
613 Avenue Create #79: Create Your Own Challenge (image, sentiment, embossing, flowers, paper punch)
Paper Issues: Gettin' the Scoop on the Sweet Days of Summer
Sugar Pea Designs SPD06: Anything Goes
Impression Obsession Challenge: Colors of Summer!
Chocolate, Coffee, & Cards Challenge #68: Summer Days

~Hugs,

Supplies Used:

Thanks for visiting my blog!
To have Ink Up delivered to your inbox,
subscribe in the box at the top right of the page.

Gardening Tools

Saturday, July 5, 2014


I've been busy since yesterday making cards from the images I colored on vacation, and the image I used on this card is one I've colored unsuccessfully several times over the past few months, but I think I finally colored one acceptable enough for a card!
Isn't this a pretty stamp? It's fabulous for summertime! I love the detail in the tools, and all the elements around it. I colored the image with Copics, adding white highlights with a Prismacolor pencil and a little sparkle on the butterfly with a clear Wink of Stella pen and a black Spica pen. I used a copper Krylon pen around the edge of the Labels 4 die cut and added color inside the die with Distress Ink. The sunflower on the gingham bow is an MFT Die-namics flower. I added black "seeds" in the center of the flower with a black Pearl Pen. This is a rather large card, as I used the 5x7 Elegant Labels 4 die set to cut the layers. I don't normally like cards this large, but it was nice to have plenty of room for embellishing with a big bow and flower. :)

The sentiment on the inside of the card is from JustRite stamps, as is the stamped flourish on the bottom of the panel. After cutting the bottom border with a curved border die, I left the die on the cs, then airbrushed just the bottom area of the panel using the chisel end of a Copic marker, then turned the marker around and added spatters along the edge of the panel using the brush tip.

I've got a couple more cards to post, but probably won't be able to get to them until later tonight. In the meantime, thanks for stopping by, and enjoy the rest of the day!

I'm entering this card in the following challenges:
Impression Obsession Challenge: Colors of Summer
Corrosive Challenge #202: Color Me Happy
Chocolate, Coffee, & Cards Challenge #68: Summer Days
The Paper Shelter Challenge #165: Photo Inspiration

~Hugs,

Supplies Used:

Thanks for visiting my blog!
To have Ink Up delivered to your inbox,
subscribe in the box at the top right of the page.

Stars and Stripes

Sunday, June 1, 2014


Have you see the Graphic Greetings line of stamps at Taylored Expressions? I love chalkboard/subway art style stamps, and Taylor has come up with some great ones. I think she may have one for just about every holiday! Independence Day is not a holiday that I would necessarily send out cards for, but I would definitely write a note to someone inside this card. Actually, I'm thinking it would be pretty cool to have a set of blank notecards designed around each of the holidays. Hmmm...maybe that should be my next card set. :-)
The design is another Viva la Verve sketch (my last one for this month's challenge--WooHoo! I got them all done!), and the paper is from Bo Bunny's Anthem Collection. The patterns mix really well. I used a retired Verve stamp set called Super Dad for the blue stars behind the Patriotic Graphic Greetings stamp, which is embossed in Red Tinsel--very glittery IRL. After die cutting some stars, I ran them through my Xyron then coated them in a coppery glitter. I love that they look so much like brown sugar. ;`) I left the inside completely clean--room for a nice, long personal note.

Thanks for stopping by, and have a wonderful week!

I'm entering this card in the following challenges:
Viva la Verve May 2014 Week 3 Sketch Challenge
Simon Says Wednesday Challenge: Anything Goes
The Paper Shelter Challenge #160: Make it Manly

~Hugs,

Supplies Used:

Thanks for visiting my blog!
To have Ink Up delivered to your inbox,
subscribe in the box at the top right of the page.

Father's Day Metal

Saturday, May 31, 2014

Ever since I made my Faux Metal Art project, I have been looking for ways to incorporate Inka Gold into my creations. (Eventually, I'll get around to posting those creations.) ;) Well, Father's Day is almost here, so a manly card is in order, and what better time to add a little faux metal, right? ;-)
This card's design is from the Viva la Verve May 2014 Week 5 sketch, and I have to admit, when I saw that sketch, I almost decided to just skip it and let this month's VLV challenge go. But, then I saw a really cool die from MFT stamps that reminded me of riveted steel. Perfect! I cut the strips from kraft cs, added several colors of Inka Gold, gave them a good buff, and voila! Faux metal! For the Father's Day banner, I first covered a piece of kraft cs with Inka Gold, buffed it, then heat embossed the Father's Day sentiment with copper ep. To give it a little more dimension, I curved the center of the banner a little and attached it with Coll-All 3D glue. I used Coll-All to attach the "metal" strips, too. The bg was distressed by inking the edges of the paper, tearing it in a couple of places, and adding more age with a few splatters of watered down Inka Gold, and random stamping using Gathered Twigs Distress Ink and a couple of pieces of wrapped candy. Yep, you read that right...wrapped candy. I had a square of Dove chocolate and a wrapped Jolly Rancher candy in a basket on my table, so I inked up the bottom of the chocolate piece and the crinkly twisted end of the Jolly Rancher and stamped just like using a regular stamp. 

The circular images were heat embossed in silver, onto paper that I had first watercolored with Inka Gold. To distress them, I tapped a little Versamark in a few places, then dipped them in Distress Embossing Powder.
I did minimal stamping on the inside of the card, and threw in another faux metal strip to "anchor" the white panel. This card was quite fun to make! :)

Thanks for stopping by!

I'm entering this card in the following challenges:
Viva la Verve May 2014 Week 5 Sketch Challenge
Simon Says Stamp Wednesday Challenge: Anything Goes
Paper Issues: The World is a Circle
The Paper Shelter Challenge #160: Make it Manly

~Hugs,

Supplies Used:

Thanks for visiting my blog!
To have Ink Up delivered to your inbox,
subscribe in the box at the top right of the page.

Sweet!

Wednesday, April 30, 2014

This card is one that would be great for any kind of celebration, and when the end of the school year rolls around, I'm always in need of celebration cards!

I used the ice cream image from the Tim Holtz Mini Blueprints 6 set, with a bit of masking, for the main image. The Viva la Verve April 2014 Week 4 sketch has a heart as the center element, so, after coloring the ice cream cones, I dry embossed a heart using a die, over the image. All the teeny hearts on the card came from the heart circle die cut that is behind the image. I added some Glossy Accents to the ones on the ice cream cones to make them look a little like cherries, then I liked it so much, I did the same to the rest of them, too. The "Sweet" sentiment is from an MFT Stamps set, and was heat embossed with a red glitter ep.
The inside is simple, but took a little bit of planning to be able to use the slivers of scraps that were left from the front of the card, but I do love using up those little scraps. ;) The sentiment is from the Birthday Sentiments MFT Stamps set.

Thanks for stopping by, and have a Sweet Week!

I'm entering this card in the following challenges:
Viva la Verve April 2014 Week 4 Sketch Challenge-VLVApr2014
613 Avenue Create #69: Anything Goes
The Paper Shelter #156: Use that Ribbon

~Hugs,

Supplies Used:

Thanks for visiting my blog!
To have Ink Up delivered to your inbox,
subscribe in the box at the top right of the page.

Feathers

Saturday, April 26, 2014

I've been busy the past couple of weeks, working on a project I've designed to teach at my local stamp store, Impressive Ideas, in May. It includes a box, notecards, tags, and a handbound mini book, and features a faux metal technique. It has been great fun to make, and I can hardly wait for classes to start! :)
In the meantime, I've got a masculine birthday card to share.  I'm loving all the feathers that are everywhere right now, and I finally got a small feather die set! Yay!
The blue feathers are Spellbinders Feathers on the Wind dies, and I just love the embossed detail in them. The third feather is one I made from an old dictionary page. Can you see the word, "feather" on it? The "f" got trimmed off just a little bit, but it's there. A closer shot of it is in the banner pic. The lattice element behind the feathers is a Tim Holtz die cut. To make it, I layered several die cuts, glued them to another piece of cardstock, then covered it with a piece of aluminum foil that I almost threw out! I was doing some experimenting, a couple of weeks ago, with different coloring mediums, and this piece wasn't doing much for me, so I sat it aside, figuring it was destined for the trash. Glad that didn't happen. ;) I love the forged metal look. The sentiment is from a new stamp set of Emily Dickinson quotes (I'm a sucker for just about anything literary), and it was heat embossed with copper embossing powder onto a piece of cardstock that I had colored with Inka Gold (my new favorite medium!).
On the inside, I used the same lattice die cut, cutting it in both the blue and orange colors, then pieced it back together with the contrasting colors. The sentiment is a companion stamp from the Dickenson set.

Thanks for stopping by, and enjoy the weekend!

I'm entering this card in the following challenges:

Paper Issues: Pitch Perfect
The Paper Shelter #155: For the Boys
613 Avenue Create #68: Anything Goes

~Hugs,

Supplies Used:

Thanks for visiting my blog!
To have Ink Up delivered to your inbox,
subscribe in the box at the top right of the page.

Bunny in the Grass

Sunday, April 20, 2014

Hello there! Are you all decked out in your Sunday best for church, headed out for an Easter Egg Hunt, or getting ready for a family gathering? Maybe all three??? Or, are you still in your jammies, spending the day on the couch, totally taking it easy? However you celebrate Easter, I hope it is a happy day for you and yours!

I've got a couple of Easter/Spring cards to share, in honor of the day and the season...
Isn't that little bunny the cutest? It's a Serendipity die, and I cut it from white cs, then painted the body with gold metallic paint and colored the flowers with Copic markers and a clear Wink of Stella pen. I actually had to color the flowers twice because I couldn't keep up with all the little petals the first time. To make it easier on the second attempt, I die cut the bunny, but before I removed any of the flowers from the die cut, I covered the back of the bunny with removable tape then pushed all the petals out from the front so that they stayed stuck on the tape. After coloring them, I just laid the painted body of the bunny back over the flowers, pressed them in place, and removed the temporary tape, replacing it with permanent tape so the petals wouldn't fall out. The eye was colored with a pink marker, then I used a black Spica pen to draw in the black pupil and coated it with Glossy Accents. The grass was cut from white cs and colored with Copics, also. The background was fun to make, and SO easy. Alcohol inks, glossy paper, a straw, and a little lung power was all it took. I left this card blank inside so I could use it as an any-occasion card.
This card is very similar to the first one, but I added a little more color on the background, and instead of coloring the flowers on the bunny, I filled them with a Pink and a Green Pearl Pen instead. They remind me of the little candy flowers that are on chocolate bunnies sometimes. This bunny took me a very long time to make because I had trouble getting the Pearl Pen to cooperate. It was a little runny and wanted to flatten out. So, I ended up really gooping (is that a real word???) my Pearl Pen on the petals, then, while they were still wet, I added 5 or 6 layers of the bunny's body over them. That way, the petals didn't run all over the place--no smearing! In real life, there are so many layers now, the bunny looks more like a wooden bunny!
This was my DD's Easter card this year, so I added the Easter sentiment to a white panel, then used the negative die cut from the front of the card as a frame for it.

This alcohol ink technique is so easy, I plan to make several more--probably a card set in the near future!

Thanks for stopping by, and have a Happy Easter!

I'm entering this card in the following challenges:
Paper Issues: Pitch Perfect (incorporated a "lawn")

~Hugs,

Supplies Used:

Thanks for visiting my blog!
To have Ink Up delivered to your inbox,
subscribe in the box at the top right of the page.

Alleluia!

Monday, April 14, 2014

I got a new Our Daily Bread stamp on Saturday, and, unlike a lot of stamps that just get stacked on a counter until I'm ready to use them, this one saw action right away! :) It's pretty, all on it's own, but, OMGosh, I can't get over how gorgeous it is with color!
I needed a card for my DD's baptism yesterday, and I hadn't been able to find a stamp that I thought was right for a 9-year old. I "settled" for this cathedral window image, but once I had finished the card, I couldn't believe I almost passed this stamp up! It's gorgeous! I wanted to emboss it onto acetate and color the back so it would look more like stained glass, but for some reason, the acetate couldn't stand up to the heat, so instead I stamped it onto white cs, colored, then fussy cut it, went over all the stained glass lines with a black Spica pen, then added Glossy Accents to all the windows. I topped it with a couple of bows, a sweet mini doily die cut, which I embossed with black embossing powder, and a gold, heat embossed cross image, that I found in Michael's dollar bin a couple of years ago. The Alleluia sentiment is also heat embossed, and the green flourish die cuts are coated in clear glitter. I wanted just a little something in the upper corners, so I transferred the negative pieces of an outline sticker.
To give the personalization panel on the inside the look of crumpled paper, I sponged Dusty Concord Distress Ink around the edges, then tapped the edge of my inked sponge tool randomly across the cs. The Bible verse is stamped in Pear Tart Memento ink, and the page dividers in Dusty Concord. The perforated lines on the outer edges of the dp mat were made with an MFT die. 

The window stamp ended up being perfect for a Baptism, and my DD loves her card! But, don't you think this would be perfect as an Easter card, too! :-)

I'm entering this card in the following challenges:

Thanks for stopping by, and have a blessed week!

~Hugs,

Supplies Used:

Thanks for visiting my blog!
To have Ink Up delivered to your inbox,
subscribe in the box at the top right of the page.

One Touch of Nature

Thursday, June 14, 2012

Hi Friends! I'm back again, with another card using this week's Tuesday Morning Sketch.
I used the TMS #150 for the card design. This was my original DT card until I realized that I didn't follow the "twist" of kraft, black, and one other color!  No worries! I just made another card for the TMS post. :)

I used the viola stamp from the Flourishes Botanical Bookplates Vol. I set for my main image. Now, I love flowers, but I don't know a thing about them. If Flourishes didn't always put the names of the flowers on their blog, I wouldn't have a clue about what they are. So, after reading that these are violas, I went to the internet to see what they are supposed to look like, and lo and behold, there is a variety called Chocolate Violas! Being the chocolate lover that I am, that's what I decided these are. I colored the image with Copics and added background shading with Distress Ink. The gold centers, as well as the gold dots on the scallops, are from a Pearl Pen.

I picked up these gold foil filigree corners at the stamp convention I went to a few months back. 
I used Versamark ink and the same viola stamp on the inside, as a watermark. It's almost impossible to see in the photo, but it's really pretty in person. The sentiment is perfect for the purpose of this card. It's a thank you to a couple who allowed me to share in their amazing personal collection of nature's beauty.

On my recent trip to Texas, my friend, Carolyn, honored me with a visit to a friend's home. The home was spectacular, but the real treat was not the actual house--it was what was inside! The couple who lives there are both--yes, both the husband and wife--big game hunters. I made this card as a thank you for the owners of the home, who were away at the time, for allowing me to get a glimpse of the most awesome collection of big game trophies I've ever seen--or even imagined! It was a big highlight of my trip!

I'd like to enter my card in the following challenges:

Thanks so much for stopping by, and enjoy the rest of your week!

~Hugs,
 
Stamps: Botanical Bookplates Vol. 1 (Flourishes)
Paper: A Beautiful Life (My Mind's Eye)
Ink: Distress Ink; Versamark; Memento; Copic markers; gold opaque paint marker
Dies: Classic Ovals Sm, Classic Scalloped Ovals Sm, Classic Scalloped Rectangles Lg (Spellbinders)
Accessories: Abstract Flower Punch (EK Success); gold foil corner stickers (Starform); sewing thread; Pearl Pen
Size: A2 (4.25" x 5.5")
Thanks for visiting my blog!
To have Ink Up delivered to your inbox,
subscribe in the box at the top right of the page.