Showing posts with label Simon Says Stamp Challenge. Show all posts

Celebrate Your Day!

Sunday, June 9, 2013

I have a masculine birthday card to share with you today.
I cut my circles first. When I stamped the cupcake image, I placed the two circles together, in the position I wanted them to be in, then used a Stamp-a-ma-jig to make sure that the entire image would end up where I wanted it on each piece. Then, I removed the smaller circle and stamped the cupcake portion on the large one. I did the same thing for the candle portion of the stamp, removing the large circle before stamping. The image is colored with Copics, and I used Frayed Burlap Distress Ink on the edges. I added a little shine to the icing with a Spica pen. It doesn't show up in this photo, but you can see a little of it in the photo at the top of the post. I stamped the sentiment on text dp. The rectangular strips are all glued directly to the card front, but all the circles are raised with layers of crimped cs.
On the inside, I used a Corner Chomper on the gray cs, and topped it with a "happy birthday" wish.

Thanks for stopping by, and have a Happy Week!

I'm entering this card in the following challenges:
Simon Says Stamp Challenge: Masculine/Father's Day
Simon Says Stamp & Show: Challenge Brought to You by the Letter S (Squares embossing plate, Summer Fresh/Simple Stories dp, Spica pen, sewing)

~Hugs,
 
Stamps: Birthday Blueprint (Stampers Anonymous); Birthday Sentiments (MFT Stamps)
Paper: Summer Fresh (Simple Stories)
Ink: Copics; Spica pen; Memento; Distress
Dies: Std. Circles Lg, Labels 21 (Spellbinders)
Accessories: Squares embossing plate (Sizzix Texturz); eyelets; pearls; Corner Chomper; sewing thread
Size: A6 (4.5" x 6.25")
Thanks for visiting my blog!
To have Ink Up delivered to your inbox,
subscribe in the box at the top right of the page.

Roses are...Yellow

Monday, June 3, 2013


No, I am not a stalker! Even though this is, yet again, another card CASEd from one of Cindy Lawrence's cards. I can't seem to help myself. ;) Here's her gorgeous card:

bb8ac09c0cae6b99e4b8dc7458cd45be
It is so beautiful, with all the details, trims and borders, that when I first saw it as an CASE option in Flourishes Designer CASE Challenge, I didn't, even for a second, consider it. I mean, just look at that ruffled ribbon, and those punched sides! But, it just kept calling to me (I love a real challenge, and this one definitely was that, for me), so I finally decided to give it a try. 
And...I did it! I even got my sides punched evenly and was able to get the ribbon ruffled! What a fun card to make!

Here's a look at the inside.

Thanks for stopping by. I hope you have a wonderful crafty week! :)

I'm entering this card in the following challenges:
Flourishes Designer Focus CASE Challenge: CASE Cindy
Flourishes Timeless Tuesday #222: It's Summertime (use sheer ribbon)
Simon Says Stamp Challenge: Anything Goes
Simon Says Stamp & Show Challenge: Brought to you by the Letter S (sheer ribbon, satin ribbon, Sizzix, summertime)

~Hugs,
 
Stamps: Roses are Red, Life Lines (Flourishes)
Paper: Anthologie (We R Memory Keepers); Annalee (Prima); Coastal cs (Taylored Expressions)
Ink: Copics; Memento; Distress
Dies: On the Edge (Tim Holtz/Sizzix)
Accessories: Garden Rail edge punch (Martha Stewart); Bracket edge punch (EK Success); sheer ribbon; satin ribbon; pearls; Scor-Tape
Size: 5.5" x 6"
Thanks for visiting my blog!
To have Ink Up delivered to your inbox,
subscribe in the box at the top right of the page.

Violas

Saturday, June 1, 2013

I think this will be my last post today...I've been on a roll, CASEing Cindy over at Flourishes! :) I just love the look of her Botanical Bookplate card, and now I've got a little gift set for someone!


The only changes to this card from the previous two are that I used a strip of rhinestones at the top of the dp, used a different punch and embossing folder, and I stamped a bit of script text randomly across the dp in Vintage Photo ink. It just seemed too plain without it--maybe because the ribbons aren't as prominent on this card. The base ribbon is a shear white organza, and the top ribbon is a thin velvet.

And, contrary to my usual MO, I left the inside clean. It just seemed like the right thing to do on this one, ya know. ;)

Thanks for stopping by, and enjoy the rest of your weekend!

I'm entering this card in the following challenges:
Flourishes Designer Focus CASE Challenge: CASE Cindy
Simon Says Stamp Challenge: Anything Goes

~Hugs,

 
Stamps: Botanical Bookplates Vol. 1, With Gratitude (Flourishes); Miss Caroline (My Mind's Eye); Avignon (7Gypsies)
Paper: Abrianna (K&Co)
Ink: Copics; Memento; Distress
Dies: Tailer-Made Classic Bookplate Template Die (Flourishes)
Accessories: Abstract Flower edge punch (EKSuccess); Decorative Tile Set embossing folder (Cuttlebug); Velvet ribbon; Organza ribbon; rhinestones; Pearl Pen
Size: 3.5" x 5.5"
Thanks for visiting my blog!
To have Ink Up delivered to your inbox,
subscribe in the box at the top right of the page.

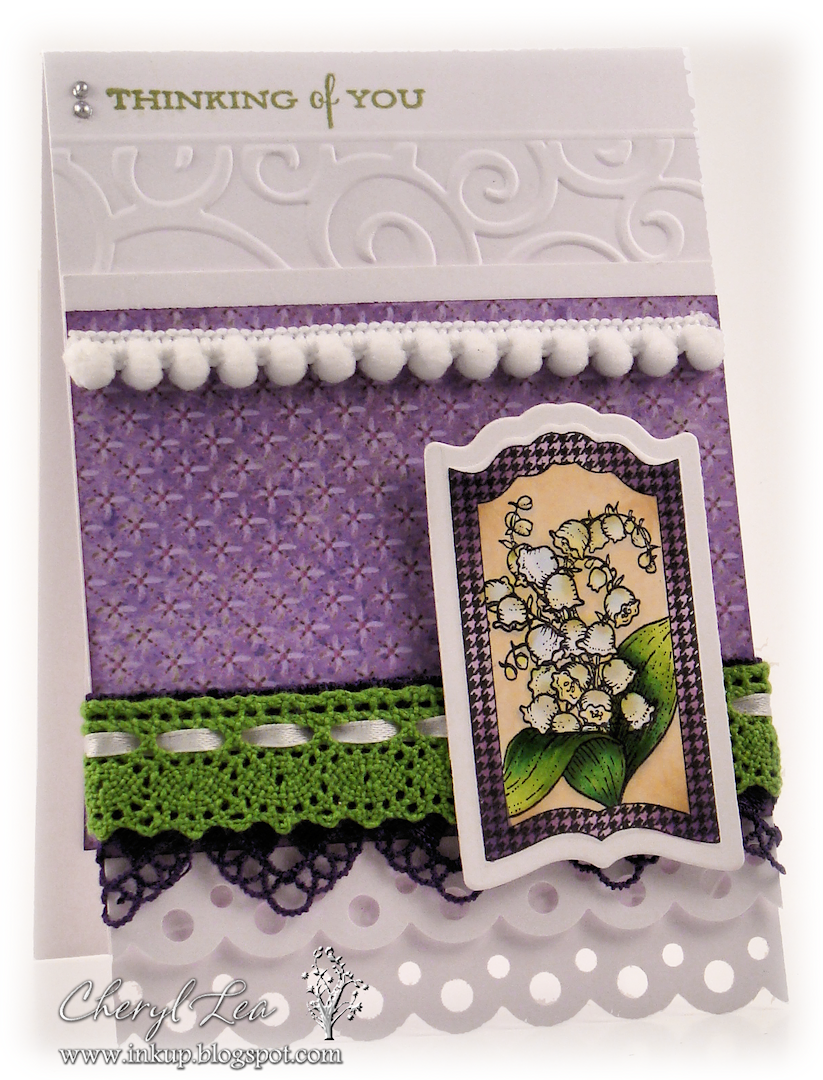
Lily of the Valley

I'm back with another card for Flourishes' CASE Cindy Challenge. I enjoyed making the first one so much, I colored up another bookplate image and made another card. Maybe I'll just make an entire set!


I wanted to change things up just a little bit, so I used a different edge punch and embossing folder, used lace instead of ribbon, and used mini pom pom trim in place of the row of pearls. This card is a quarter of an inch shorter than yesterday's card because the edge punch I used today punched a little deeper into the cs.


Like yesterday's card, the inside on this one is also simple. The silver pearls are made with a Pearl Pen.

Thanks for stopping by!

I'm entering this card in the following challenges:
Flourishes Designer Focus CASE Challenge: CASE Cindy
Simon Says Stamp Challenge: Anything Goes

~Hugs,

 
Stamps: Botanical Bookplates Vol. 2 (Flourishes)
Paper: Watercolor Bouquet (K&Co)
Ink: Copics; Memento; Distress
Dies: Tailor-Made Classic Bookplate Template Die (Flourishes)
Accessories: D'Vine Swirls embossing folder (Cuttlebug); Scallop Dot Edge Punch (Martha Stewart); Mini Pom Pom trim; lace; ribbon; Pearl Pen; Scor-Tape; foam dots
Size: 3.5" x 5.25"
Thanks for visiting my blog!
To have Ink Up delivered to your inbox,
subscribe in the box at the top right of the page.

Blue Snowdrops

Friday, May 31, 2013

I'm really enjoying learning a little about the designers over at Flourishes. This week the focus is on Cindy Lawrence, and if you haven't already read about her, you should head over to the Flourishes blog and at least read her "random facts" at the end of the interview. She has lead an interesting life, to say the least, and is quite the world traveler. I haven't traveled around much, but I did once have an experience similar to one of hers: I once drove my car into the side of a Dairy Queen. ;)  (Also, like Cindy, I'm an excellent driver...I think that little mishap occurred in 1976--when I was learning to drive!)
For the CASE Cindy Challenge, I chose this card here. I've always liked the way she layers ribbons and borders. I copied her card very closely, using different, but similar elements. I even dyed my braided trim with a Copic marker, like she did. ;) I'd never have thought to do that, but it works like a charm. I used a Pearl Pen for my pearls and chose to do some stitching with my machine, rather than faux stitching.


I don't like leaving the inside of my cards completely bare, but I didn't want anything at the bottom to show through the punched border on the front of the card, either. So, I went simple, with just a top and bottom scallop from the same dp as the front of the card, and a few Pearl Pen pearls.

Thanks for stopping by, and have a great weekend!

I'm entering this card in the following challenges:
Flourishes Designer Focus CASE Challenge: CASE Cindy
Simon Says Stamp Challenge: Anything Goes

~Hugs,

 
Stamps: Botanical Bookplates Vol. 1 & 2 (Flourishes)
Paper: Best of K&Co
Ink: Copics; Memento; Distress
Dies: Tailor-Made Classic Bookplate Template Die (Flourishes/Spellbinders)
Accessories: Garden Rail Edge Punch (Martha Stewart); Bracket Edge Punch (EK Success); Woven embossing folder (Lifestyle Crafts); grosgrain ribbon; sheer ribbon; braided trim; Pearl Pen; Scor-Tape; sewing thread
Size: 3.5" x 5.5"
Thanks for visiting my blog!
To have Ink Up delivered to your inbox,
subscribe in the box at the top right of the page.

Seaside Bookmark

Thursday, May 30, 2013

I wanted to CASE one more of Christine's creations for the Flourishes Friday Focus CASE Challenge, and the deadline is looming, so I'll be quick. ;)

Check out this great masculine bookmark Christine made using the What A Catch stamp set. Her coloring on that image is amazing, isn't it! I don't have that stamp set, or any other fishing stamps, but I do have the A Guiding Light stamp set, that has some fab masculine images. I colored the lighthouse image with Copics and added a little glimmer to the sand and water with a Spica pen. After distressing everything (you know I can't make something without at least a little distressing!), I used her general layout to put it all together. I had to raid my DD's shell collection for the little seashell at the top of the bookmark. :)

I'm entering this in the following challenges:
Flourishes Friday Focus CASE Challenge: Case Christine
ColourQ Case Challenge #191
Simon Says Stamp Challenge: Anything Goes
Simon Says Stamp & Show Challenge: Into the Woods (I used a wood image dp)

Thanks for stopping by, and enjoy your evening!

~Hugs,

 
Stamps: A Guiding Light (Flourishes)
Paper: Dolled Up (My Mind's Eye); Clippings (Basic Grey)
Ink: Copics; Distress; Memento; Spica pen
Accessories: Corner Chomper; jute; seashell; circle punches; pearls; Zing embossing powder; eyelet
Size: 2.75" x 5.5"
Thanks for visiting my blog!
To have Ink Up delivered to your inbox,
subscribe in the box at the top right of the page.

Grow

Tuesday, May 21, 2013

I'm back! I made this card for my DD's principal, who is retiring after tomorrow. I'm sorry to see her go, because everything runs perfectly with her in charge, and my DD still has two more years to go to that school. The incoming principal for next year will have some big shoes to fill!
Is that not the sweetest face ever? I just love this stamp! It was a freebie from Krista at Saturated Canary, and it's my first time to color one of her images, but I guarantee you, it won't be my last time.

I colored the image with Copics and used a white charcoal pencil to do a little highlighting. There are two small dots of Stickles on her hair barrettes. I sponged the edges of the layers with Distress Ink, then used my Distrezz-It-All to scrape the edges of the panels, which are popped up with layers of crimped cs.

You can see the raised layers better in this picture.

This month's Verve Diva Dare is Stars & Stripes, so I added some glittery gold star-shaped brads. Once they were on the card, I realized that they look just like the gold stars I used to get on my school papers in grammar school. Given that this card is for an educator, I thought the stars were a nice detail.

This sentiment comes with the digital stamp. You can't see it very well in the photos, but after coloring the letters with Copics, I gave them a subtle shine with a Spica Pen.  I used the inside part of the Rounded Scalloped Frame die for the sentiment layer.

The inside is distressed to match the front of the card, and like the sentiment on the front, the stars here got some glimmer with a Spica pen.

The little girl on the card is holding a potted orchid, so I got one for my DD to give to her principal, too.

I don't think those blooms could be any more beautiful!

Thanks for stopping by. I hope you have a chance to get inky this week! ;)

I'm entering this card in the following challenges:

Viva la Verve - May 2013 Week 3 Sketch Challenge
Verve Stamps: Stars & Stripes May 2013 Diva Dare
ColourQ Challenge #190
Simon Says Stamp Challenge: Flower Power
Simon Says Stamp & Show Challenge: Favorite Ink (mine is Distress Ink)

~Hugs,
 
Stamps: Grow--Digital Stamp (Saturated Canary); Super Dad (Verve); Vertical Greetings (MFT Stamps)
Paper: Reunion (My Mind's Eye)
Ink: Copics; Distress Ink; Spica marker; Memento
Dies: Rounded Scallop Frame Die (Verve)
Accessories: White charcoal pencil; Ribbon; star brads; rhinestones; Stickles; sewing thread; Distrezz-It-All
Size: A2 (4.25" x 5.5")
Thanks for visiting my blog!
To have Ink Up delivered to your inbox,
subscribe in the box at the top right of the page.

Butterfly Birthday

Hi there! I've got a birthday card using a simple, but fun technique, to share with you today--embossed resist.

The main image was heat embossed with white ep, then I painted all the open areas with Distress Inks. I love this technique because anyone can turn out something beautiful. I especially like how this one turned out with the white embossed bg, rather than black, which I've done in the past.

The inside is simple, with just a sentiment and a few stamped butterflies.

I'll be back in a little while with a super cute card I made for my DD to give to her school principal.

Thanks for stopping by, and I'll see you later tonight. :)

I'm entering this card in the following challenges:

Flourishes Timeless Tuesday Challenge #221: Butterflies
Simon Says Stamp Challenge: Flower Power
Simon Says Stamp & Show Challenge: Favorite Ink (mine is Distress Ink)

~Hugs,
 
Stamps: On Butterfly Wings (Hampton Art); Signature Greetings (PTI); Papillon Potpourri, From My Heart (SU!)
Paper: Summer Song (My Mind's Eye)
Ink: Distress; Memento; Versamark 
Accessories: Embossing Powder (Zing); lace; Corner Chomper
Size: A6 (4.5" x 6.25")
Thanks for visiting my blog!
To have Ink Up delivered to your inbox,
subscribe in the box at the top right of the page.

You Glow Girl

Friday, May 17, 2013

Happy Friday! Are you ready for the weekend? I sure am! We've got a big 25th anniversary celebration going on at church tonight, and my daughter is having a skating birthday party on Saturday (her birthday is actually July 5, but it's almost impossible for her to have a party in the middle of the summer with everyone on vacation, so we're celebrating early this year.) On top of that, school is out for the summer this coming Wednesday, so everybody is happy around my house! :)

My DD had a fantastic 3rd grade year, breaking the school record again in Accelerated Reader points, and exceeding expectations in every area on the standardized tests given at the end of the year. We are always so proud of her, and I made this card to give to her after Awards Day next week. She likes all my cards, but she especially likes the colorful ones, so this one should be perfect.

The sunflower was stamped in a light tan color so I could try my hand at no-line coloring with my Copics. I've attempted this kind of coloring before, without much success, but I did okay with this one. For the center of the flower, I added teeny little black pearls with a Pearl Pen. After I fussy cut the sunflower, I adhered it to the green circle, lifting up the top edge with layers of crimped cs. The sentiment is heat embossed.

There is a little bitty ladybug stamp in the Sunflowers stamp set, and I couldn't resist using it. I stamped it onto red cs, cut it out, then coated it with Glossy Accents. It almost looks like a real ladybug on the card.

Here's a look at the layers of the card, including the partially popped up flower.

I love this quote, and it seems so fitting for the occasion. ;)

Well, that's it for me for a few days. Thanks for stopping by, and go have yourself a fantastic weekend!

I'm entering this card in the following challenges:
Viva la Verve May 2013 Week 1 Sketch Challenge (VLVMay2013)
Color Throwdown #242
Simon Says Stamp & Show Challenge: A Little Paper
Simon Says Stamp Challenge: Flower Power

~Hugs,

Stamps: Sunflowers (Flourishes); Follow Your Heart (Impression Obsession)
Paper: Hello Summer (Echo Park); Journeys (Kathy Davis)
Ink: Copics; Distress; Memento; Versamark
Dies: Classic Rectangles Lg & Sm, Std. Circles Lg, Classic Scalloped Circles Lg
Accessories: Daisy edge punch (Martha Stewart); Zigzag Chain edge punch (EK Success); Glossy Accents); embossing powder (Ranger); pearls (Prima); Pearl Pen; sewing thread
Size: A2 (4.25" x 5.5")
Thanks for visiting my blog!
To have Ink Up delivered to your inbox,
subscribe in the box at the top right of the page.

Sweet Birthday Girl

Wednesday, May 15, 2013

Hi there! Are you having a good week so far? I hope so! Our air conditioner and the home theater system went out at the same time, so we've been dealing with service techs to try to get it all running again. Sometimes I miss the days of only 4 television channels and a TV that required nothing more than an electrical outlet and maybe a rabbit ear antenna.

In between service techs, I did find time to make my DD a birthday card. ;)

I just love this Chloe stamp. She looks so sweet, and reminds me of my DD. I colored her with Copics, and used a die cut negative to frame her. The frame is lifted off the image with layers of crimped cs, and the image is positioned behind it so that you can still see the little bee buzzing around. The diagonal stripes are Washi tape with Stickles. The sentiment is stamped on a Verve Floral Circle die cut, then popped up over a larger Floral Circle. The bling under the sentiment are Swarovski crystals. They sparkle so much more than other rhinestones.

pic name      pic name
The metal charms are on a chain necklace, which is wrapped once around the foam dot behind the sentiment, and the excess is draped over the top of the card and hangs down the back. It is easily removed so that my DD can wear it. One of the charms is a sunflower and the other says "Laugh Often" on one side and "Love Much" on the flip side.

A bit of Stickles sparkle on the red and white flowers. That's Distress Dry Glitter on the blue flower.
On the inside, I added Stickles to part of the sentiment and used red brads as an accent. You can't tell in the photo, but the sentiment panel has a puffy, pillow look. I used 3 layers of crimped cs behind the word, "BIRTHDAY," and glued just the outer edges down. It's a subtle detail, but it looks great IRL. :)

I mentioned last week that I had made 14 fabric-covered boxes for my DD's upcoming birthday party. I've finally gotten all the spray adhesive off nearly everything in my craft room (tip: never use spray adhesive indoors, even with a color catcher box for overspray--it gets airborne, and covers EVERYTHING!), so I thought you might like to see how they turned out.

With the boxes open, you can see that no two are alike.

I also made the birthday party invitations, using a La-La-Land digital stamp. I colored the stamp in my photo editing program, and made the disco ball using the pixelate effect. It's amazing how many tutorials are out there on how to make a disco ball. :)

Well, that's all I've got for now. Thanks so much for stopping by, and have a fantastic day!

I'm entering this card in the following challenges:
Tuesday Morning Sketches #198 (Twist: use Flowers)
Flourishes Timeless Tuesday #220: Blue & Green (I used blue & green dp, Washi tape, and flowers)
Verve May Diva Dare: Stars & Stripes
Simon Says Stamp Challenge: Things with Wings
Color Throwdown #242

~Hugs,

 
Stamps: Chloe (Elisabeth Bell); Blue Skies (Verve); Birthday Sentiments (MFT Stamps)
Paper: Basics (Paper Studio)
Ink: Copics; Memento; white gel pen; Versafine; Distress
Dies: Labels 14 (Spellbinders); Floral Circles (Verve)
Accessories: Washi tape; flowers; Stickles; rhinestones (Swarovski); Glossy Accents; Distress Dry Glitter; brads; Glossy Accents; chain necklace; metal charms; foam dots; sewing thread
Size: A2 (4.25" x 5.5")
Thanks for visiting my blog!
To have Ink Up delivered to your inbox,
subscribe in the box at the top right of the page.