Showing posts with label Penny Black. Show all posts

People Will Stare: Another Crazy Bird Card

Wednesday, December 23, 2015

I recently got the Technique Junkies sentiment stamp that I used on this card, and couldn't wait to pair it up with this particular Crazy Bird!
I colored this bird with Copics, adding some detail and dimension to the face. You can't see it in the pic, but the red scallops on the wings and tail were colored with a red Spica pen so they have a nice sparkle. I used a white Sharpie paint pen to make the white dots on the bird's body, and gave him some Glossy Accent eyes. After stamping the sentiment, I colored in some of the words with a Copic marker, then sprinkled a few shiny sequins around the card.

Just one more card to post! 

I'm entering this card in the following challenges:
Simon Says Wednesday: Make it Sparkle
613 Avenue Create Challenge #155: Anything Goes
Penny Black and More December Challenge: Anything Goes with a Stamp

~Hugs,
Thanks for visiting my blog!
To have Ink Up delivered to your inbox,
subscribe in the box at the top right of the page.

You're Weird: A Crazy Bird Card

Here's the second of four Crazy Bird cards I made this week. I used the current Your Next Stamp sketch for the card design.
The bird is colored with Copics, and I used a little gesso in the upper left corner before heat embossing the sentiment.  The texture behind the bird is pink Frantage Embossing Enamel, and I also used some silver embossing powder over that and in the opposite corner, over the sentiment. Silver Paper Sweeties sequins filled with blue Pearl Pen gel add sparkle. As with the earlier Fluffy Bird, I used Glossy Accents on the eyes, but on this one, I first used a dot of black Pearl Pen, let that dry, then added a smaller dot of white paint pen, let that dry, then filled the rest of the eye with Glossy Accents.

I'm entering this card in the following challenges:
~Hugs,
Thanks for visiting my blog!
To have Ink Up delivered to your inbox,
subscribe in the box at the top right of the page.

Fluffy Crazy Bird Card

A friend specifically requested a Crazy Bird card with this sentiment, so I made it and 3 other Crazy Bird cards as a set for her. I'll post the other cards as I get the pics edited.
I've had the stamps for awhile, and recently got the dies for them, too. I love that the dies cut right along the line of the image, with very little white border showing. I made rub-ons with a transparency for the sentiment. The eyes are dimensional with Glossy Accents, the cute sequins are from Paper Sweeties, and I used a sketch from Sugar Pea Designs.

I'll be back with the rest of the set soon.

I'm entering this card in the following challenges:
Sugar Sketch Challenge #33
Simon Says Wednesday: Make it Sparkle
613 Avenue Create Challenge #155: Anything Goes
Penny Black and More December Challenge: Anything Goes with a Stamp

~Hugs,
Thanks for visiting my blog!
To have Ink Up delivered to your inbox,
subscribe in the box at the top right of the page.

Paper Sweeties October Release Rewind!

Friday, October 16, 2015

Time for a Paper Sweeties Rewind, where we mix new release stamps and dies with older ones. Abigail and Jake stamps and dies were perfect, paired with the Do You See What I See and Reason for the Season stamps sets.

I used a mix of Dylusions Ink Sprays and Distress Ink to create the background on a Manila tag. Then, I heat embossed the sentiment, first with a gold mirror embossing powder, then again, offset slightly, with a light brown ep. Jake, Abigail, and baby Jesus were colored with Copic markers, and the outfits were paper pieced. Abigail is popped up slightly, but I wanted to keep the tag as flat as possible in case it ended up being used as a bookmark. The edges of the tag were heat embossed with two different Fran-tage embossing powders, and I finished the tag off with several Paper Sweeties seam bindings and baker's twines.

Be sure to visit my teamies' blogs, too!

You still have time to enter this month's Inspiration Challenge!

http://papersweeties.com/blog/paper-sweeties-inspiration-challenge-october-2015/

And, be sure to check out the October Kit of the Month, too.

<DSCN3109


Thanks so much for your visit, and enjoy your weekend!

I'm entering this card in the following challenges:
~Hugs,

Supplies Used:

Thanks for visiting my blog!
To have Ink Up delivered to your inbox,
subscribe in the box at the top right of the page.

Paper Sweeties October Release Sneak Peeks!

Tuesday, October 13, 2015

Hello all my crafty friends! I hope you had a fun, long holiday weekend. We topped ours off with a trip to a local farm with our homeschool group and had an amazing day! 

And, now, since it's mid-month, it's time for Release Week at Paper Sweeties! Yay! Here we go....
I used the new stamp set, Stand Add On: Manger to create this Christmas card, and used kraft cardstock, in keeping with Paper Sweeties October Inspiration Challenge, which you still have time to enter. I stamped the images, including the star from the new Do You See What I See stamp set, onto kraft cs, then colored them with Prismacolor pencils, adding Stickles to the halo. The star was heat embossed with glitter ep. For the background, I cut a kraft distressed rectangle, then inked up a woodgrain embossing folder with Fossilized Amber on one side and Walnut Stain on the other, spritzed them with water, then sandwiched the kraft cs, and embossed it. I used Paper Sweeties Tea Seam Binding and Cookie Dough Baker's Twine for the bow, and added Gold and Frosting sequins for a starry night sparkle. The vellum banner, from the Hello Friend stamp set, was heat embossed with clear ep, and the sentiment was heat embossed with black ep. I used the Be Happy Sweet Cuts die set to die cut the banner. 
The inside sentiment panel was sponged with Fossilized Amber and I did a little masking to stamp two straw images together. The sentiment, from the new Do You See What I See stamp set, was stamped, then I colored in the "Christmas" text with a Garnet Spica pen. I hand-doodled the brown border with a fine-tip Sharpie marker.

Now, prepare yourself to be wowed by the rest of the Paper Sweeties team!


As I mentioned earlier, there is still time to enter this month's Inspiration Challenge.

http://papersweeties.com/blog/paper-sweeties-inspiration-challenge-october-2015/

And, be sure to check out the October Kit of the Month. Aren't these cards adorable!

<DSCN3109


Thanks for stopping by! Hope you'll come back tomorrow for another sneak peek. Here's a little teaser for ya...


Until then,

I'm entering this card in the following challenges:
613 Avenue Create #145: Anything Goes
Penny Black October Challenge: Warm Autumn Colours
Craft Your Passion Challenge #283: Always Anything Goes
House of Cards October Challenge: Add Texture &/or Color Inspiration

~Hugs,

Supplies Used:

Thanks for visiting my blog!
To have Ink Up delivered to your inbox,
subscribe in the box at the top right of the page.

Things of Nature

Tuesday, September 29, 2015

Hello Friends! A quick post here to share my latest creation. I'm pretty excited about this one because I made it using my brand new Kutrimmer 1071 paper trimmer! I've wanted one ever since I used one at a bookbinding bookcamp in Athens, but the cost was prohibitive. But, I found a brand new one on Ebay last week for a great price and the seller just happened to be within driving distance, so I was able to pick it up and get started using it right away! 
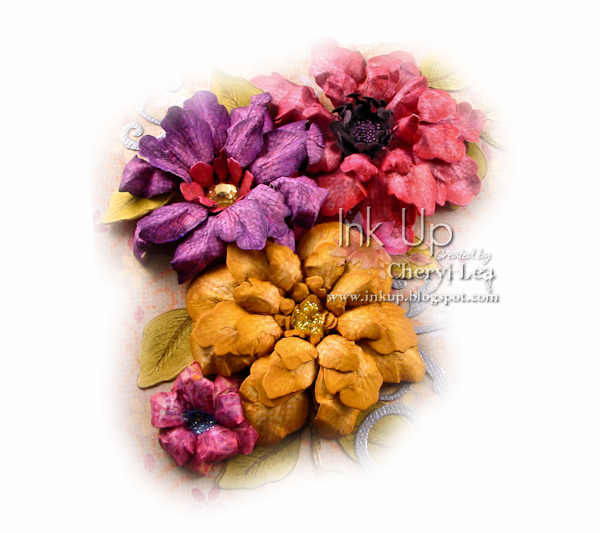
I made all the flowers on this project, and all but the two tiny pink ones are made from the same stamp and die set. The flowers were all stamped onto patterned papers, die cut, inked along the edges, then shaped. There is a close up of the flowers at the bottom of the post.
I've always liked making boxes, but with my new paper cutter, that can cut right through book board, I like it even more. Cutting the parts for the box only takes a few minutes now, and requires very little effort, unlike cutting it by hand with a blade.
Here's a look at the inside. Actually, it has a set of cards inside it now, but they are all cards I've posted before, so nothing new to see there.
The spine of the box is covered in bookcloth with a strip of patterned paper added over that.

Here's a close-up of the larger flowers. You can see the centers much better here. I love how the dark pink one turned out! I used micro beads in the center of that one. The yellow and pink flowers have Stickles centers, and the purple one has a large rhinestone.
These are the smaller flowers. The yellow flower is filled with beads and glitter, and the purple flower has Stickles on the edges of all the petals. The butterfly die cut was covered in Ice Blue Inka Gold, then I heat embossed it with UTEE.

I hope you enjoyed seeing this. You'll probably be seeing a lot more handmade boxes (and books) in the future now! ;)

Thanks for stopping by, and have a wonderful week!

I'm entering this card in the following challenges:
Tiddly Inks Challenge #166: Don't Be Square
613 Avenue Create Challenge #143 : Anything Goes
Penny Black and More September Challenge: Anything Goes
4 Crafty Chicks Challenge #265: Sparkle & Shine
Craft Your Passion Challenge #281: Always Anything Goes

~Hugs,

Supplies Used:

Thanks for visiting my blog!
To have Ink Up delivered to your inbox,
subscribe in the box at the top right of the page.