Showing posts with label MAWTT Challenge. Show all posts

TMS #159: So Many Smiles

Tuesday, August 14, 2012

Hello Friends, and Happy, Happy Tuesday! I took a little break from the DT at Tuesday Morning Sketches over the summer to spend more time with my DD, and now that she's back in school, I'm back on the team! Yaaayyy!

This week, our sponsor is Sparkle Creations. A few of the DT cards this week feature Sparkle stamps, including Shelby, of Color of Happy, our fab Guest Designer this month.
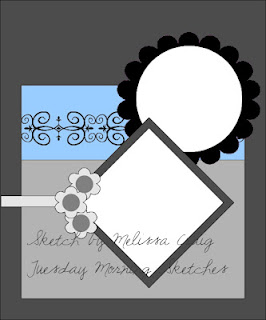


Melissa came up with yet another really cute sketch for us to play with this week. She always comes up with the best sketches! And, I used this Play Date Cafe challenge for the color palette.
The butterfly, leaves, flower, and sentiment stamps are all part of the Natural Beauties stamp set at Papertrey Ink. The rhinestone strip on the pink dp was from Wanda Cullen during a Color Throwdown blog hop. I don't think I've ever used a strip of embellies before. Now I get why people are doing that--easy, fun, and so pretty when you are done!


I stamped the flower twice, cut one out along the outer edge, then cut the second along the inner petals. I love that the center of the flower is a separate stamp. All the layers are popped up, and the entire flower is backed with a piece of burlap that I cut with a Spellbinders Blossom Nestabilities Die.

I thought about stamping something inside the card, but changed my mind. This card would be great for so many occasions. I can always stamp something in it later or just make it really personal and hand write everything inside.

Okay, so now you need to go head on over to Tuesday Morning Sketches and check out the other DT members' awesome creations, then make your own, so you can be in the drawing for the Sparkle Creations prize! Have fun, and Good Luck!

I'd like to enter this card in the following challenges:

Thanks so much for stopping by today!

~Hugs,

 
Stamps: Natural Beauties (Papertrey Ink)
Paper: Out of Print (Basic Grey); Apricot cs (Taylored Expressions); Lt Blue cs (Bazzill)
Ink: Distress Ink; Colorbox; Memento 
Dies: Romantic Rectangles, Blossom Nestabilities, Lacy Squares (Spellbinders)
Accessories: Scallop Diamond Edge Punch (EK Success); 2" Square punch; burlap; Twinkle Goosebumps (Queen & Co); Corner Chomper; rhinestones; pearls; flowers; foam dots
Size: A2 (4.25" x 5.5")
Thanks for visiting my blog!
To have Ink Up delivered to your inbox,
subscribe in the box at the top right of the page.

Hugs & Smiles & Happy Birthday!

Sunday, August 5, 2012

Hi Friends! I hope you are having a fantastic weekend! We've had some rain the past couple of days, so we're enjoying some cooler weather, which is nice. What's even nicer is time spent crafting! Here's my latest creation.
This card was fun to make because I had no preconceived vision of what I wanted it to look like. I just knew I needed to follow a sketch, use certain colors and polka dots, and have it end up as a birthday card in order to be able to enter this in a few challenges. The pretty sentiment is a Verve stamp, and the two floral spray stamps are from Flourishes. The panel behind the sentiment layer and ribbon was originally going to be a piece of acetate until I found out that the inks I have won't dry on acetate. So, I ended up stamping on vellum instead and gluing that onto a piece of dp with a subtle design on it. It was really pretty, but, turns out, between the sentiment layer, flowers, and bow, you can't even see the design. I know it's there, though, and it's still pretty, even if no one else can see it. :)


Lately, I've noticed that a lot of people are using lots of different flowers in clusters on their cards. It's always so pretty, I decided to give it a try, too. It took lots of fiddling with them to get an arrangement I liked, but I think it was worth it. I definitely need to stock up on a variety of flowers!
I used another stamp from the same Flourishes Summer Blossom stamp set for the inside, but I stamped it in  green and colored it with much lighter colors. 

Thanks for stopping by today, and have a great week! School starts here tomorrow, so I'm going to try to get my before and after craft room photos edited this week so I can post them! It is sooo nice to be a little more organized now!

I'd like to enter this card in the following challenges:

Viva la Verve August 2012 Week 1: VLVAug2012
Flourishes Birthday Wishes Challenge: FLLCAug12
Do You Stack Up #83: Polka Dots
Sugar Creek Hollow #23: Something old (mulberry roses & pearls), something new (stamps)
Fat Pages and Cards with Attitude #19: Anything Goes
Poodles Parlour: Anything Goes
Simply Create Too #19: Anything Goes
Moving Along with the Times #157: Summer
Simon Says...Kristina's Inspiration Photo: Kitty
Whimsy Stamps #49: Summer Fun

~Hugs!
 
Stamps: Kind Words, Bloom & Grow (Verve); Summer Blossoms, Tag Lines (Flourishes)
Paper: Stash; vellum
Ink: Memento; Copics; Colorbox; Distress Ink
Dies: Std Circles Lg, Antique Frame & Accents, Fleur de Lis Squares (Spellbinders)
Accessories: Ribbon (Joann); flowers & leaf; leaf pins (Maya Road); Stickles; pearls
Size: 5" sq.
Thanks for visiting my blog!
To have Ink Up delivered to your inbox,
subscribe in the box at the top right of the page.

Faith, Trust, & Pixie Dust

Monday, July 23, 2012

Happy Monday, Friends! I hope your week is getting off to a great start. I'm starting off the week in my craft room, so I'm a happy girl, today! One of my nieces is having a baby girl soon, and I found out that she is decorating the nursery in a Tinkerbell theme, using pinks and purples. I just happened to have a cute Tink digi image, so I went to work, to make a nursery wall hanging that would double as my baby shower card.


This project took me longer than anything I've ever worked on, but I think all my time was worth it. That said, this is a fairly long post, and very photo heavy. :)


Both The Shabby Tea Room and Stampin' For the Weekend had spectacular photos for inspiration. I just love all the girliness in them. 


I decided right away that I was going to use Prima's Fairy Flora paper pack and a Vintage Damask digi paper, so that part was easy. But, finding a sketch wasn't, because I wanted to use several different papers and didn't want to cover them up too much.   I tried several sketches, and this one, from the Simon Says Stamp Challenge this week was perfect!


My sewing machine has a lot of built-in stitches that I've never used, so I thought I'd try one out here. Being a fairy project, a leaf stitch seemed like a good choice. I used a meandering stitch on the bg paper, and alternated between zig zag and straight stitch on the vertical panel.


While I had my sewing machine going, I took some wide lime green tulle ribbon, folded about a third of it over, then stitched down the center to make a ruffle for the bottom of the wall hanging. I adhered the mini pompom trim and the tulle ruffle with Scor-Tape.


Every little girl needs lots of sparkle in her bedroom, so I used Stickles on Tink's wings, shoes, eyes, and the edges of the flowers. 

The white dots around the "Hello Baby" sentiment are Liquid Pearls. The yellow center on the pearl flowers are dots of yellow Liquid Pearls, too.


If you've read my blog very long, you know I love making my own rub-ons with transparencies. All the sentiments on the project, except for the Flourishes Hello Baby stamp, were made in Word, printed on transparencies, and rubbed onto the cs. I could just print directly onto the cs, but I prefer the look of rub-ons because it looks more like a stamp.


I like decorating the back of my wall hangings so they double as a card. For this one, I used the Vintage Damask digital dp again, in green and in violet. I paper pierced the edge of the die cut, stamped a Heidi Grace flower, added my rub on quote and sentiment, distressed the green dp, added another Heidi Grace corner stamp, inked the edges, then glued it all down. Oh, and I've learned to add the eyelets to the back layer of the wall hanging and to thread my ribbon through, before adhering the decorative front. It hangs much better that way, and I prefer not seeing the eyelets from the front most of the time.


The flourish stamp at the bottom of the project came from a Heidi Grace set that I won in a Color Throwdown Challenge/Blog Hop. Check out the blog candy I received from DT member, Wanda Cullen! Thanks, again, Wanda!


Here are a couple of photos of what I've been spending my time on lately: making doll clothes! My DD is thrilled with them, but, MAN, are they time consuming!


Thanks for stopping by and hanging with me until the end! ;) Have a wonderful week!

I'd like to enter my wall hanging card project in the following challenges:
Simon Says Stamp: Dawny's Sketch
Flourishes Bring Back Beautiful BBB24: The Beauty of Winged Things
The Shabby Tea Room Week #124: 'Oh-So Pretty in Pink'
Cute Card Thursday Challenge #226: Fairy Nice
Moving Along With the Times Challenge: We Are In the Pink (Pink, Pearly, and Pretty Celebration)
Whimsy Stamps Challenge #48: Punches and Edgers
Crazy 4 Challenges C4C146: Stitching--Faux or Real
Fat Pages & Cards With Attitude #18: Anything Goes
The Poodles Parlour: Use a Digi Stamp
Stampin' For the Weekend #14: Photo Inspiration
Digi Doodle Shop Challenge #117: Anything Goes
Sentimental Sundays #112: Things With Wings
Color Me Creative Challenge #48: Anything Goes With a Girly Twist
Totally Gorjuss Challenge #141: Leaf It In!

~Hugs!
 
Stamps: Little Honey's Tinkerbell (Sassy Studio Designs); Hello Baby (Flourishes); Wild Daisy Road (Heidi Grace)
Paper: Fairy Flora (Prima); Vintage Damask Digital Paper (Print Candee)
Ink: Copic markers; Distress Ink; Colorbox
Dies: Fancy Tags Two, Labels One, Floral Doily Accent, Labels 25, Classic Scalloped Circles Sm, Bird Flourishes (Spellbinders)
Accessories: Abstract Flower Edge Punch (EK Success); tulle ribbon; mini pompom trim; satin ribbon; rhinestones; pearls; eyelets; flowers; Stickles; Liquid Pearls; sewing thread; foam dots; Distrezz-It-All; some sentiments created in Word.
Size: 6-3/4" x 8"
Thanks for visiting my blog!
To have Ink Up delivered to your inbox,
subscribe in the box at the top right of the page.

You're a Peach!

Tuesday, May 8, 2012

Hi Friends! My DD wanted to give her teacher a gift for teacher appreciation week, so, of course, I just had to make a card for the occasion, also. 


I love mixing dp's, and the Viva la Verve May 2012 Week 2 sketch is a good one for that.

And, this pretty color palette is perfect for peaches!
I found a peach-scented candle that smells heavenly, so I used a Flourishes peach stamp set to make a coordinating card. I meant to add three staples above the image, but forgot to do it before I glued everything together, darn it!


My DD had a really good 2nd grade year, so I left plenty of room for her to thank her teacher and sign her name. :)

Thanks for stopping by, and have a wonderful week!

I'll be entering this card in the following challenges:
Viva la Verve May 2012 Week 2 Sketch Challenge
ColourQ Challenge #136
Flourishes Bring Back Beautiful Challenge 22: The Beauty of the Garden
Crafty Friends Challenge #3: Inspiration Challenge
Crazy 4 Challenges #135: Gardening or the Great Outdoors
Do You Stack Up Challenge #70: Circles
Moving Along With the Times: Summer Sunshine
Great Impressions Rubber Stamps Challenge #3: Anything Goes
The Emerald Fairies Challenge #23: Anything Goes

~Hugs!
 
Stamps: Cherries & Peaches (Flourishes)
Paper: Farmhouse (Crate Paper); Sweetness (Pink Paislee); Best of K&Co
Ink: Distress Ink; Memento; Copic markers
Dies: Std Circles Sm, Classic Scalloped Circles Sm (Spellbinders)
Accessories: Postage Stamp edge punch, Binding Edge edge punch (EK Success); lace (Joann); grosgrain ribbon (Taylored Expressions); rhinestones; Stickles; foam dots; sewing thread
Size: A2 (4.25" x 5.5")
Thanks for visiting my blog!
To have Ink Up delivered to your inbox,
subscribe in the box at the top right of the page.

Lavender Daisy and a Tote

Saturday, April 28, 2012

Hello again...I'm baaaack! I've got one more card to share with you today, as well as a sewing project. I'll start with the sewing project, as I only have one photo for that.


I made this quilted tote bag for a friend I met when I first started my blog, about nine months ago--Hi, Heather! (I posted a similar tote bag here, where you can also find a link for the free pattern, but I used French seams inside this one so the seam edges are enclosed.) Heather probably has no idea how much she helped me back then, answering all kinds of questions, critiquing my blog, and giving me encouragement when I thought I was never going to get blogging or cardmaking figured out. I've still got a lot to learn, but at least now I know it's not impossible. Thanks for getting me through the hardest part, Girl!!! Couldn't have done it without you! :D I'll get this in the mail to you on Monday.


Now on to the card.

I used the colors from The Play Date Cafe Challenge #129, of Dusk, Magenta, and Seedling--a luscious palette!
I stamped the daisy with Staz On ink, then used chalk and a wet paintbrush to color it. The edges of the image panel were torn with a deckle ruler, then I sponged Distress Ink on it. The lavender and green panels are all dry embossed. The bg layer was embossed with a Sizzix embossing plate. It's subtle, but you can see the squares if you look closely.

I made an envelope for this card using my Martha Stewart Scoreboard. Because the paper is patterned, I added pieces of solid cardstock for the mailing address and return address, and the scalloped border is decorative.


The inside is partially lined with paper that coordinates with the card. I really like making matching envelopes for my cards, but they are too time-consuming to do it often. 
Well, that will do it for me tonight.

I'll be entering this card in the following challenges:

Thanks for stopping by...again! :)

~Hugs,
 
Stamps: Watercolor Daisy (Hampton Art)
Paper: Best of Brenda Walton (K&Co); watercolor paper
Ink: Distress Ink; Staz On
Accessories: Chalk; deckle ruler; Real Estate Sign Large punch, Scallop Diamond Edge punch (EK Success); Corner Chomper; Swiss Dot embossing folder, Script Texture embossing folder (Cuttlebug); Squares embossing plate (Sizzix); twine (The Twinery); foam dots; scoreboard (for envelope)
Size: A6 (4.5" x 6.25")
Thanks for visiting my blog!
To have Ink Up delivered to your inbox,
subscribe in the box at the top right of the page.

Mother's Day Butterfly

Tuesday, March 20, 2012

Hi there, Friends! I hope you had a wonderful weekend. I watched my DD climb her first rock wall--a scary adventure for both of us--but she not only did it, she did it twice! I can tell you, I was one proud mama, watching her.

As for cards, I've been working on some projects for future posts, but I took a little time out to make one for fun, and for a few challenges:


Viva la Verve Sketch Challenge: VLVMar2012 Week2
Crazy4Challenges C4C128: use green
Do You Stack Up DYSU63: use your favorite color
Moving Along With the Times #140: Special Lady
Simon Says Stamp: A Bit O' Green


For the sentiment circle, I stamped the sentiment, then the small butterflies, and added Stickles to the butterflies. The pink and white dots are Liquid Pearls. Can you see the small pink flowers stamped on the pink cs? I stamped those in VersaMark ink to get just a hint of design. I didn't want it overpowering the sentiment. The flower stamp came from the Prickley Pear Mini Birds Clear Stamp set.


I used the Prickley Pear Rubber Stamp Butterfly 2 Clear Stamp Set for the sentiment, small butterflies, and large music butterfly. The small butterflies are covered in Stickles. The large butterfly was stamped with Memento ink, then I used Distress Inks to color it, and I spritzed it with Shimmer Spritz for just a little bit of shine. The edges of the butterfly were sponged with Walnut Stain Distress Ink. For the body of the butterfly, I used a gold Pearl Pen. After it was dry, I folded the curved the edges of the wings down a little bit, added a foam dot to the back of each wing, then glued the body to the card and popped the wings up.

The sentiment on the inside of the card is a Quietfire design. The pink flourish and butterflies are from the Butterfly 2 stamp set.

And, that's it for now. Thanks for stopping by, and have a great week!

~Hugs,

Stamps: Butterflies 2 Clear Stamps, Mini Birds Clear Stamps (Prickley Pear Rubber Stamps); A Mother is She (Quietfire)
Paper: This & That (Echo Park); Mariposa Matstack (DCWV)
Ink: Distress Ink; Memento; Colorbox
Dies: Floral Doily Motif (Spellbinders)
Accessories: Textile Texture embossing folder (Cuttlebug); mini round gems (Recollections); flower (Recollections); foam dots; Stickles; Liquid Pearls; Pearl Pen; Shimmer Spritz; sewing thread
Size: A2 (4.25" x 5.5")
Thanks for visiting my blog!
To have Ink Up delivered to your inbox,
subscribe in the box at the top right of the page.