Showing posts with label Stampin Up. Show all posts

Just a Note: Desk Notes & Box

Tuesday, December 17, 2013

This is my last post today...I Promise! This is not a Silhouette project, but one that I designed myself.

I recently saw a pretty box of desk notes, and wanted to see if I could replicate it for one of my DD's teachers. This box is made of very heavy, doubled chipboard. Each part is cut separately, rather than creasing and folding the corners and joints. Because of the design on the dp that I positioned to be on the top of the box, I could have left the top unadorned, however, to help the top stay closed, I wanted to add something to it, to help weigh it down. So, I made a large Tattered Blossom flower rimmed with Stickles, and flanked it with leaf die cuts and smaller flowers. And, of course, shiny sequins, for sparkle. :)

The small opening in the front is to allow you to pick up a sheet easily.


For the notes, I filled the box with squares cut from nice, linen textured writing paper, and stamped 1 of 6 different butterfly designs in the corner of every sheet, in different colors. I wrapped them with a belly band and topped that with a decorative die cut. The text is a Flourishes stamp, and the butterflies are Stampin Up!

Thank you SO much for visiting my blog--especially if you popped in for all 5 of my posts today! And, may you and your family have a Merry and Blessed Christmas!

I'm entering this project in the following challenge:

~Hugs,
 
Supplies:

Thanks for visiting my blog!
To have Ink Up delivered to your inbox,
subscribe in the box at the top right of the page.

Wishing You a Perfect Day

Tuesday, September 3, 2013


(If you are looking for this week's Timeless Tuesday post, click here.)

Hello there! Hope you had a good weekend, and for those of you in the states, a nice, long, holiday weekend! I was able to get caught up on some blog housekeeping, so I'm happy...whoo hoo! ;)
I needed a birthday card for a friend, and this week's Mojo Monday sketch was calling my name, so I got to work and made this card. It's really a simple card, but I made the bg paper using Dylusions Ink Sprays, Distress Inks, acrylic paint and a stencil, so it took longer than it probably should have--especially since I had to make 3 of them to get the look I wanted. I do like the end result, though.
A bit of stamping, Distress Ink sponging, and a few punched butterflies finished off the inside easily. I only glued the butterflies along the center of each one. They will lie flat when the card is closed, but pop back up when it's opened.

Thanks for stopping by, and have a Perfect Day!

I'm entering this card in the following challenges:
Mojo Monday #309
Simon Says Stamp Monday Challenge: Stamping All-Stars (Distress Ink, an absolute necessity!)
Simon Says Stamp Wednesday Challenge: Anything Goes

~Hugs,
 
Supplies:

Plus: Vintage Verses Stamp Set (No longer available--Stampin Up)
         Signature Greetings II Stamp Set (Papertrey Ink)

Thanks for visiting my blog!
To have Ink Up delivered to your inbox,
subscribe in the box at the top right of the page.

Orange Poppy Thank You

Tuesday, August 13, 2013


I've missed playing in the Viva la Verve Sketch Challenge for the past few weeks, so I pulled out an image I colored several months ago and used it for the August 2013 Week 1 sketch.
It's easy to see what I did on this card, so I'll skip the details, but I will mention that I colored this pretty Our Daily Bread poppy image with Copics back in February, then used Prismacolor pencils today to add a little more shading. I am loving my Prismacolors lately!
I needed a thank you card to put in a package I'm mailing out tomorrow, and this card fit the bill perfectly!

Thanks for stopping by, and have a wonderful Wednesday! :)

I'm entering this card in the following challenges:
Viva la Verve Sketch Challenge: August 2013 Week 1
Simon Says Stamp Monday Challenge: Make the Cut

~Hugs,

Supplies:

Thanks for visiting my blog!
To have Ink Up delivered to your inbox,
subscribe in the box at the top right of the page.

Nature Mini Card Set & Box

Wednesday, February 27, 2013

Hi Friends! Can you believe it? I did it! This is the last challenge of the SCS Love Fest that I needed to make!!! This is for the Taylored Expressions Love Fest challenge, A Little Love Goes A Long Way, and the challenge was to create a set of 3" x 3" cards, or smaller. I've been meaning to do this anyway, because I like to include a little card when I mail a package to someone, but kept putting it off. Now, it's done!
Here are the cards in their own little box, all put together.


Blue card Purple card
Yellow card Green card
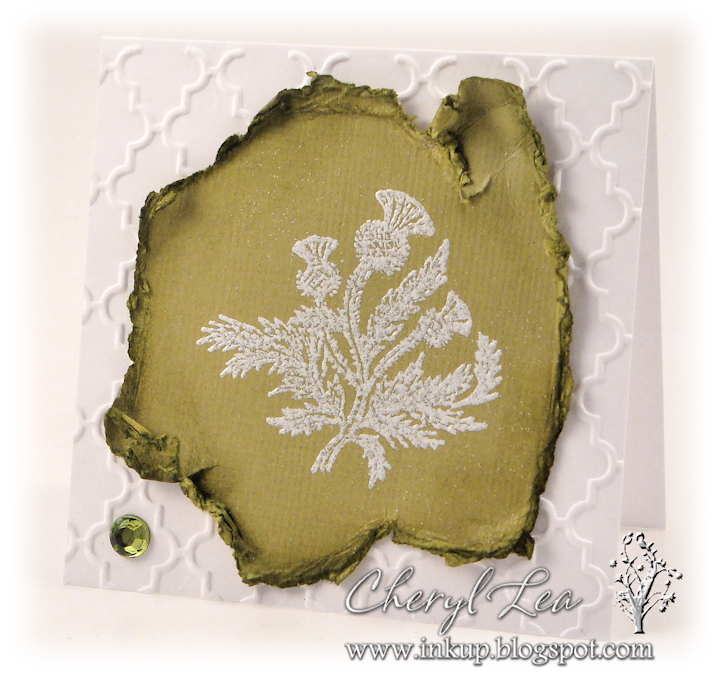
And, here are each of the cards, individually. For these cards, I stamped my "nature" images with white Colorbox ink, then heat embossed with white embossing powder. With spring just around the corner, I chose an Easter-y palette, and used white cs as my base. If you know me, you know I love distressing, but I didn't want a dirty look, so after tearing the edges of each image panel, I inked the torn edges with Distress Inks that were the same color, but a few shades darker than the cs. After inking, I spritzed my craft mat with water and dragged the inked edges through it to give them a water stained look, and also to weaken the edges so I could roll and tear them just a little bit more. ;) I embossed just the front of each white card base, then glued the images on, leaving the edges free to hang out in all their distressed glory. I added one color-matched rhinestone to a corner of each card, alternating the corners so that all four corners ended up being blinged.

For the box, I used Beth Beard's tutorial here. I covered the sides with the same embossed design as the cards, and instead of making a handle, I added a rhinestone in each of the 4 colors I used for the cards. Beth decorated the front of her box with a button, but I used a nature quote on a die cut and put two little Swarovski crystals on each end of it. I didn't have any envelopes for these cards, so I used my Enveloper to made some, and that was quite a challenge. They needed to be slightly larger than regular 3x3 envelopes since the distressed cs on the front of the cards is bulky, but they need to be small enough to fit inside the little box. It's amazing how precise the measurements have to be to get certain sized envelopes. To create a 3-3/16" square envelope, I had to cut the paper at 5-13/32" square. Just 1/32" off, either way made the envelope unusable for my purposes!!! Amazing!

Well, I think I'll go take a nap, now. :) I've been running on just a couple hours of sleep for the past few days, trying to get all these challenges completed.

Thanks for stopping by, and I hope you have a wonderful day!

I'll be entering this project in the following challenges:

Splitcoaststampers Love Fest Challenge: LOVEFEST2013I (A Little Love Goes A Long Way, sponsored by Taylored Expressions)
Flourishes Timeless Tuesday #209: All That Glitters (FTTC209)
Simon Says Stamp: Anything Goes

~Hugs,
 
Stamps: Nature's Pace, Nature Walk (Stampin Up)
Paper: Bazzill
Ink: Colorbox, Distress Ink
Dies: Labels 25 (Spellbinders)
Accessories: Decorative Tile Set embossing folder (Cuttlebug); embossing powder (Zing); rhinestones; Swarovski crystals; foam dots
Size: Cards: 3 x 3
Thanks for visiting my blog!
To have Ink Up delivered to your inbox,
subscribe in the box at the top right of the page.

Friendship

Monday, January 14, 2013

Hi Friends! I hope you had a wonderful weekend. I spent mine with my Savannah Stamp Club friends, and had a blast! We met at Tybee Island on Saturday, stamped all morning, took a nice walk on the beach (the weather was phenomenal!), then stamped again until dinnertime. We talked and laughed the entire time--it was serious FUN! It was great to visit again with the girls I met IRL last year, as well as meet seven new friends, and each one of them was an absolute sweetheart. A girl just couldn't ask for a better day than that!

I managed to make only one card on Saturday, but the sentiment is so very apropos. :) The image is colored with Prismacolor pencils and Gamsol, then Distress Ink was sponged inside the edges of the die. I didn't have any cs with me in the shade of green that I wanted, so I just cut the scalloped circle from white cs, then swiped Pear Tart Memento ink across it. Can you see that it's a bit fuzzy looking? I used a metal brush on it, just to see what would happen. It wasn't what I expected, but I was pleased with the result, nonetheless. The rest of the card is self-explanatory, I think.

(The blue in this photo looks different that the photo of the front of the card, but they are the same cs. I had a "Dickens" of a time trying to get the color right and finally gave up on this photo. The true color is closest in the photo of the front.)

This card could have been made for just about any occasion, but I chose to make it into a birthday card so I could send it to one of my Savannah friends who is having a birthday this week. Yeah, I know she's already seen it--actually watched me make it--but she didn't know I intended it for her, so she'll be surprised when she gets it. ;)

Thanks for stopping by today! I hope you have a crafty week!

~Hugs,

 
Stamps: From My Heart (Stampin' Up)
Paper: Poetic Postage (Paper Studio)
Ink/Pencils: Distress Ink; Memento; Prismacolor pencils
Dies: Classic Scalloped Circles, Labels Three (Spellbinders)
Accessories: Gamsol; Bracket punch (EK Success); seam binding (Hug Snug); rhinestones; brad; twine
Size: A2 (4.25" x 5.5")
Thanks for visiting my blog!
To have Ink Up delivered to your inbox,
subscribe in the box at the top right of the page.