Showing posts with label paper piercing. Show all posts

Timeless Tuesday #248: Score It, Pierce It, Color It

Tuesday, November 26, 2013


I can hardly believe it's the last Tuesday in November! Just 29 days until Christmas!!! So the holiday frenzy officially begins this Friday. Just sayin', ya know. ;~)


In the meantime, ready for a little Timeless Tuesday challenge? Connie MacFarlane is our Guest Hostess this week, and you're going to love her challenge. It's one that can be incorporated into just about any card or project you have in mind:

Here's my take:
I used the Viva la Verve November 2013 Week 1 sketch for this card, substituting cute ornament images, from Flourishes' Holiday Sparkle stamp set, for the fishtail banners. After coloring them with Copics, I did some fussy cutting and glued twine to the back so I could "hang" them from the top of the card. For the next layer, I die cut a square from Classic White Cardstock, then sponged Vintage Photo and Scattered Straw Distress Inks over the entire square. Next, I spritzed water onto the pine tree stamp from the Forest of Trees stamp set, and stamped on top of the sponged ink, giving me a light colored silhouette of the image. After drying the water, I stamped the tree in a white pigment ink, then again, offsetting the stamp just a little for a hint of frost, using Memento Bamboo Leaves ink. I gave it some sparkle by stamping the little snowflake images from the Snow Scenes stamp set onto the tree with Versamark Ink and heat embossed with a glitter embossing powder. I then stamped "Believe," from the Handmade Snowflakes stamp set, and heat embossed it with red glitter embossing powder. To finish off the layer, I scored two parallel lines down the left side of the square and across the top and did some paper piercing between the lines. I matted that layer onto a square of white cs, which I edged with a Krylon silver leafing pen. The gold horizontal strip is a piece of textured white cs which I pierced along the top and bottom, then colored with a Krylon gold leafing pen. Finally, for the bg, I dry embossed snowflakes on a piece of shimmer cs and added Diamond Stickles for sparkle. To hang the ornaments, I first attached them to the front of the card, then taped the twine to the back of the bg layer before adhering it to the card base. 
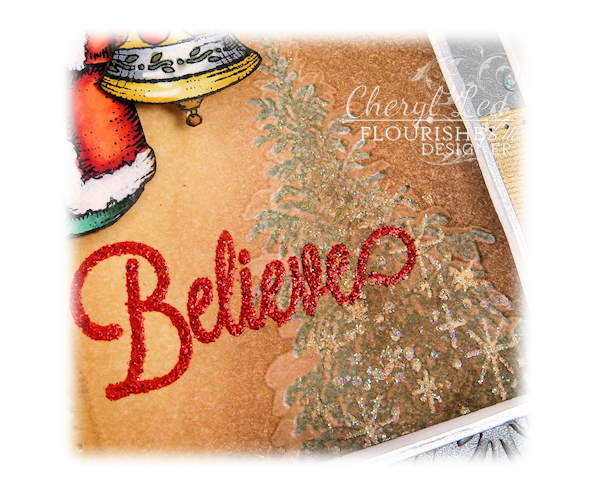
Here's a better look at the sparkle on the tree.
On the inside, I embossed the same snowflake embossing folder on shimmer paper, but left the Stickles off. After die cutting a rectangle of classic white cardstock, I sponged Scattered Straw Distress Ink inside the die, then added two sentiments from the Sentimental Christmas and Star of Bethlehem stamp sets.

Did you happen to notice how many different stamp sets I used on this simple card? I was certainly surprised when I realized how many there were. When I make a card, I often just pile up stamps, dies, and all the other supplies as I use them, so I can remember what I used when it comes time to write up my supply list. So, when I went through the pile for this card, I did a double take when I saw that there were six--yes, that's right, SIX--stamp sets used on this one simple card. But, I shouldn't have been surprised at all. One of the things I've always liked about Flourishes' stamps is that they work so well together. 

And, speaking of working well together, you have got to check out what the rest of the Design Team has for your viewing pleasure! Visit their blogs, leave a little blog love, then put all that juicy inspiration into your own creation and play along with us. You don't have to use Flourishes stamps, but if you do, you get two ballots toward the weekly prize! You can find all the details for the challenge here.
Thanks for stopping by, have a wonderful week, and for those in the U.S., Happy Thanksgiving! Gobble, Gobble! :)

I'm entering this card in the following challenges:
Viva la Verve November 2013 Week 1 Sketch Challenge
Simon Says Monday Challenge: Countdown to the Holidays
Corrosive Challenge #188: Happy Holidays
Paper Issues: It's Beginning to Look a Lot Like Christmas

~Hugs,
 
Supplies:
PLUS these individual Copics: R21, R22, G17, YG03
Thanks for visiting my blog!
To have Ink Up delivered to your inbox,
subscribe in the box at the top right of the page.

Tuesday Morning Sketch Challenge #138: One In a Melon

Tuesday, March 20, 2012

Hello Friends! It's time for another awesome Tuesday Morning Sketch Challenge (TMS138), and you are going to love this one. Our sponsor this week is The Stamping Boutique, and our own Kathy Curry has created a wonderful sketch, full of possibilities--no matter which way you turn this sketch it looks fab!
I turned it on it's side for a birthday card.
This card was so much fun to make--especially coloring that watermelon with my Copics. It's from the Wild for Watermelon stamp set from Flourishes. And, that scrap of red dp was not only the perfect watermelon color, it also has a "watermelonish" texture in the design. I used the out of the box technique to cut the oval around the watermelon and leave the leaf intact. I stamped the sentiment and some watermelon seeds on another oval and covered the seeds in Glossy Accents, then paper pierced that oval. The fork stamp is from the watermelon set, and I use a D'Vine Swirl embossing folder for the green cs.

After coloring the red part of the watermelon, I dampened a paper towel with colorless blender and laid it gently on it, creating a textured look, then I used Glossy Accents on the seeds.

The inside of the card was originally very basic, however...

...when applying the black Enamel Accent dots to the inside of the card, I got a blob in the upper left corner of the Labels One die cut. I tried to repair it, but soon realized I was making it worse, so I stamped the salt shaker from the same watermelon stamp set, put Glossy Accents on the "glass" and Stickles on the salt, then cut it out and glued it in the corner, and TaDa! No more blob!

To balance things, I stamped one of the watermelon slices, colored it, used the same paper towel technique here that I did on the front of the card, put Glossy Accents on the seeds and glued it in the opposite corner. The green dots behind the salt and slice are from the In Flight stamp set from Our Craft Lounge. The Happy Birthday sentiment is from the Say It Big stamp set, also from Our Craft Lounge.

That's it for my card. But, you can head on over to Tuesday Morning Sketches for more inspiration from the rest of the DT. All the details of the sketch challenge are there.

I can't wait to see what you create!!!

I'll be playing along with these challenges too:
Crazy 4 Challenges 128 (C4C128): Use Green
Do You Stack Up Challenge #63: use your Favorite Color (mine is GREEN!)
Cute Card Thursday Challenge 208: Happy Birthday
Simon Says Stamp Challenge: A Bit O' Green: Use Green
Whimsy Stamps Challenge 30: Emboss It! Wet or Dry Embossing

Thanks for stopping by my blog! Have a wonderful day!

~Hugs!
 
Stamps: Wild for Watermelon (Flourishes); In Flight, Say It Big (Our Craft Lounge)
Paper: Best of K&Co; Que Sera Sera (K&Co); Origins Paper Pad (Basic Grey)
Ink: Distress Ink; Memento; Copic Markers
Dies: Classic Ovals Lg, Labels One (Spellbinders)
Accessories: D'Vine Swirls embossing folder (Cuttlebug); ribbon (Michaels); pearls; Glossy Accents; Stickles; Enamel Accents; paper piercer
Size: 5.5" square
Thanks for visiting my blog!
To have Ink Up delivered to your inbox,
subscribe in the box at the top right of the page.

Tuesday Morning Sketch Challenge #133: Get Well Soon!

Tuesday, February 14, 2012

Hello Blog Friends, and Happy Valentine's Day to you! We're back with another Tuesday Morning Sketch Challenge, and this week is the judged challenge with a 2-1-4 twist: you must use 2 ribbons, 1 embellishment, and 4 layers. Think you're up to the challenge? Well, let's hope so, because our sponsor is DRS Designs and their stamps are fab! I mean...just look how cute sick little Leonard is in this photo. :)


Jessica George has come up with a really unique sketch for this challenge:
She designed this to be a 4-1/4" square card and a scrapling. However, I made my card, incorporating everything into one card--not because I'm clever or ornery :), but because I didn't know what a scrapling was. Darn it! Turns out scraplings are cute and fun to make, too. But, in case you don't know what a scrapling is, it's just basically an A2 card base that you trim down to a 4-1/4" square card. The leftover scrap can be decorated to coordinate with your card to be used as a bookmark, or gift tag, or whatever you want. Isn't that a great idea! Anyway, you can make one card, as I did, or design a card and scrapling. I know I'm definitely going to make a scrapling eventually--just not today.

Here's my take on this sketch:
I colored Leonard with Copics. Then, I added Glossy Accents to his thermometer and glass vase, and a drop of Stickles to the center of his flower. I also drew little lines on the screw top of his ice pack. For his blanket, I colored it with Copics, then used the colorless blender to make light lines, then used a Prismacolor pencil over that to add a plaid design.

The image was cut out using a Crocheted Circle Die, then I paper pierced it by holding a Spellbinders circle die in place and piercing inside it to get the holes in a circular pattern. The sentiment was heat embossed. 

For the ribbons, I cut slits in the dp and just pulled the ribbons through before tying them.

Here's the inside:

I used a Prismacolor pencil to draw the blue lines. I love that look.

So, that's it for my card today. Be sure to go to the Tuesday Morning Sketch blog to check out the rest of the Design Team's awesome creations, then design your own and link it to the site for a chance at a fantastic prize from DRS Designs. I can't wait to see what you create!

Thanks for stopping by my blog, and have a crafty week!

~Hugs,
 
Stamps: Leonard Pig Sickday Blues (DRS Designs); Sunshine Cheer (Our Craft Lounge); Lg Porcelain Crackle (Stamp Camp)
Paper: Picket Fence (Lily Bee Designs)
Ink: Copic markers, Distress Ink
Dies: Crocheted Circle Die (Our Daily Bread); Fancy Tags Three (Spellbinders)
Accessories: Organic embossing folder (Cuttlebug); embossing powder (Zing); ribbon (Offray); Prismacolor pencils; button; twine (The Twinery); Glossy Accents; Stickles; sewing thread; foam dots
Size: A2 (4.25" x 5.5")
Thanks for visiting my blog!
To have Ink Up delivered to your inbox,
subscribe in the box at the top right of the page.

Beauty of Dreams

Friday, December 16, 2011


Hi Friends! If you saw this post an hour ago, you saw a raw, super quick shot of my card, using an on-camera flash instead of a light box and there was very little photo editing. I apologize for that. I was seriously under the wire on the Flourishes Feminine Flair Challenge, and I didn't have time for all that editing then. Here's a much better photo:


That gorgeous paper by Pink Paislee did most of the work on this card. I just layered a wide piece of lace over it, stamped the sentiment onto a white oval, sponged Spun Sugar Distress Ink inside the die and pierced the inside edge, then adhered an Ironwork Motif die cut to the back of the sentiment. The gold pearls on the Ironwork diecut are Pearl Pen pearls, and the little rose is resin. A few pink pearls in the upper corners and this card was done.

For the inside, I sponged Spun Sugar and Victorian Velvet inks on the edges of a white panel, adhered the Ironworks Accent strip along the top, and stamped the sentiment and rose in Stormy Sky, stamping on scrap paper first, to get a lighter blue on the card. I didn't stamp off for the rose well enough, and left some dark spots, but hey, it's handmade, right? :)


I seriously, didn't think I'd be making cards and posting again until after Christmas. I guess I'm just the tiniest bit obsessed. :)

Have a wonderful weekend!

~Hugs,
 
Stamps: Tag Lines, Sweet Nature (Flourishes)
Paper: Sweetness (Pink Paislee)
Ink: Tim Holtz Distress Ink
Dies: Ironwork Motifs, Ironwork Accents, Classic Ovals Lg (Spellbinders)
Accessories: Lace (Fancy Pants Designs; pearls; sewing thread; Pearl Pen; paper piercer; floral embellishment (Recollections)
Size: A2 (4.25" x 5.5")
Thanks for visiting my blog!
To have Ink Up delivered to your inbox,
subscribe in the box at the top right of the page.

Reindeer Fly

Tuesday, November 29, 2011


Hi Friends! I'm back. And, this time I have a Christmas card to share with you. I wish I could take credit for the fabulous layout of this card, but I can't--it's from the Week 2 Viva la Verve November 2011 Sketch Challenge. It's such a classic design. I'll definitely be using it again. :)

I've made previous unsuccessful attempts to use the Out of the Box technique, but this time I think I finally figured out my problem. The technique worked great with the reindeer, and I love how his antlers extend beyond the circle. I added Diamond Stickles to the snowflakes on his body, Lime Green Stickles to his antlers, and Xmas Red Stickles along the edge of the circle. The gold dots in the corners of the embossed bg are from a Pearl Pen. The edge of the green Labels One Spellbinders die-cut layer is paper pierced.

On the inside, I used Classic Ric Rac Edgebilities dies to cut the neutral layer and backed it with green dp. I love the sentiment, and this is the perfect day to use it--we're supposed to get our first bit of snow here tonight. :)

I hope you have a wonderful day tomorrow. Stay warm!

~Hugs, 
 
Stamps: Sparkle & Cheer (Taylored Expressions)
Paper: Wonder (Authentique)
Ink: Tim Holtz Distress Ink; Memento
Dies: Labels One, Std. Circles Lg.,Classic Ric Rac Edgebilities (Spellbinders)
Accessories: Damask Embossing Folder (Sizzix); seam binding (Hug Snug); Paper Piercer; Pearl Pen; Stickles; sewing thread
Size: A2 (4.25" x 5.5")
Thanks for visiting my blog!
To have Ink Up delivered to your inbox,
subscribe in the box at the top right of the page.


On Its Way!

Friday, October 28, 2011


Happy Friday, Friends! I hope you have a fun weekend planned. We'll probably go to the annual fall festival at my DD's school. I was afraid I'd be spending this weekend in a frantic rush to finish her Halloween costume (Pandora), but I finally finished the box last night, so I can rest easy on that one. In a few days I'll post a photo of her in costume. It turned out cute.

For now, I've got another Christmas card to share with you. This one is for two challenges: Tuesday Morning Sketches #117 (the last week of their think pink challenge), and Lily Pad's Texture Challenge. Here's my card:

This card definitely has some texture going on. LOL! In fact, it has a little bit of everything: stamping, embossing, glitter (both Stickles and homemade Mod Podge glitter glue), die cuts, sewing, ribbon, a button, and paper piercing--not to mention some pretty wild colors for a Christmas card. One thing that is missing is Distress Ink. I very seldom make a card without at least sponging an edge or two, but I refrained this time. I wanted the card to be crisp and vivid. 
I did use my Copic airbrush system for the inside. I left the die in the paper (at the bottom where the Stickles dots are) and sprayed a light blue color just along the bottom and lower sides to coordinate it a little better with all that is going on on the front of the card.

And, that's it for today. Thanks for stopping by, and have a wonderful weekend!
 
 
Stamps: Warm Holiday Wishes (Inkadinkadoo); Distressing stamp (Glitz)
Paper: 12 Days of Chriatmas (My Mind's Eye)
Ink: Colorbox; Copic marker
Dies: Holly Accents, Classic Ric Rac Edgeabilities, Labels Fourteen, Labels Sixteen, Std Circles Lg (Spellbinders)
Accessories: Paper Lace II embossing folder, Polka Dot embossing folder (Cuttlebug); gold opaque paint marker (Marvy); ribbon (Michaels); glitter (Martha Stewart); Stickles; Enamel Accents (Inkssentials); sewing thread; Mod Podge; victorian mini button (Dress It Up); paper piercer
Size: A2 (4.25" x 5.5")
Thanks for visiting my blog!
To have Ink Up delivered to your inbox,
subscribe in the box at the top right of the page.

CR84FN40 -- Joy!

Saturday, October 8, 2011


Hi Friends! I hope you're having a nice, cool, fall weekend, and maybe even getting in a little crafting time. I've been eagerly awaiting today so that I could finally tell you my latest happy news! I'm the Guest Designer for the CR84FN Color Challenge for the month of October! Whoo Hoo! When I got Mona's invitation I was beyond thrilled, as I already loved participating in CR84FN's challenges. Mona always has the most beautiful color combinations and her super-talented Design Team consistently creates beautiful, inspirational projects to spark your personal creativity. Thanks, Mona. I'm looking forward to a fabulous, colorful month with CR84FN!

So, without further ado, here is my take on this week's CR84FN color challenge of red, brown, and kraft.

If you've been around my blog at all, you probably already know that I adore distressing paper, and the challenge colors this week are perfect for shredding and inking! I used both Vintage Photo and Black Soot Distress Inks on the edges. On the lower panel, I used the Dots, Circles & Stars embossing folder, then swiped white acrylic paint across the raised areas to give them just a little extra definition before distressing the edges. The dots on the Lotus pendant behind the sentiment panel are Liquid Pearls and the black dots on the Parisian motif are Enamel Accents. The Joy stamp was another dollar bin find at Michael's. I stamped it in Aged Mahogany Distress Ink and added teeny little red rhinestones to the tip of each flourish.


I dyed red seam binding with Aged Mahogany Distress Ink reinker and sponged that same color on the edges of the poinsettia petals (McGill Paper Blossoms punches) before I assembled the flower. The beads in the center were a pearl white color. I colored them with a yellow Copic marker.


Here's another angle so you can see the layers a little better.


The bg paper on the inside came about as an afterthought. When I was dying the seam binding, I accidentally spilled reinker on my craft mat--more than I needed to dye the seam binding, so I grabbed a piece of cardstock and blotted it up. As I was drying the seam binding with my heat gun, I also kept blotting the extra ink with that same piece of cardstock. When I was finished, I really liked the way the cs looked, but it still needed a little something else, so I used Vintage Photo ink and a Hero Arts background stamp to add a design to it. I inked the edges with Vintage Photo, and...tada!


You can just barely see it in the photo, but there is a small watermark design directly behind the "Peace Hope Love" sentiment, and I inked and pierced the edges of the Labels Thirteen die cut while the paper was still in the die.

Now that you've seen my card, be sure to feast your eyes on the rest of the Design Team's inspiring creations, and then head over to the CR84FN40 Color Challenge for details on the challenge and play along with us!  
Lisa  

I can't wait to see YOUR fabulous creation!

Thanks for visiting, and come back soon!

 
Stamps: Joy (Michael's); Holiday Greetings (Flourishes); Dots & Flowers (Hero Arts); Studio 112
Paper: Timepiece Collection (Bo Bunny)
Ink: Tim Holtz Distress Ink; Versamark; Copic markers
Dies: Labels Thirteen, Parisian Motifs, Lotus Pendant (Spellbinders)
Accessories: Alpine Snowflake punch, Star Lily punch (McGill Paper Blossoms punches); stylus; Dots, Circles, & Stars embossing folder (Sizzix); seam binding dyed with Distress reinker (Hug Snug); Enamel Accents (Inkssentials); acrylic paint (Ceramcoat); paper piercing tool; rhinestones; sewing thread; beads; Liquid Pearls; Glossy Accents; Perfect Pearls Mist; foam dots
Size: A2 (4.25" x 5.5")
Thanks for visiting my blog!
To have Ink Up delivered to your inbox,
subscribe in the box at the top right of the page.