Showing posts with label bookmark. Show all posts

Paper Sweeties October Release Rewind!

Friday, October 16, 2015

Time for a Paper Sweeties Rewind, where we mix new release stamps and dies with older ones. Abigail and Jake stamps and dies were perfect, paired with the Do You See What I See and Reason for the Season stamps sets.

I used a mix of Dylusions Ink Sprays and Distress Ink to create the background on a Manila tag. Then, I heat embossed the sentiment, first with a gold mirror embossing powder, then again, offset slightly, with a light brown ep. Jake, Abigail, and baby Jesus were colored with Copic markers, and the outfits were paper pieced. Abigail is popped up slightly, but I wanted to keep the tag as flat as possible in case it ended up being used as a bookmark. The edges of the tag were heat embossed with two different Fran-tage embossing powders, and I finished the tag off with several Paper Sweeties seam bindings and baker's twines.

Be sure to visit my teamies' blogs, too!

You still have time to enter this month's Inspiration Challenge!

http://papersweeties.com/blog/paper-sweeties-inspiration-challenge-october-2015/

And, be sure to check out the October Kit of the Month, too.

<DSCN3109


Thanks so much for your visit, and enjoy your weekend!

I'm entering this card in the following challenges:
~Hugs,

Supplies Used:

Thanks for visiting my blog!
To have Ink Up delivered to your inbox,
subscribe in the box at the top right of the page.

Paper Sweeties September Release Party!

Tuesday, September 15, 2015

Today is Paper Sweeties' Release Party, and the newest stamps and dies that we've been featuring for three days are in the shop right now! Don't you just love that sweet little mason jar image? 

If you saw my post from yesterday, you know that it was not an entire project. I have Part 2, today, which finishes out the bookmark set, and I also created a cute holder for them.
After making the bookmarks, I knew I'd need a place to keep them together when I wasn't using them, and I found the perfect way to store and display them in an easel stand design from the Silhouette store. After making the stand, I heat embossed the Mason Jar image on watercolor paper, die cut it with the matching die, watercolored it, then created a rub-on of the "Fruit of the Spirit" text (in Word) for the jar label. I went over the label with a Spica pen which gives the letters just a little bit of sparkle. Now, I can just pull a "fruit" right out of the jar when I need to mark my place in a book! But, I still haven't shown you the rest of the bookmarks...

I made these the same way I made the earlier bookmarks, with heat embossing and watercolors. For the text on these, I used a Paper Sweeties die cut and stamp (Love), an old alpha stamp set from the dollar bin (Self-control), an IO alpha die (Goodness), and a retired Sizzix alpha die set (Faithful). I like every one of the bookmarks in the set, but my favorite is "Self-control." I was super pleased with how the watercoloring turned out on the apples, and it's the only one that I paired specific text with specific fruit. Do you get it??? If Adam and Eve had used more self-control when they were looking at that yummy fruit, well.... ;~)  (I know the fruit may not have been apples, but it's what most people think of when they think of that fateful day, so I went with it.)
pic name pic name
pic name pic name

If you'd like to see any of these better, you can click on these, individually, for a larger photo.
And, here's what the easel holder looks like when it's empty. 

I thought you might like to see the entire set all together, too. (If you zoom in on this photo, don't look too close. I had a seriously hard time editing the photo, and it is nowhere near perfect.) 

I hope you enjoyed seeing this project. Now, to see more new release goodies, visit my Paper Sweeties Teamies' blogs. You will LOVE what they have for you today!


And, don't forget, for a chance to win a gift certificate to the Paper Sweeties' boutique, play along with us in this month's Paper Sweeties Inspiration Challenge

papersweeties-inspiration#35  

Thanks for stopping by. I'll have one more project for this new release tomorrow. Hope to see you then!

I'm entering this project in the following challenges:
Simon Says Stamp Monday: Love this Technique (heat embossing & watercolor)

~Hugs,

Supplies Used:

Thanks for visiting my blog!
To have Ink Up delivered to your inbox,
subscribe in the box at the top right of the page.

Paper Sweeties September Release Countdown!

Monday, September 14, 2015

As promised, I've got a fun project to share with you today, featuring another Paper Sweeties New Release stamp set. Homegrown is a set of four fruit stamps, which pairs nicely with the Mason Jar stamps and dies I used yesterday, and with their distinct lines and large open areas, they are perfect for simple watercoloring, which I've been enjoying lately!

Since the Homegrown set is all about fruit, I had fruit on the brain, so to speak, and was reminded of Galatians 5:22-23 and the Fruit of the Spirit:
"But the Holy Spirit produces this kind of fruit in our lives: love, joy, peace, patience, kindness, goodness, faithfulness, gentleness, and self-control." Gal. 5:22-23 NLT
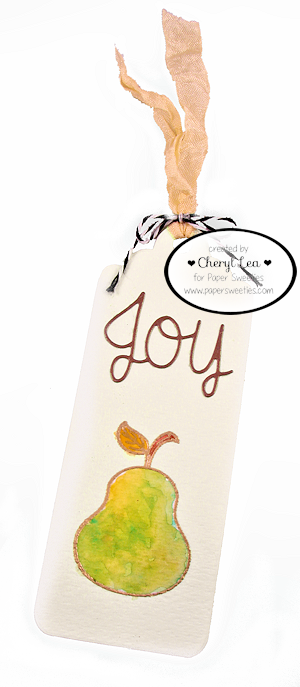
Now, I wasn't up for making an individual card for each of the nine attributes, but I really wanted to make a set of something. Then, I noticed the huge stack of books in my family room that I'm trying to read through, and immediately started die cutting bookmarks out of heavy watercolor paper. I can use them to keep my place in books, and to remind me to keep these attributes in my life.

On each bookmark, I heat embossed the fruit images with gold embossing powder, then got out my Koi watercolors and Color Bursts to add lots of color. For the text, I used Fancy Monograms (Patience), die cut (Joy), Silhouette cut (Kindness), hand lettering with a Spica pen (Gentleness), and hand lettering with a Versamark pen and gold embossing (Peace). I tried to make each bookmark unique with the word and image placement and fonts, and I am very pleased with how they turned out. I added Paper Sweeties Seam Binding, in various colors, to the top of each bookmark, and tied each one with a Licorice twine bow. I've included photos of each of the bookmarks individually, below. (The color looks a little different in the group versus the individual pics. The group photo is closer to how the colors look in person.)   

pic name pic name pic name
pic name pic name
I wish you could see the beautiful gold embossing on the images. It's just so darn hard to get that in photos! Tomorrow, I'll share more bookmarks, as well as decorative storage for them--Fruit of the Spirit, Part II. ;~)

There's always yummy goodness to be had when you visit the Paper Sweeties Design Team! You don't want to miss even one!


Tomorrow is Paper Sweeties' Release Party, when all the newest stamps and dies will be released! And, for a chance to win a gift certificate to the Paper Sweeties' boutique, play along with us in this month's Paper Sweeties Inspiration Challenge

papersweeties-inspiration#35  

I'm entering this project in the following challenges:

~Hugs,

Supplies Used:

Thanks for visiting my blog!
To have Ink Up delivered to your inbox,
subscribe in the box at the top right of the page.

Seaside Bookmark

Thursday, May 30, 2013

I wanted to CASE one more of Christine's creations for the Flourishes Friday Focus CASE Challenge, and the deadline is looming, so I'll be quick. ;)

Check out this great masculine bookmark Christine made using the What A Catch stamp set. Her coloring on that image is amazing, isn't it! I don't have that stamp set, or any other fishing stamps, but I do have the A Guiding Light stamp set, that has some fab masculine images. I colored the lighthouse image with Copics and added a little glimmer to the sand and water with a Spica pen. After distressing everything (you know I can't make something without at least a little distressing!), I used her general layout to put it all together. I had to raid my DD's shell collection for the little seashell at the top of the bookmark. :)

I'm entering this in the following challenges:
Flourishes Friday Focus CASE Challenge: Case Christine
ColourQ Case Challenge #191
Simon Says Stamp Challenge: Anything Goes
Simon Says Stamp & Show Challenge: Into the Woods (I used a wood image dp)

Thanks for stopping by, and enjoy your evening!

~Hugs,

 
Stamps: A Guiding Light (Flourishes)
Paper: Dolled Up (My Mind's Eye); Clippings (Basic Grey)
Ink: Copics; Distress; Memento; Spica pen
Accessories: Corner Chomper; jute; seashell; circle punches; pearls; Zing embossing powder; eyelet
Size: 2.75" x 5.5"
Thanks for visiting my blog!
To have Ink Up delivered to your inbox,
subscribe in the box at the top right of the page.

Be Like a Flower

Sunday, September 23, 2012

Hi Friends! Just a quick post for a tiny project today...a bookmark.

You might recognize the cute image on this bookmark...it's the same one that I used in my last post, here. It's perfect for my bookworm DD, as she and our dog are best friends. :) And, I really want to improve my coloring on these type of images, so I've colored this one several times. I finally got one that is pretty good, although I need some serious practice time on hair. :)

I colored the image with Copic markers and used a new cloud mask and Memento ink that I picked up at the Greenville convention to make the clouds. The sentiment was heat embossed with white ep.

And, that's it for today. Thanks for stopping by, and be sure to check back on Tuesday for the newest Tuesday Morning Sketch Challenge. I'll have a fun project to share with you, made with some of the new goodies I snagged at the convention!!!

I'd like to enter this in the following challenges:


Stamps: Olivia (Guylou's Inimitability Digistamps); Summer Afternoon (Taylored Expressions)
Paper: Garden Party Digital Paper (Design House Digital); kraft cs
Ink: Memento; Copic markers; Distress Ink; Colorbox
Dies: Mark Your Spot Bookmark (Taylored Expressions); Big Scalloped Ovals Sm (Spellbinders)
Accessories: Cloud Stencil (Inky Antics); white embossing powder; ribbon
Size: 1.75" x 6" (I trimmed about 1/4" off the bottom of the die cut)

Thanks for visiting my blog!
To have Ink Up delivered to your inbox,
subscribe in the box at the top right of the page.

A Life Without Love

Tuesday, August 28, 2012


(If you are looking for my TMS post, click here.)

(Spouse Spoiler Alert: Hi Hubby...don't open this post until after Sept. 3!)


Hi Friends! How's the week treating you, so far? I think our 3rd grader may be on the road to recovery from her little crisis last week! Yaaayyy! Check that off my list of things to worry about. ;)

The card I have to share with you today is an anniversary card for my DH. We'll be celebrating our 13th anniversary next Monday! :) The card is a bit deceptive. It looks very simple, and I suppose it really is, but did it ever take a long time to figure out how I could make it come together!
I did some stitching, made a couple of flowers with my new MFT Die-namics, which I LOVE!, did some heat embossing and paper piercing, added a few die cuts, and wa-la, there you have it, right? Nope, not this time! First of all, I'm sure you can tell that the patterned vertical strip is a bookmark. The eyelet and twine at the top kind of give it away. Well, getting that sucker to stay put was a challenge, to say the least!

I started with the Week 4 Viva la Verve sketch. Quite simple, but unfortunately, for me, it has a lot of room to get crazy, which I tend to do when there are large spaces in a sketch. Amazingly, however, I didn't flip or turn the sketch--just left it as is. :D
Here's the same card with the bookmark removed. I wanted the card to look complete, even without the bookmark, so I cut a kraft strip, put a different sentiment on it, and did a little stamping and heat embossing to liven it up. The red leaves die cuts are actually much darker than in the photo, more of a deep cranberry color. I think I should have stamped the leaves in a darker color so they would stand out more. To assemble this, I had to first glue the small leaf die cut, then partially glue the largest leaf die cut. Only then could I glue the vertical strip, pulling the leaf over the edge of the strip and adhering it at the same time.  All the while, I had to make sure that the strip was going to be centered under the curved diecut at the bottom. (The Tennyson quote was created in Word, printed onto a transparency, and rubbed on).

I used the Parisian Edge punch to make the narrow scalloped strip behind the twill, and glued it onto a strip of kraft for stability, then adhered the twill over that. The curved die cut has a design heat embossed on it, and I glued it to the back of the twill strip before gluing the strip to the card. The strip is only glued to the card at the right edge and about 1-1/2" along the left edge, to leave room to slip the bookmark in later. I thought that would be sufficient to hold the bookmark in place. Hehehe.

For the bookmark, I cut one from patterned paper and another from kraft and glued them together to give it more structure. After stamping the sentiment and decorative stamps onto a kraft die cut, I paper pierced the edges and glued it to the front of the bookmark. I held the bookmark against the front of the card to position the "Love You" sentiment so that it doesn't show until it is removed from the card. I wanted something where the button is, because when the bookmark was inserted, that spot seemed kind of naked, but I was concerned about the thickness of a button on a bookmark (I'm a stickler for taking care of books, especially protecting the spines), but I tested it, and the button didn't seem to hurt the book at all, so I went with it. Then, I realized I had a problem I couldn't seem to solve.
No matter what I did, the bookmark wouldn't stay in place on the card. All the twill strip did was give the bookmark a place to pivot from. It kept falling to one side or the other and slipping down further than it was supposed to. Because I really wanted this card to be complete, with or without the bookmark, I needed a solution that was secure, but at the same time didn't alter the aesthetics of the card or the bookmark. 

So, here's what I came up with, and it works great! I used a Creative Page Tab die to cut a piece of plastic (the packaging the dies came in) to make a tab, folded it in half, and hot glued it to the back of the bookmark. The most difficult part was figuring out exactly where to put it, so that it held the bookmark at the correct height. Thank goodness the last thing I always do when making a card is to adhere everything as a whole to the card base, because when I glued the cs to the card base, I just made sure to leave an area unglued that was large enough for the tab to be able to slip in. So, now, the bookmark stays put, but can be removed, and even be put back with ease, and the tab is completely out of sight--even from the back of the card. As for using it as a bookmark, the tab could be left on and hooked over the top of the page, or it can be removed with a craft knife.
So, here's a photo of the entire card, together, but separate.
And, except for heat embossing the Happy Anniversary sentiment, I left the inside blank, so I can add my own personal message. I figured the front of this card was so sufficiently decorated, it didn't need much on the inside, anyway. ;)

So, that's it for me today! Thanks for stopping by today, and if you're in the path of Hurricane Issac, be safe. My prayers are with you!

I'd like to enter this card in the following challenges:
Viva la Verve Sketch Challenge: VLVAug2012 Week 4
ABC Challenge: V for Vanish (something hidden)
Basic Grey Challenge #75: Anything Goes (use something Basic Grey)
Cute Card Thursday #231: Bling It Up
Digi Doodle Challenge #122: Use Pearls (there's a pearl in one of my roses)
Moving Along With the Times: Shape Up-Anything but Square
Paper Play Challenge: Week 34--Sentiment as the main focus
The Poodles Parlour: Winged Things
Sentimental Sunday Challenge #117: Sewing or faux stitching
Stampin' Sisters in Christ Challenge #154: Use punches, dies, or shapes
Stamptacular Sunday Challenge #178: Roses & Ribbons

~Hugs,


Stamps: Summer Afternoon (Taylored Expressions); Bloom & Grow (Verve); Avignon, Venice (7 Gypsies); Tag Lines, Wedded Bliss (Flourishes); Treasures (Shabby Chic)
Paper: Clippings, Little Black Dress (Basic Grey)
Ink: Distress Ink; Memento; clear embossing ink
Dies: Classy Label Die, Elegant Leaves Die (Verve); Mark Your Spot Bookmark Die (Taylored Expressions); Die-namics Royal Rose, Die-namics Mini Royal Roses (MFT Stamps); Labels Three, Creative Page Tabs (Spellbinders)
Accessories: Parisian Edge Punch (EK Success); glitter embossing powder (Zing); twill ribbon (Taylored Expressions); felt; pearl; eyelet; button; flower; twine; sewing thread; plastic scrap
Size: A2 (4.25" x 5.5")
Thanks for visiting my blog!
To have Ink Up delivered to your inbox,
subscribe in the box at the top right of the page.

Once You Learn To Read

Friday, August 24, 2012

Hi Friends! Happy, Happy Friday!!! I am SO glad the weekend is finally here. Who knew 3rd grade could be so stressful? Wish a cute little bookmark, made with lots of love, could make it all better.

The bookmark is cut from kraft cs, and the colors came from the TCPTues 223 Color Challenge.

I'd like to enter this project in the following challenges:
Simon Says Stamp: Back to School
TCPTues223 Color Challenge: Rose, Sunshine, Teal
Cute Card Thursday Challenge #231: Bling It Up
A Blog Named Hero Challenge #10: The Krafty Crafter

Thanks for stopping by and have a great weekend!

~Hugs,

 
Stamps: Mark Your Spot (Taylored Expressions)
Paper: Kraft; Hello Spring (Little Yellow Bicycle)
Ink: Colorbox; Distress Ink
Dies: Mark Your Spot Bookmark (Taylored Expressions); Romantic Rectangles, Antique Frame & Accents, Rose Creations (Spellbinders)
Accessories: Twine; brad; Corner Chomper; felt; Memory Thread (DMC); Stickles; Prismacolor pencils; acrylic paint
Size: 1.75" x 6.25"
Thanks for visiting my blog!
To have Ink Up delivered to your inbox,
subscribe in the box at the top right of the page.

Another Corner Bookmark: Butterfly

Sunday, February 26, 2012


Hi Friends! Another corner bookmark, another quick post. And, like the previous bookmark, I'll be entering this in the Flourishes Timeless Tuesday Challenge #157: Create a Corner Bookmark. I'm not going to go into details, as it's a pretty simple design, but if you want any information about what I did, just leave a comment and I'll be happy to answer any questions you might have.

The front:

The back:

See...quick, wasn't it? :)

Note to Mom...DD decided she wants this bookmark instead, so the silhouette bookmark is all yours, if you still want it. :D

Thanks for stopping by, and have a fantastic week!

~Hugs!
 
Stamps: In Flight (Our Craft Lounge); Grape Floral Background (Stamp Camp)
Paper: Mariposa Stack (DCWV
Ink: Distress Ink, Sharpie marker, Memento
Dies: Bird Flourishes, Labels Fourteen (Spellbinders)
Accessories: Scallop Dot edge punch (Martha Stewart); clear embossing powder; ribbon; sewing thread; Stickles; Enamel Accents
Size: 4"
Thanks for visiting my blog!
To have Ink Up delivered to your inbox,
subscribe in the box at the top right of the page.

FTTC157: Corner Bookmark

Saturday, February 25, 2012

Hello Friends! Quick post here today. The challenge this week for Flourishes Timeless Tuesday is to create a corner bookmark--yet another project I've never made, but I can't imagine why not. It was easy, and fun.


My color palette is from the Color Throwdown #180 challenge. This is such a nice, soothing palette.


Here's my bookmark:

I used Beate's SCS video tutorial as a guide to making the bookmark. I sewed dp to the bookmark base before folding the edges down in the back, then added ribbon, Liquid Pearls, and Stickles.


used a silhouette from Flourishes' Sweet Days of Summer stamp set for my image. I love that it's a girl reading, and the tree fit into the circle die cut perfectly. It's embossed with Chocolate embossing powder, then I sponged Distress Ink for the ground and sky, and used Flower Soft for the grass and flowers in the tree, and Sparkly Fluff for the ground under the tree.

The sentiment on the back of the bookmark is from the same stamp set as the silhouette.

My DD saw this and immediately called dibs on it. :) My entire family are readers, but, even at seven years old, my DD is the most avid reader, so she probably would have gotten this anyway, but I'm glad she liked it so much she requested it herself.

And, that'll do it for today. Thanks so much for stopping by, and enjoy the rest of your weekend.

~Hugs,
 
Stamps: Sweet Days of Summer (Flourishes)
Paper: Just Chillin' (Making Memories)
Ink: Memento; Distress Ink, clear embossing ink
Dies: Std. Circles Lg, Classic Scalloped Circles Lg, Classic Ric Rac Edgebilities (Spellbinders)
Accessories: Scallop Dot border punch (Martha Stewart); Zing embossing powder; Offray ribbon; sewing thread; Sparkly Fluff; Stickles; Liquid Pearls; Flower Soft
Size: 4" 
Thanks for visiting my blog!
To have Ink Up delivered to your inbox,
subscribe in the box at the top right of the page.