Showing posts with label glitter. Show all posts

Tuesday Morning Sketch Challenge #135: What???

Tuesday, February 28, 2012


Hi Blog Friends! Can you believe it's already Tuesday again? Wow, the days really fly by, don't they? But, I love Tuesdays because it means we have another sketch for you at Tuesday Morning Sketches! I can't wait to show you the card I made with this week's awesome sketch, created by our own Melissa.


Digi Doodle Shop is sponsoring the challenge this week, and I used the most adorable Digi Doodle image for my card. It's called Twitty Diddle. He's a bird, maybe a pelican, and he appears to be just a little surprised, or maybe worried. Whatever he is, I love his expression. I colored him with Copics and used Glossy Accents on his eyes.


And, here's how I interpreted that deer-in-the-headlights look:


Whaaat?!? Don't you know that's what he's thinking? I had such fun with this card! I sewed all the layers down, cut the Fancy Tag out of chipboard, coated it with Mod Podge, then sprinkled it heavily with glitter and sprayed it with a clear gloss to keep the glitter from flaking off. I put Liquid Pearl dots on the perimeter of the image and popped it up onto the glittered tag, then popped the entire thing up on the card.

For the sentiment, I cut the letters with my Alpha Bubbles dies, colored them with a Martha Stewart glitter marker, then adhered them to the card with glue.

Here's a look at the popped up layers.


For the inside, I printed the sentiment, in a dark brown, onto a transparency and rubbed it onto white cs. I colored in the letters with Copics, in a gradient pattern of three shades of blue, then added Diamond Stickles for sparkle. I attached a scrap of dp left over from the front of the card and added Liquid Pearls to the motifs. The yellow doodling just above the dp is hand drawn with a fine tip marker. On a piece of blue cs, I scored lines along the edges, adhered the sentiment panel to it, then glued it into the card.

I can think of a dozen occasions for which I could send this card, for everything from encouragement to congratulations--even for a birthday! And, little Twitty Diddle is so stinking cute, I know he'd add a smile to someone's day.

So, will you join us for the sketch challenge? I sure hope so! You have until Sunday at 8:00 PM (EST) to link your creation, and one lucky winner will win a gift certificate to the Digi Doodle Shop! All the details are on the Tuesday Morning Sketches blog, and you can get more inspiration from the rest of the design team there, too.

Thanks for stopping by today. I hope you have a creative week!

~Hugs,
 
Stamps: Twitty Diddle--digital stamp (Digi Doodle Shop)
Paper: Hattie Papers (My Mind's Eye); Circa 1934 (Cosmo Cricket); Splendid (Authentique); chipboard
Ink: Copic markers; Distress Ink; glitter marker (Martha Stewart)
Dies: Labels Fourteen, Fancy Tags Two (Spellbinders); Alpha Bubbles (Sizzix)
Accessories: Seeing Spots embossing folder (Cuttlebug); rhinestones; sewing thread; glitter; Glossy Accents; Stickles; Liquid Pearls; foam dots; transparency (for making rub on letters)
Size: A2 (4.25" x 5.5")
Thanks for visiting my blog!
To have Ink Up delivered to your inbox,
subscribe in the box at the top right of the page.

On Its Way!

Friday, October 28, 2011


Happy Friday, Friends! I hope you have a fun weekend planned. We'll probably go to the annual fall festival at my DD's school. I was afraid I'd be spending this weekend in a frantic rush to finish her Halloween costume (Pandora), but I finally finished the box last night, so I can rest easy on that one. In a few days I'll post a photo of her in costume. It turned out cute.

For now, I've got another Christmas card to share with you. This one is for two challenges: Tuesday Morning Sketches #117 (the last week of their think pink challenge), and Lily Pad's Texture Challenge. Here's my card:

This card definitely has some texture going on. LOL! In fact, it has a little bit of everything: stamping, embossing, glitter (both Stickles and homemade Mod Podge glitter glue), die cuts, sewing, ribbon, a button, and paper piercing--not to mention some pretty wild colors for a Christmas card. One thing that is missing is Distress Ink. I very seldom make a card without at least sponging an edge or two, but I refrained this time. I wanted the card to be crisp and vivid. 
I did use my Copic airbrush system for the inside. I left the die in the paper (at the bottom where the Stickles dots are) and sprayed a light blue color just along the bottom and lower sides to coordinate it a little better with all that is going on on the front of the card.

And, that's it for today. Thanks for stopping by, and have a wonderful weekend!
 
 
Stamps: Warm Holiday Wishes (Inkadinkadoo); Distressing stamp (Glitz)
Paper: 12 Days of Chriatmas (My Mind's Eye)
Ink: Colorbox; Copic marker
Dies: Holly Accents, Classic Ric Rac Edgeabilities, Labels Fourteen, Labels Sixteen, Std Circles Lg (Spellbinders)
Accessories: Paper Lace II embossing folder, Polka Dot embossing folder (Cuttlebug); gold opaque paint marker (Marvy); ribbon (Michaels); glitter (Martha Stewart); Stickles; Enamel Accents (Inkssentials); sewing thread; Mod Podge; victorian mini button (Dress It Up); paper piercer
Size: A2 (4.25" x 5.5")
Thanks for visiting my blog!
To have Ink Up delivered to your inbox,
subscribe in the box at the top right of the page.

Christmas Snow

Saturday, October 22, 2011

Hi Friends! Well, I have to tell you, it's been so nice to make this card I have to share with you. It was a fun card, and I love the way it turned out, but best of all..it's NOT a bag topper!!! Yippee!

I used the Tuesday Morning Sketch #116, designed by my sweet friend, Theresa, and it is a fabulous sketch. I love that wide panel down the center of the card. I opted to use shapes other than squares and rectangles, added ribbon down the center, and a few pearls, but other than that, I stuck with the sketch. Because there are two sponsors this week, there will be two drawings, so if you haven't entered yet, get busy! You have until tomorrow night (Sunday) at 8PM EST to get your entry in. Oh, and don't forget to add some pink in there somewhere, for Breast Cancer Awareness Month!

Here's a close up of the blue embossed layer. I started with a blue cs, embossed it with a Paper Lace II embossing folder, brushed a thin layer of white acrylic paint over it, then mixed Mod Podge and purple glitter and brushed that over the white paint. I think it turned out really pretty.

 
Those snowflakes in the top center panel gave me a bit of trouble. I really wanted to stamp them with glue, then sprinkle glitter on, but I tried several times, and all I ever got were blobs of glitter--no detail. So, I finally gave up on that route and heat embossed the snowflakes with white embossing powder, then used Stickles to add a little glitter.


I colored the little snowman with Copics, making his scarf pink for Breast Cancer Awareness, then used a Snow Marker to create puffy snow.


Here's a look at the inside.
I think that's it for me today. I'll have another post for you around midnight for the new CR84FN Color Challenge and I think you're going to really like it, so be sure to check back in tomorrow to see how I used the inspiration photo and colors.

Thanks for stopping by, and have a nice evening!
 
Stamps: Christmas Characters (Inkadinkadoo)
Paper: Best of K&Co; Love Nest (My Mind's Eye)
Ink: Tim Holtz Distress Ink; Memento; Staz-on; Copic Markers
Dies: Beaded Circles; Labels Four (Spellbinders)
Accessories: Scallop Dot Edge Punch (Martha Stewart); Paper Lace II embossing folder (Cuttlebug); embossing powder (Zing); organza ribbon (Berwick); velvet ribbon (Fancy Pants Designs); acrylic paint (Ceramcoat); Mod Podge; Snow Marker (Marvy); Enamel Accents (Inkssentials); glitter (Martha Stewart); Corner Chomper; pearls; foam dots
Size: A2 (4.25" x 5.5")
Thanks for visiting my blog!
To have Ink Up delivered to your inbox,
subscribe in the box at the top right of the page.

Sweet Smells of the Season

Friday, October 14, 2011


Hello there! First of all, I will go ahead and apologize for bombarding you with posts today. I just realized that three of Flourishes challenges end today at 5:00, so I've got to get a move on if I want to enter, and I REALLY want a shot at their new stamp sets. Have you seen them? Gorgeous!!!

This card is for Christmas, and I've made it to fit Flourishes' Name Game Challenge. The rules are to use your monogram as the inspiration for your creation! So, if your name starts with an “J” – add jewels! What about “B” –add a bow! How about a “P” – use a punch! Just that simple! Well, my initials are CDL, so I used Copics, Dies, and Liquid Pearls.


I started this card with absolutely no idea of how it might turn out. I didn't use a sketch, and all I knew was that I wanted to follow the Name Game rules and use these two darling gingerbread cookie people. First I colored them with Copic markers, then I made glitter glue with glitter and Mod Podge and painted them with it to mimic sparkling sugar crystals, but I may have used just a little too much glitter. It looks good straight on, but at an angle, it sparkles A LOT. I used Liquid Pearls on the buttons--still shiny, but toned down a bit. I'm just thinking of these as extra sweet, happy cookies, and that makes all that sparkle okay in my mind. ;)

I couldn't figure out how to arrange the cookies on the card individually, so I made a tiny baking sheet out of shimmer cardstock and "grouped" them together. I cut a rectangle, rounded the corners, then scored the edges at about 1/4", and folded them up slightly. I used some scrap fabric to sew a teeny tiny oven mitt. Boy, was that a chore. It's upholstery fabric and I had a heck of a time getting it turned right side out after sewing it. But, it did turn out cute.

I used a Fleur de Lis die behind the pan and flower to keep the space from looking too empty there, and a Beaded Circles die for the sentiment.

The rest is pretty self-explanatory, but if you want to know anything specific, just ask and I'll give you the details.

Here's a peek at the inside.

 Thanks for stopping by! Have a fabulous day!

 
Stamps: Sweets of the Season (Flourishes); Daily Junque (Pinkpaislee)
Paper: Gingerbread Fun (Designs by Krista-digital paper); Shimmer Stack (DCWV); Dinner Party-digital paper (Shabby Princess)
Ink: Tim Holtz Distress Ink; Memento; Copic Markers
Dies: Fleur de Lis Pendants & Beaded Circles (Spellbinders)
Accessories: Hemp Cord (Hobby Lobby); flower (Recollections); Corner Chomper; scrap fabric; doily; glitter; Mod Podge; Liquid Pearls; Perfect Pearls Mist; sewing thread
Size: A2 (4.25" x 5.5")
Thanks for visiting my blog!
To have Ink Up delivered to your inbox,
subscribe in the box at the top right of the page.

Wacky World Card Making Day Challenge

Thursday, October 6, 2011


Hi Friends! In honor of World Card Making Day earlier this month, Flourishes issued a wacky color challenge: find a picture of your favorite animated character and be inspired by the colors. This was a fun challenge, and it was so easy to know which character I was going to go with. My favorite animated character is...


If you haven't seen this movie, well...you should. I won't even tell you how many times I've seen it! It's a really funny movie, but I like the Megamind character (the big-headed blue guy) more than the actual story. He's the "bad guy" but only because he likes playing the role. I won't say any more. It would spoil the movie for you.

So, for my Wacky Megamind card, I used blue, green, black, purple, and pink. The blue and black is obvious. The not-so-obvious: green for his eyes, and pink and purple for his cheeks and ears. Isn't he just adorable!


The layout is from the September 2011 Card Maps. I chose the word "Hello" for the sentiment because of a scene in the movie where Megamind answers the phone and says "Olow" (hello, backwards...sort of). Kind of clues you in about how clueless he is about even the simplest things. It's cute. Anyway, here's the inside of the card.


Thanks for stopping by. Have a fabulous evening.
 
Stamps: Bee My Honey (Flourishes)
Paper: Abrianna (K&Co); Best of K&Co
Ink: Tim Holtz Distress Ink
Dies: Nested Lacey Pennants, Ironwork Motifs (Spellbinders)
Accessories: Binding Edge punch (EK Success); Tropical Paisley embossing folder (Sizzix); Corner Chomper; Mod Podge; glitter (Martha Stewart); twine (The Twinery); buttons
Size: A2 (4.25" x 5.5")
Thanks for visiting my blog!
To have Ink Up delivered to your inbox,
subscribe in the box at the top right of the page.

Heartfelt Wishes & BIG News!

Saturday, October 1, 2011


Hi Blog Friends! Let me just start right in with my BIG News! I'm on my First Design Team! I'm now officially on the 2011-2012 PPRS Design Team as a Guest Designer! I'm super excited and can't wait to design my first card with their beautiful stamps! Congrats to all the Design Team members, and thanks, Nicole, for giving me the opportunity to work with such a talented group of designers. Be sure to stop by each of their blogs to say hi, and to see their beautiful creations!

2011-2012 PPRS Design Team:

Amy
Cheryl (That's Me!)

My card today is one I made a few months ago, but had left blank inside. My mother needed a wedding card for my cousin's upcoming wedding, and this particular one is perfect, as they are using sunflowers and rich fall colors in the wedding.

To make this card, I embossed the chandelier on vellum and sponged Wild Honey Distress Ink on the raised areas on the back. Then I turned it over and sponged Crushed Olive Distress Ink on the raised areas of the front. I glued the vellum to white cardstock, then cut it in an oval shape with my Curvy Cutter (This was before I owned very many Spellbinders dies). I added yellow Stickles to the lights of the chandelier and clear Stickles to the chandelier crystals. I sponged pumice stone around the edge of the oval.


I randomly stamped a distressing stamp over the entire bottom panel, then scored the cardstock every half inch. I folded on the score lines and sponged each folded edge with Wild Honey Distress Ink.


For the inside of the card, I typed the bride and groom's names in Word, printed on a transparency, then rubbed it onto the cardstock (thank goodness for homemade rub-ons!). I then used a fancy flourish under that, and a sentiment in the opposite corner, along with a wedding ring stamp.


There are two little flowers in the flourish, in which I placed a tiny dot of gold Stickles, and I also used gold Stickles on the wedding rings. I didn't try to completely fill in the rings--just wanted some sparkle.


And, that's all there was to it. ;)

I hope you have a wonderful weekend, and be sure to come back again, soon. I'll have lots of Prickley Pear stamps to show you, and I'll also have even MORE exciting news to share with you next weekend!

Thanks for visiting!
 
Stamps: Wedding (Inkadinkadoo); Distressing (Glitz); All Occasion Messages (Hero Arts)
Paper: Vellum (The Paper Co.); Darice
Ink: Tim Holtz Distress Ink; Memento
Dies: Lattice Border, Blossom Two (Spellbinders)
Accessories: Arch Lattice Edge Punch (Martha Stewart); Love is in the Air embossing folder (Cuttlebug); Organic Borders embossing folders (Cuttlebug); Curvy Cutter (EK Success); craft knife; Corner Chomper; scoreboard (Martha Stewart); rhinestones; sewing thread; twine (The Twinery); Stickles; Perfect Pearls Mist; foam dots; computer (for personalization)
Size: 6" square
Thanks for visiting my blog!
To have Ink Up delivered to your inbox,
subscribe in the box at the top right of the page.


Big Wish

Monday, September 19, 2011


Hello Friends! For today's card, I used the Viva la Verve September Week 2 sketch, turned on it's side, and the CR84FN38 color challenge colors of bright pink, black, and gray. 

My favorite card making technique is distressing. I love ripping, crumpling, sponging and smearing ink, and generally just aging paper. When I first started making cards, I think I used that technique a lot to cover up my mistakes. Now that I *NEVER* make mistakes, ;oD I just do it because it's fun! Well, I had a ball with this card--I used paint--something I hadn't done before. Check this out! 
As with most of my cards, I didn't start out with this idea. In this case, I felt like the pink Fair Isle border needed a dark frame behind it. I didn't want just a rectangle, so I decided to paint a swipe of black on the background. Because the bg cardstock is slightly textured, the areas that are painted thinly look a little like netting to me. I like the effect.

For the flower, I used Verve stamps, but they didn't seem big enough here, so I tore apart a silk flower and used two of the layers behind the stamped flowers. The butterflies are actually a dark burgundy color, but for some reason, I couldn't get them to come out any color but red in the photo.


The entire time I was making this card, I kept thinking, "this isn't going to work," but once I was finished, I really liked it. Hope you do, too.

And that's it for tonight. Thanks for stopping by!
 
 
Stamps: Sunny Days, Tag Time, Blue Skies (Verve)
Paper: Elegance (Creative Imagination); Sweet Threads (Basic Grey)
Ink: Tim Holtz Distress Ink; Staz-On; Colorbox
Dies: Peony, Fair Isle Border Petites (Spellbinders); Tiny Sweets Scallop (Verve)
Accessories: Classic Butterfly punch (Martha Stewart); embossing powder (Zing); ribbon (Michael's); acrylic paint (Ceramcoat); colored pencils (Primacolor); Enamel Accents (Inkssentials); flower; twine (Twinery); glitter (Martha Stewart); button; Liquid Pearls; foam dots
Size: A2 (4.25" x 5.5")
Thanks for visiting my blog!
To have Ink Up delivered to your inbox,
subscribe in the box at the top right of the page.

Spirit of Love

Thursday, September 1, 2011


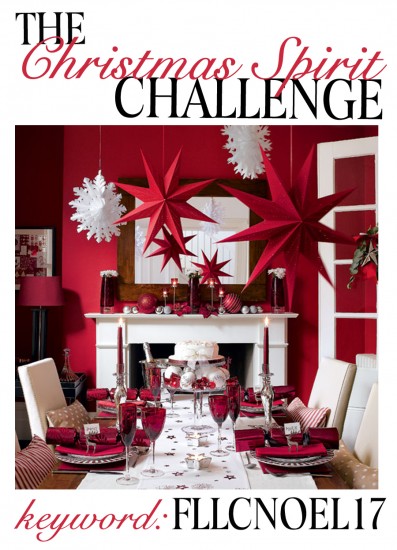
Hi there! Today's card is for two challenges: Flourishes' Christmas Spirit Challenge #17 and the Sweet Sunday Sketch Challenge #132. The Christmas Spirit Challenge is an inspiration challenge using this photo:

Isn't that a gorgeous scene! I love the deep reds and pure white combination, so I used it as my main inspiration for this card. I stamped the stocking image from Flourishes' Christmas Classics set because I felt like they would look perfect hanging from that fireplace mantle in the photo.  I used a Snow Marker for the first time on this card on the white "fur" of the red stocking. You can't see it in the photo, of course, but it's looks great peeking out between the holly leaves. 

Maria, over at Maria's Merry Makings made the prettiest flower for a baby card this week using this tutorial, and I tried my hand at it, too. It was so easy to make, and it's only about half an inch high.   


The two sentiments inside the card are both from the Christmas Classics set, and the swirl stamp is a Studio G stamp I picked up at Michael's in their dollar bin. I thought the "spirit of love" sentiment fit the inspiration photo scene perfectly.  

Thanks for visiting tonight. Hope you have a fabulous evening!

 
Stamps: Chirstmas Classics (Flourishes); Studio G
Paper: Susan Winget Glad Tidings (K&Co); Recollections
Ink: Copics, Memento; Colorbox, Tim Holtz Distress Ink; Craft Smart
Dies: Lacy Squares; Blossom Two, Labels One; Curved Rectangles (Spellbinders)
Accessories: Parisian Edger (EK Success); Dots, Circles & Stars Embossing Folder (Sizzix); Raffia (Michaels); Snow Marker (Marvy); Mulberry Paper Holly Leaves (Recollections); Corner Chomper; rhinestones; brad; Stickles; glitter (Martha Stewart); Perfect Pearls
Size: xA2 (4.25" x 5.5")
Thanks for visiting my blog!
To have Ink Up delivered to your inbox,
subscribe in the box at the top right of the page.

Peace Hope Love

Tuesday, August 30, 2011

  
Hello Blog Friends! Notice anything different on my blog? I've got my new Terrific Top 3 badge from CR84FN Color Challenge over there on my sidebar! Isn't it the cutest! Thanks again to the DT at CR84FN for choosing my card as a Top 3!

The August Viva la Verve sketch challenge is almost over for this month, and I was thinking I might not get all five cards made, but I did it! This is the last one. The theme for this week's Shabby Tea Room challenge is "Birthstones," so I incorporated it into this card, also. And, since my birthday is in November, I was "inspired" by the Topaz.

This card began as a blue and gold card--gold for Topaz and blue for Blue Topaz. The Blue Topaz is actually sometimes used for a December birthstone, but since I used to dislike the color of my birthstone (has anyone ever actually liked having the Topaz as their birthstone as a child?), I always used the Blue Topaz, figuring a topaz is a topaz. Anyway, by the time I got around to actually putting this card together, I ended up with a completely different color scheme of brown, gold and red and turned it into a Christmas card. A few weeks ago, I set myself a goal of at least one Christmas card a week, which I am already behind on, so maybe this was my subconscious mind getting me back on track. ;)


(For all the paper edges in this card, including the inside, I sponged either Tea Dye, Walnut Stain, or Black Soot Distress Ink before gluing them down.) 

I started by stamping floral motifs, from Verve's Sunny Days set, in gold pigment ink onto the brown cardstock. You can see them in the photo, but in person, they sparkle and shine. Then, I glued the patterned paper rectangles to dark red cardstock, leaving just a teeny little red edge showing. I zig zagged the edges with gold thread and was careful not to go over the red edges. For the tag, I used a tag stamp from Verve's Sweet Treats set and heat embossed with gold glitter embossing powder, then cut it with the Sweet Scallop die. I put a large eyelet in the top of the tab so I could add the glitter ribbon. That is some seriously stiff (and flaky) ribbon. I had brown glitter everywhere by the time I had it tied to the tag. It was in the Halloween dollar bin at Joann's. I bought four different colors, but once it's used up, I probably won't buy any more. The sentiment is from Flourishes Holiday Greetings set.

On the sketch, there is a circle added to the tag, but I didn't want to cover up this one, so I used two of the circle Spellbinders dies to cut a circular frame out of red cardstock. I made glitter glue with Mod Podge and red glitter and painted it on the frame. After it dried, I added it to the tag. I love the way it turned out. Finally, I tied a yellow ribbon on and added a large gem brad in "topaz" gold.

For the inside, I used another stamp from the same Flourishes set, punched the corners of the white cardstock with a Fleur de Lis edger, and layered up the brown, red, and gingham papers as a frame. I just love how having just a sliver of red showing creates a piping cord effect.  

Thanks for stopping by! Have yourself a terrific Tuesday!
 
Stamps: Sunny Days & Sweet Treats (Verve); Holiday Greetings (Flourishes)
Paper: Gingerbread Fun (Designs by Krista-digital paper); The Breathe Paper Collection (Prima); Bazzill Basics; Coredinations; The Paper Studio
Ink: Tim Holtz Distress Ink; Stampabilities; Colorbox; Staz-On
Dies: Sweet Scallop Tag Die (Verve); Standard Circles Lg (Spellbinders)
Accessories: Fleur de Lis Edger (EK Success); Gold Glitter Embossing Powder (Zing); Red Glitter (Martha Stewart); glitter ribbon (Joann); satin ribbon (Michael's); gem brad (Recollections); eyelet (We R Memory Keepers); Mod Podge; foam dots
Size: A2 (4.25" x 5.5")
Thanks for visiting my blog!
To have Ink Up delivered to your inbox,
subscribe in the box at the top right of the page.