Showing posts with label Sweet Sunday Sketch Challenge. Show all posts

Paper Sweeties June Release Rewind!

Tuesday, June 16, 2015

To finish off Paper Sweeties' Release Week, we have a Release Rewind where we combine new products with old. 
I decided to dress Jake and Emma up in some beach attire from the new Surf's Up and At the Beach stamp sets. I love that you can move Emma's pigtails just by snipping them and gluing them back on wherever you want them. I thought they should be low for this card. I colored both of the kiddos with Copics then paper pieced their swimsuits. The embossed sentiment is from the At the Beach set, too. I accidentally used a somewhat chunky embossing powder, so the font isn't as fine as it could be, but I didn't have another piece of that paper, so I went with the chunky look anyway.

This entire beachy release is one of my favs! Not only are the stamps super cute, but every single stamp and Sweet Cuts die in every one of the new sets works well together. And, it turns out, the new releases "play well with others," too. Check out my Teamies' blogs for more fabulous ideas for combining new and old sets:


And, you've still got time to enter the June Paper Sweeties Party Time Inspiration Challenge for a chance to win a Paper Sweeties Gift Certificate!

papersweeties-inspiration#32


Have an amazing week!

I'm entering this card in the following challenges:
Sweet Sunday Sketch Challenge #272
Simon Says Wednesday Challenge: Friends or Superhero
613 Avenue Create Challenge #128: Anything Goes
Corrosive Challenge #226: Pile It On
Curtain Call Inspiration Challenge: Flip Flops


~Hugs,

Supplies Used:

Thanks for visiting my blog!
To have Ink Up delivered to your inbox,
subscribe in the box at the top right of the page.

Paper Sweeties March Release Sneak Peeks!

Friday, March 13, 2015

Hello Friends! It's Friday, the 13th! And, what does that mean? Well, what else...it's time for the March Sneak Peeks at Paper Sweeties! Yay!!! You're going to love this month's release. As soon as I saw the Sweet Cuts Stitched Tags #1 dies, I knew I was going to have to use them immediately!
After cutting three tags from designer paper, I heat embossed Easter and Spring sentiments from the Jelly Bean Time stamp set onto two of the tags, and on the third tag, I added a fussy cut basket from the new I Pick You stamp set and filled it with eggs from the Bloom & Grow stamp set. Three different trims are tied to the tags, with a Cotton Candy Twine bow added to the bottom tag. Finally, I added several clear sequins from the Sweetheart Mix Sequins, and one of the pink ones to the basket.

Just behind the tags, using a stencil and molding paste, I added a Harlequin design to a piece of kraft cardstock, then spritzed it with several colors of Dylusions Ink Spray. After everything dried, I sanded the stenciled area to tone down the colors a bit, and added white paint to the torn edges, and a bit of wonky sewing around the edges, also. Behind that, is a white layer, embossed with a chicken wire design, and accented with Brushed Corduroy ink.

To leave a smooth area for personalization on the inside, I used an embossing diffuser with the chicken wire embossing folder, then stamped a sentiment from Jelly Bean Time and a sweet little butterfly from the new I Pick You stamp set.

Be sure to check out the rest of the Paper Sweeties Design Team for more inspiration:

Cheryl Lea (you are here)
Debbie Marcinkiewicz – Paper Sweeties
Jill Norwood 


Thanks for stopping by!  Come back tomorrow for another sneak peek of the I Pick You stamp set! It's a real cutie!

I'm entering this card in the following challenges:
Sweet Sunday Sketch Challenge #259: Use any previous SSSC sketch (I used #248)
Your Next Stamp Color Challenge #9
Simon Says Stamp Monday Challenge: B is for... (Basket)
613 Avenue Create Challenge #114: Anything Goes
Really Reasonable Ribbon Challenge #113: Flower and Ribbon or Trim
Fresh Brewed Designs Challenge: March 11-17--Flowers

~Hugs,

Supplies Used:

Thanks for visiting my blog!
To have Ink Up delivered to your inbox,
subscribe in the box at the top right of the page.

You Make Me Smile :)

Thursday, January 5, 2012

Hello Friends, and Happy Thursday! I won't keep you but a sec with this little card I'm adding to the notecard set I'm working on.
Check out that stitched border. I finally used the sculputure stitch successfully on my sewing machine! Remember, back in November it got a little wonky on me. :)

The little orange sparkly dots are Stickles. I can't say too many times: I Love Stickles! Well, I really wanted to put them all over that blue lattice border, too, but I refrained, instead just putting teeny tiny dots on the points of the sentiment layer die cut.


I'm really enjoying the CR84FN45 colors and the Sweet Sunday Sketch Challenge #149 was wonderful as the layout. It was perfect for making this card flat for mailing, and also so it would fit in the dvd tin when it's all finished. I think I'll be able to get two flat cards, two dimensional cards, and the envelopes in the tin without squishing anything too much.

Thanks for visiting, and have a super day!


Stamps: Blue Skies (Verve)
Paper: Que Sera Sera (K&Co); Pocket Full of Posies (DCWV)
Ink: Tim Holtz Distress Ink; Colorbox
Dies: Ironwork Accents, Lattice Border (Spellbinders)
Accessories: Ribbon (Michaels); Stickles; Paper Piercer; Sewing Thread
Size: 4 Bar (3.5" x 4.875")
Thanks for visiting my blog!
To have Ink Up delivered to your inbox,
subscribe in the box at the top right of the page.

Happy Turkey Day!

Tuesday, November 15, 2011

Hi Friends! I've got a cute turkey card to share with you today, but before I do, I have to show you the blog candy I received from Melissa at Tuesday Morning Sketches for winning the Think Pink challenge in October.


Wow! What fab candy! She even sent me three of the beautiful cards she made during the month-long challenge. If you haven't played along at Tuesday Morning Sketches, mosey on over there and give it a try. You'll love her sketches! Melissa just posted the newest sketch today, so you have until this coming Sunday at 8PM to enter.

And, as a reminder, the Prickley Pear Rubber Stamp November sketch challenge is open to everyone now. You don't have to use PPRS stamps, and you have until November 30th to enter. You should see the samples the DT have for the challenge this week...AWESOME!

Now for that turkey card. The sketch is Sweet Sunday Sketch Challenge 143, and the Outlines Monday Challenge 26 theme is Thanksgiving or Fall.

Isn't that little guy sweet? Not too happy looking, though, is he? I guess I can't blame him, this time of year. I colored him with Copics, put Glossy Accents on his beak, and black Enamel Accents on his eyes. The dark red shiny dots in the corners of the turkey square were colored with a Copic, then covered with Glossy Accents, too. Now that they've dried, they look like little bits of cranberry sauce on the card. I used Stickles on the green border around the turkey.

For the sentiment, I cut the tag out of white cs, then sponged Peeled Paint Distress Ink on the edges, then Walnut Stain. I sponged Wild Honey over the entire tag, then sprayed it with Perfect Pearls Mist in Heirloom Gold (I just LOVE that stuff!). The sentiment is heat embossed in Chocolate Brown.

I think the stitch I used around the bg paper is called a feather stitch. I thought it was appropriate for a turkey card. The burgundy stitching along the sides of the dp layer is the same stitch I used on my Holiday Surprise card a few days ago. This time, I didn't make any sudden jags while sewing, but did end up with slight curved lines rather than straight ones. I think I need to practice using that stitch before I use it on another card. To make it, the machine has to do a lot of forward and backward movements and it makes the paper jump around. It's a cool stitch if I can learn to control it!!! :) The bottom edge of the dp is punched with a scallop punch and I distressed the top with my Distrezzer. Fantastic tool, by the way.

I went a little crazy with the Stickles, but I just love sparkle on a card, and the Fleur de Lis die cut looked a little bare without it.

And, of course, I couldn't have all that glam on the front and not have just a little bit inside, too.

Thanks so much for stopping by today! And, don't forget to play in the Prickley Pear Sketch Challenge, as well as the Tuesday Morning Sketch Challenge. Fab sketches, sweet prizes!

~Hugs,
 
Stamps: Turkey Square Lg, Tiny Happy Turkey Day (Outlines Rubber Stamps)
Paper: Tim Coffey Fall Nat Pad (K&Co); Shimmer Stack (DCWV)
Ink: Tim Holtz Distress Ink; Memento; Versamark; Colorbox; Copic markers
Dies: Fleur de Lis Pendants, Fancy Tags, Curved Rectangles (Spellbinders)
Accessories: Scallop Diamond Edge Punch (EK Success); embossing powder (Zing); Clair de Lune velvet ribbon (Fancy Pants Design); satin ribbon (Michaels); Stickles; Enamel Accents (Inkssentials); Pearl Pen; Glossy Accents; Perfect Pearls Mist; sewing thread; foam dots
Size: A2 (4.25" x 5.5")
Thanks for visiting my blog!
To have Ink Up delivered to your inbox,
subscribe in the box at the top right of the page.

Coneflower Birthday

Thursday, September 15, 2011

Hello there! I've got a card today that is for two challenges: Flourishes Colors of Fall Challenge and the Sweet Sunday Sketch Challenge #134. Aren't those fall colors yummy! I only needed to use one of the colors for the challenge, but I liked them so much, I went five: deep teal, cedar, phlox, coffee liquor, and quarry.


I inked up the coneflower stamp, from Flourishes' With Gratitude set, with Memento ink in Bamboo and colored the flowers with Copics, leaving the centers of the flowers alone.

See that blue background behind the flowers??? I finally got my gizmo! It's going to take a lot of practice (I ended up having to redo this image three times to get it even close to okay), but I can already tell that my Copic airbrush is going to get some use. I love it!

I followed the sketch almost exactly except I added a second velvet ribbon over the striped one and added an oval sentiment tag. Oh, and I promised my daughter that I would mention that the buttons came from her stash. Thanks, Sweetie! ;D


Thanks so much for stopping by! 
 
Stamps: With Gratitude, Kids Play, Moments in Time (Flourishes)
Paper: Tim Coffey-Cottage Garden (K&Co); Life's Journey (K&Co); So-So-Sweet (Paper Studio)
Ink: Tim Holtz Distress Ink; Memento; Copic Markers
Dies: Curved Rectangles, Fair Isle Border Petites; Classic Ovals; Fleur de Lis Motifs, Labels Sixteen (Spellbinders)
Accessories: Striped Ribbon (American Crafts-Elements); Velvet Ribbon (Fancy Pants Designs); Pearl Brads (Recollections); Buttons; Foam Dots
Size: A2 (4.25" x 5.5")
Thanks for visiting my blog!
To have Ink Up delivered to your inbox,
subscribe in the box at the top right of the page.

Tomato Soup

Wednesday, September 7, 2011

Good Morning to you! I hope your week is a good one so far. 

Before I tell you about today's card, a quick Thank You to Lydia (Understandblue at Splitcoaststampers) for posting my Spooky Tree Halloween card on Facebook yesterday. It generated 1,500 views to that particular card in just one day! Wow! I didn't even know that was possible. 8~D

I made today's card using the Sweet Sunday Sketch Challenge #133. It follows the sketch fairly closely, except that I put copper brads at both ends of the rickrack, and where 3 small embellies would be in the upper left corner, I used a Leafy Sprig die cut, and I put a smaller one in the lower right corner to balance it out. They look a little bit like tomato leaves when they are cut without using the coordinating stamp, don't they?

I'm also playing along with the Flourishes Bring Back Beauty Challenge #14. This month's theme is "The Beauty of Color," and the challenge is to make a monochromatic card. I couldn't begin to tell you what the color of my card is, but since it features tomatoes, I'm calling it tomato soup. Even the rickrack looks like it's been colored with tomato soup. Okay, I know that the leaves are green, but I couldn't find a way around that. :D  I was a little bit concerned that I wouldn't be able to do this stamp justice because of all the red I would be using, but it turned out okay. I did have to use yellow and white colored pencils with mineral spirits to highlight the bumps on the tops of the tomatoes. I never seem to leave enough room for highlights when I'm using Copics.

For the inside of my card, I stamped the tomato image in Rusty Hinge Distress Ink. I stamped off onto scrap paper one time before stamping my card so the image would be light enough to be able to write a message over it. I love the look of this stamp--even when it's left plain it's beautiful.  

Thanks for stopping by! Have a great day!!!

Stamps: Italian Garden, Garden Fresh (Flourishes)
Paper: The Breathe Paper Collection (Prima)
Ink: Tim Holtz Distress Ink; Memento; Staz-On; Copic markers
Dies: Std Circles Lg; Lotus Pendant (Spellbinders); Leafy Sprigs (Verve)
Accessories: Diamonds in Diamonds embossing folder (Sizzix); rickrack (Fancy Pants Designs); antique copper brads (Making Memories); colored pencils; sewing thread; Corner Chomper
Size: A2 (4.25" x 5.5")
Thanks for visiting my blog!
To have Ink Up delivered to your inbox,
subscribe in the box at the top right of the page.

Spirit of Love

Thursday, September 1, 2011


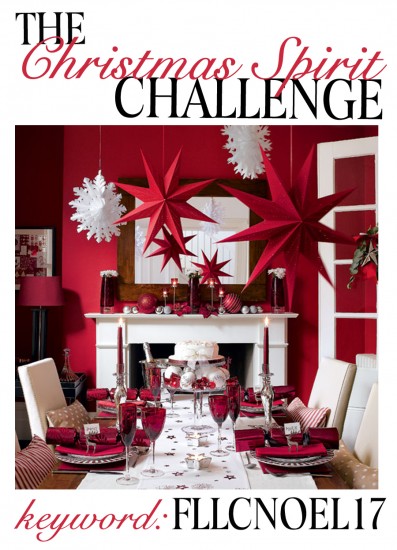
Hi there! Today's card is for two challenges: Flourishes' Christmas Spirit Challenge #17 and the Sweet Sunday Sketch Challenge #132. The Christmas Spirit Challenge is an inspiration challenge using this photo:

Isn't that a gorgeous scene! I love the deep reds and pure white combination, so I used it as my main inspiration for this card. I stamped the stocking image from Flourishes' Christmas Classics set because I felt like they would look perfect hanging from that fireplace mantle in the photo.  I used a Snow Marker for the first time on this card on the white "fur" of the red stocking. You can't see it in the photo, of course, but it's looks great peeking out between the holly leaves. 

Maria, over at Maria's Merry Makings made the prettiest flower for a baby card this week using this tutorial, and I tried my hand at it, too. It was so easy to make, and it's only about half an inch high.   


The two sentiments inside the card are both from the Christmas Classics set, and the swirl stamp is a Studio G stamp I picked up at Michael's in their dollar bin. I thought the "spirit of love" sentiment fit the inspiration photo scene perfectly.  

Thanks for visiting tonight. Hope you have a fabulous evening!

 
Stamps: Chirstmas Classics (Flourishes); Studio G
Paper: Susan Winget Glad Tidings (K&Co); Recollections
Ink: Copics, Memento; Colorbox, Tim Holtz Distress Ink; Craft Smart
Dies: Lacy Squares; Blossom Two, Labels One; Curved Rectangles (Spellbinders)
Accessories: Parisian Edger (EK Success); Dots, Circles & Stars Embossing Folder (Sizzix); Raffia (Michaels); Snow Marker (Marvy); Mulberry Paper Holly Leaves (Recollections); Corner Chomper; rhinestones; brad; Stickles; glitter (Martha Stewart); Perfect Pearls
Size: xA2 (4.25" x 5.5")
Thanks for visiting my blog!
To have Ink Up delivered to your inbox,
subscribe in the box at the top right of the page.

SSSC131

Friday, August 26, 2011

I've got a Sweet Sunday Sketch Challenge card to share with you today. This is a great sketch for a masculine card because there aren't any ribbons or bows, and few embellishments.


I left the scalloped edging off the right side, and opted, instead, to put the bracket on the left of the main panel with the Happy Anniversary sentiment on it.

I used the emboss resist technique for the leaves, embossing them with white embossing powder, then sponging several colors of distress ink over them.

Just as a reminder, if you haven't participated in Flourishes Birthday Blog Hop, head over there and check it out. Lots of great goodies up for grabs!

And, that's it for me tonight. Thanks for stopping by!
 
Stamps: Leaves (Cloud 9 Designs); Everyday Sayings (Hero Arts)
Paper: Origins (Basic Grey); Life's Journey (K&Co); Recollections; The Paper Studio
Ink: Tim Holtz Distress Ink; Staz-on; clear embossing powder
Dies: Brackets (Tim Holtz Alterations--Sizzix)
Accessories: Binding Edge Edger (EK Success); embossing powder (Ranger); Gridlock embossing folder (Sizzix); Flora & Fauna Stud Metal Art (K&Co); foam dots
Size: 5" x 5"
Thanks for visiting my blog!
To have Ink Up delivered to your inbox,
subscribe in the box at the top right of the page.

Never too late

Monday, August 8, 2011


The card I made for today is for two challenges: the Sweet Sunday Sketch Challenge #129 and Flourishes Shades of Sunset Color Challenge (sunset colors). I love the sketch because it is a long, skinny card--fun--and I bought two of the new dimensional punches from EK Success that make rolled flowers, so a long card was easily big enough to be able to use one of the flowers. For the color challenge, rather than use early evening warm sunset colors, I chose to go with the late evening, cooler colors of purple, blue, and deep pink.


I used a pale blue cardstock for the flower and cut two 12" strips, layered and glued them together, inked them with Distress Inks on both sides, then rolled the flower up. After gluing it together, I curled the outside petals down, and the center petals in. I glued a large dark pink rhinestone down inside the flower to cover the center of it. I really like how this flower looks, hence all the close-up photos at the top of the post ;), but it is over an inch high, so I might not use it on a card that I was going to mail someone. Also, it's not in this post, but the carnation dimensional flower punch would make great trim for a crown for a little prince or princess :~D

For the sentiment panel, I used stamps from the Kids at Play set, distressed the edges, then sponged several Distress Inks on the edges, concentrating warmer colors on the left and cooler on the right behind the tree for a "sunset" look. The tiny clear rhinestones are stars in the sky.  I layered this panel on top of a tilted Labels Small die cut that I first embossed with the Tropical Paisley embossing folder.

The rest is pretty standard, I think. Here's a peek at the inside:

Thanks for stopping in, and have a terrific week!
 
Stamps: Kids at Play (Flourishes); Celebrate (Studio G)
Paper: Abrianna (K&Co); Bazzill Basics Tropical Stack; Recollections; The Paper Studio
Ink: Staz-On; Tim Holtz Distress Inks
Accessories: Dies: Labels Small, Parisian Accents (Spellbinders); Punches: Fleur de Lis Edger, Gerber Daisy Dimensional Punch (EK Success); Tropical Paisley embossing folder (Sizzix); ribbon (Offray); twine (Twinery); rhinestones, distressing tool, Perfect Pearls (mixed with water for a mist)
Size: #10 (3.75" x 9")
Thanks for visiting my blog!
To have Ink Up delivered to your inbox,
subscribe in the box at the top right of the page.

You've got a friend

Monday, August 1, 2011

Good Monday morning to you, friends! I hope you all had a good weekend and are looking forward to whatever this week holds for you. I'm starting off this week with a sweet card that almost didn't get made. It's for the sketch challenge at Sweet Sunday (SSSC128),


and the color challenge at CR84FN (CR84FN35).


I couldn't tell you what my problem was today, because I like the sketch and the colors are great--especially that lovely celery green color. ;)  But, I worked on this card for hours before I finally figured out what I wanted to do.

Both the inside and the outside are fairly simple.  


And, this simple card calls for a simple post. Have a Marvelous Monday! 
 
Stamps: Gem Stone Birds (Inkadinkadoo); Sweet Nature (Flourishes)
Paper: Pin Dots (Paperwhite); Watercolor Bouquet (K&Co); DCWV
Ink: Colorbox; Stampabilities; Tim Holtz Distress Ink
Accessories: Spellbinders Labels Thirteen die; Scallop Dot Edge Punch (Martha Stewart); Dimensional Butterfly (Cheery Lynn Designs); clear embossing powder (Zing); ribbon (Offray & Michaels); rhinestones, leaf pins (Maya Road); flowers (Recollections); Perfect Pearls; Dimensionals; sewing
Size: 4.25 sq.
Thanks for visiting my blog!
To have Ink Up delivered to your inbox,
subscribe in the box at the top right of the page.

Snips & snails

Monday, July 25, 2011

Hi there! I've got a cute baby boy card for you today. I don't often have an occasion to make a baby card--especially a boy one--so I was glad to see the Sweet Sunday Sketch Challenge 127. It's perfect for a baby card, which I need for a shower next weekend.

Remember the nursery rhyme about what little boys and little girls are made of? Well, I could--sort of. So, I looked it up to be sure. It used to be "snips and snails and puppy dog tails" for the boys, but according to Wikipedia, the modern version is "frogs and snails...." If I'd wanted to use a frog stamp, I may have gone with the modern version, but luckily, I had a snail stamp because I prefer the alliteration in the original version best. I printed the rhyme on a transparency, then rubbed it onto the cardstock. I love being able to do that!

It's hard to see in the photo, but the blue panel is embossed with the Critters embossing plate from Fiskars--lots of insects and amphibians.

I just love that little smiling snail. Although, he does make me feel a little twinge of guilt for the way I treated his distant relatives when I was young (:-\

Thanks for stopping in for a visit. Have a joy-filled week, and come back soon!
 
Stamps: Don't Bug Me (Recollections)
Paper: Colorbok Pattern Pack; So-So-Sweet Pack (Paper Studio); Coredinations; The Paper Co.
Ink: Tim Holtz Distress Ink-Tumbled Glass; Copics: 0, Y21, YG03, G21, B00, BG34
Accessories: Critters embossing plate (Fiskars); twine (Twinery); Scallop Dot Edge Punch (Martha Stewart); buttons; rhinestones; adhesive dots; dimensionals; transparency film (for computer-generated sentiment)
Size: A2 (4.25" x 5.5")
Thanks for visiting my blog!
To have Ink Up delivered to your inbox,
subscribe in the box at the top right of the page.