Showing posts with label embossing. Show all posts

Mojo Monday 400 Contest and Designer Search!

Thursday, June 4, 2015

Mojo Monday is celebrating it's 400th sketch challenge this week! Whoo Hoo! Congratulations Julee!!! I have a special fondness in my heart for Mojo Monday. It was the very first challenge I entered when I started making cards 4 years ago (ok, I put a link to that first card, but be gentle with any comments; I was brand new at cardmaking). A few months later, I kicked off my own blog with another Mojo Monday challenge entry. So, while I haven't been with Mojo Monday since it's beginning, Mojo Monday has been with me since mine!

To celebrate this Mojo milestone, Julee is doing two things: using her very first sketch for this week's challenge, and offering two participants a spot on the Mojo Monday DT! Exciting!!! I had a blast creating my own embossed background paper for this card, using the Verve Bloom & Grow stamps, probably my most used Verve set. 
I love how the background turned out, and it was so easy to make. I just spritzed a piece of white cardstock with water, then used Dylusions Ink Sprays to add color. After drying it completely, I stamped the leaves from the Bloom & Grow set in Versamark ink and heat embossed them with copper embossing powder. To give the ink sprays a softer look, I sprayed water over the entire sheet one more time after embossing, then let the paper air dry in a book press so it would dry flat. The sentiment, heat embossed in copper, is from the On Occasion stamp set

The inside of the card has a simple message, from a Penny Black stamp set, which might seem odd for a Father's Day card, but it is perfect for my husband. Our sweet, sweet daughter is with us today because eleven years ago my husband was willing to trade in his long-anticipated, quiet, peaceful, golf-filled retirement days for my tiny, newborn granddaughter. And, he didn't just agree to adopt her, he insisted on it, and I am grateful for that selfless act every single day (even when I'm ticked off and want to lock him outside of the house!) ;)


I hope that the next time I post a Mojo Monday card it's as a member of the DT, but even if I'm not one of the lucky winners of a DT spot, I'll continue to enjoy Julee's sketches and challenges, both at Mojo Monday and Viva la Verve

Thanks for stopping by, and have a Mojo-filled day!

I'm entering this card in the following challenges:
Mojo Monday 400
Simon Says Wednesday: Make it Masculine
613 Avenue Create #126: Anything Goes
Sugar Pea Designs SPD16: Hey Dude!
Corrosive Challenge Blog #225: Anything Goes

~Hugs,

Supplies Used:

Thanks for visiting my blog!
To have Ink Up delivered to your inbox,
subscribe in the box at the top right of the page.

Clip Heart

Thursday, February 12, 2015

This was a fun card to make, and super simple, too! Who knew basic office supplies could look so pretty, right? 
To make the main portion of this card I used a handful of round paper clips and two jumbo paper clips. (I actually still call the double oval clips, "Gem clips," but usually no one knows what I'm talking about. What do you call them?) After making two heart shaped clips from a jumbo paper clip, I cut the excess wire off one heart for embossing, then laid out the round paperclips and the modified heart shaped clip on a die cutting plate, placed a piece of white cardstock over them, then topped that with an embossing pad and another cutting plate, and ran it through my Big Shot. I colored the paper by sponging several colors of Distress ink over the embossed areas, blending the colors in between. After die cutting the paper with a distressed edge die, I sponged more ink along the edges, then distressed further by spritzing water onto the paper. Finally, I sprinkled some chunky white embossing powder onto the paper and heated it from the back side (to keep from blowing the powder off before it had a chance to melt and stick to the paper). After assembling the card front, I attached the 2nd heart clip to the top of the card.
To tie in with the front of the card, I embossed just the modified heart clip in the corner of a white die cut, then sponged Distress ink over that, and also over the entire die cut, while it was still in the die.

See? Easy peasy! Have a great day!

I'm entering this card in the following challenges:
Simon Says Stamp Monday Challenge: Red + Pink
Oddball Art Stamp: Add Some Sparkle Challenge
Robyn's Fetish Challenge #250: Valentine Cards
TCP Tuesday Challenge 283: Anything Goes

~Hugs,

Supplies Used:

Thanks for visiting my blog!
To have Ink Up delivered to your inbox,
subscribe in the box at the top right of the page.

Vintage Santa

Monday, November 25, 2013

 
I'll make this a really quick post. It's time to finish up with the Viva la Verve sketches for November, so I made a Christmas card with the Week 4 sketch.
I used a new-to-me Tim Holtz Christmas stamp for this card, heat embossing it with clear ep, on kraft cs, then sponged red and green Distress Inks over parts of it. The green layer is a paper doily that I misted with Dylusions Ink Sprays. I like the color, but every time I look at this card, I think of lettuce! ;-) For the bg, I die cut a piece of glitter cs and topped it with a text dp die cut. The fishtail banner was hand cut. I layered raffia and twine bows and topped it off with a brad that I made with my I-Top Brad Maker.
Here's the inside. The red and white striped edges were from the same chevron dp that I cut the fishtail banner from. I just cut it right on the points to make it look striped. The sentiment and Christmas bell are from a Recollections stamp set called Vintage Christmas.

And, there you have it. Short and sweet! :)

Thanks for stopping by, and enjoy your week!

I'm entering this card in the following challenges:
Viva la Verve November 2013 Week 4 Sketch Challenge
The Corrosive Challenge #188: Happy Holidays
Simon Says Monday Challenge: Countdown to the Holidays
Paper Issues: It's Beginning to Look a Lot Like Christmas

~Hugs,
 
Supplies: 

Thanks for visiting my blog!
To have Ink Up delivered to your inbox,
subscribe in the box at the top right of the page.

You Make Me Smile

Friday, September 27, 2013


Hello, and Happy Friday! I hope you had a fab week and are looking forward to an even better weekend! I'm going to be brief here, as I have two more cards to post in a little while. This card was pretty simple to put together, so I won't go much into what I did. The card recipe is at the end of the post.

I made this card for my DD, who recently had her first AR celebration. She earned a whopping 440 points! It took her about 3 months to do that last year! Needless to say we are really proud of her.
I love this sweet image, and it colored up nicely, but I have to confess that the "dirt" was not my original intention. I've been working on my shading, and it didn't go too well on this image, so rather than have it look like bruises, I turned my mess into dirt. It ended up being cute, but for a sec there, I thought I was going to have to start all over! :) I used a sketch from the September 2013 Week 2 Viva la Verve Sketch Challenge for the layout of the card.

The swirl background on the inside of the card was made with Faded Jeans Distress Ink and a swirl stencil.

That's it...short and sweet! I'll be back later with another card. 

I'm entering this in the following challenges:
Viva la Verve Sketch Challenge VLVSep2013, Week 2

~Hugs,
 
Supplies:
Thanks for visiting my blog!

To have Ink Up delivered to your inbox,

subscribe in the box at the top right of the page.

Timeless Tuesday #236: Double Wrap

Tuesday, September 3, 2013


Happy Tuesday! It's time for another Timeless Tuesday Challenge


The amazingly talented Jenny is our hostess this week, and she is challenging us to...


Two times the Ribbon! Some ribbon is good, more is always better! Use more than one kind of ribbon on your creation.
For my card, I stamped the pinwheel image and sentiment from Flourishes Pinwheels and Popsicles stamp set in Memento Tuxedo Black ink, onto Flourishes Classic White cs, then stamped it onto dp from the My Mind's Eye Happy Days paper pad, fussy cut, and paper pieced it. For the card base, I used the light pink Emma Burlap cs, from the Flourishes Color Made Easy Candy Pink Paper Collection. I embossed the bottom two inches of the bottom front of the card base, added a cute pinwheel design dp to the upper portion, along with the sentiment panel, then used a strip of red Prima Bloomers and a sweet satin bow for my "Double Wrap." ;)  I finished it off with a sparkly embellie on the bow, a few Stickles dots on the sentiment panel, and silver pearls.
On the inside, I sponged Spun Sugar Distress Ink inside the die, then stamped the birthday cake image and sentiment from the same stamp set, with Memento Summer Sky ink.

Well, that about wraps it up for me! (I just HAD to say that!) ;)  I hope you'll play along with us this week! And, remember you don't have to use Flourishes stamps, but if you do, you get two ballots toward the weekly prize! You can find all the details for the challenge here.

Be sure to visit the rest of the design team, including Kathy Roney, our September Guest Designer, to see their beautiful creations, and leave them a little blog love while you're there!
Thanks for stopping by, and have a wonderful week!

I'm entering this in the following challenges:
Simon Says Stamp Monday Challenge: Stamping All-Stars (my Grand Calibur for embossing and die-cutting is my All-Star!)
Simon Says Stamp Wednesday Challenge: Anything Goes

~Hugs,

Supplies Used:

Thanks for visiting my blog!
To have Ink Up delivered to your inbox,
subscribe in the box at the top right of the page.

Swallowtail Courage

Thursday, April 18, 2013

Hi Friends! I hope you've had a good week so far. Ours has been interesting, but extremely trying. We have honeybees in one of our exterior walls! What a frustrating mess! We thought they were just in a garage wall, and that the beekeeper had gotten all of them a few days ago, but they are back with a vengeance!!!

But, on to my card...
The design is from this week's My Favorite Things Wednesday Stamp Club (MFTWSC120), and the color palette is from The Play Date Cafe Color Challenge #178 (PDCC178). It was a simple card to make, but it may not be obvious how I did it, so here are the deets: The card base is gray. I heat embossed the beautiful Swallowtail image on white cs, with a bright pink embossing powder then randomly swiped a Squeezed Lemonade Distress Ink pad directly on the cs. The edges were sponged with Memento London Fog. The layers behind the image are gray, then yellow, then pink. The final, largest layer is gray cs, dry embossed with a Bubble embossing folder. Then I used a silver and a white paint dauber along the outer edges, finishing it with Black Soot Distress Ink.

For the flags, I die cut them, then folded them along the yellow twine, gluing the ends together, and I added just a tiny bit of glue to the back to hold them in place over the image, but I left the pointy ends of the flags loose. The clear gems were added to each flag with Glossy Accents.

On the inside, I used a smaller butterfly stamp randomly on white cs, punched the corners with a Stub Corner Chomper, stamped the sentiment in gray ink, then again in pink ink, and sponged yellow, then black ink along the edges. It is mounted to pink dp and the yellow pearls in the corners are dots of Liquid Pearl.

Oh, what I would give for a butterfly infestation rather than honeybees!

Thanks for stopping by, and have a fantastic, bee-free weekend. :)

I'll be entering this card in the following challenges:

My Favorite Things Wednesday Stamp Club #120 (MFTWSC120)
The Play Date Cafe Color Challenge #178 (PDCC178)

~Hugs,

Stamps: Swallowtail, Papillon Potpourri (Stampin Up); Words of Wisdom (Verve)
Ink: Distress; Memento; Versamark
Dies: Banner Stacklets 1 (Taylored Expressions)
Accessories: Bubble Embossing Folder (Sizzix); embossing powder (Recollections); twine; mini round gems (Recollections); Stub Corner Chomper; Liquid Pearls; acrylic paint
Size: A2 (4.25" x 5.5")


Thanks for visiting my blog!
To have Ink Up delivered to your inbox,
subscribe in the box at the top right of the page.

Nature Mini Card Set & Box

Wednesday, February 27, 2013

Hi Friends! Can you believe it? I did it! This is the last challenge of the SCS Love Fest that I needed to make!!! This is for the Taylored Expressions Love Fest challenge, A Little Love Goes A Long Way, and the challenge was to create a set of 3" x 3" cards, or smaller. I've been meaning to do this anyway, because I like to include a little card when I mail a package to someone, but kept putting it off. Now, it's done!
Here are the cards in their own little box, all put together.


Blue card Purple card
Yellow card Green card
And, here are each of the cards, individually. For these cards, I stamped my "nature" images with white Colorbox ink, then heat embossed with white embossing powder. With spring just around the corner, I chose an Easter-y palette, and used white cs as my base. If you know me, you know I love distressing, but I didn't want a dirty look, so after tearing the edges of each image panel, I inked the torn edges with Distress Inks that were the same color, but a few shades darker than the cs. After inking, I spritzed my craft mat with water and dragged the inked edges through it to give them a water stained look, and also to weaken the edges so I could roll and tear them just a little bit more. ;) I embossed just the front of each white card base, then glued the images on, leaving the edges free to hang out in all their distressed glory. I added one color-matched rhinestone to a corner of each card, alternating the corners so that all four corners ended up being blinged.

For the box, I used Beth Beard's tutorial here. I covered the sides with the same embossed design as the cards, and instead of making a handle, I added a rhinestone in each of the 4 colors I used for the cards. Beth decorated the front of her box with a button, but I used a nature quote on a die cut and put two little Swarovski crystals on each end of it. I didn't have any envelopes for these cards, so I used my Enveloper to made some, and that was quite a challenge. They needed to be slightly larger than regular 3x3 envelopes since the distressed cs on the front of the cards is bulky, but they need to be small enough to fit inside the little box. It's amazing how precise the measurements have to be to get certain sized envelopes. To create a 3-3/16" square envelope, I had to cut the paper at 5-13/32" square. Just 1/32" off, either way made the envelope unusable for my purposes!!! Amazing!

Well, I think I'll go take a nap, now. :) I've been running on just a couple hours of sleep for the past few days, trying to get all these challenges completed.

Thanks for stopping by, and I hope you have a wonderful day!

I'll be entering this project in the following challenges:

Splitcoaststampers Love Fest Challenge: LOVEFEST2013I (A Little Love Goes A Long Way, sponsored by Taylored Expressions)
Flourishes Timeless Tuesday #209: All That Glitters (FTTC209)
Simon Says Stamp: Anything Goes

~Hugs,
 
Stamps: Nature's Pace, Nature Walk (Stampin Up)
Paper: Bazzill
Ink: Colorbox, Distress Ink
Dies: Labels 25 (Spellbinders)
Accessories: Decorative Tile Set embossing folder (Cuttlebug); embossing powder (Zing); rhinestones; Swarovski crystals; foam dots
Size: Cards: 3 x 3
Thanks for visiting my blog!
To have Ink Up delivered to your inbox,
subscribe in the box at the top right of the page.

Butterfly Garden

I'm so excited to share this card with you! It's much simpler than most of my cards, but there is one element on it that I struggled with, that ended up turning out really pretty.
This card is for the SCS LoveFest "Bring on the Bling!" Challenge, sponsored by Stamping Bella (LOVEFEST2013C). My "bling" is technically the flower rhinestones under the sentiment, but, to me, the three-dimensional butterfly is WAY bling-ier! ;)

This butterfly flew all over my craft room looking for a place to light. It started off as a one-dimensional creature, stamped in brown, and colored with Copics. Then, I colored another one and cut the individual wings out on both butterflies. I used a stylus to give them some dimension, then glued them, one set on top of the other, just where they would connect at the body. I put foam dots under the top wings to keep them raised. Then, I stamped the butterfly in brown, again, onto a die cut that I had sponged with Tumbled Glass Distress Ink, colored the wings on that butterfly, and colored the body brown. I glued the fussy cut wings on top, popping up the middle layer with foam dots. My original intention was to add the entire die cut with the butterfly on it, to a card front. But, I couldn't figure out a way to do it that would look good. So, I finally cut around the butterfly, leaving the popped up wings attached, and eliminating the die cut altogether. But, what to do with it? Then, I found this beautiful dp in an old paper pad and the flowers were the exact proportions I needed to use with the butterfly. So, I embossed the sentiment and the butterfly on the dp in black, added Glossy Accents over the body, then glued the wings in place over it. The butterfly doesn't look much like the original stamp since you can't see the stamp lines after coloring it, but I love the soft look of the wings.

I added a die cut butterfly to the inside, and used red Stickles on it to coordinate with the red rhinestones on the front of the card. The black dots are made with a Pearl Pen.

Just one more challenge to go for the SCS Love Fest!!! I better hurry, the challenge ends in less than 24 hours!

Thanks for stopping by today!

I'll be entering this in the following challenges:
Splitcoaststampers Love Fest Challenge LOVEFEST2013C (Bring on the Bling! with Stamping Bella)
Flourishes Timeless Tuesday #209 (FTTC209)
Simon Says Stamp: Anything Goes

~Hugs,
 
Stamps: Nature Walk (Stampin Up); Nicest Thoughts (Verve)
Paper: Best of K&Co; Shimmer Stack (DCWV)
Ink: Copics; Memento; Distress Ink; Versamark
Dies: Labels 18, Big Scalloped Ovals Sm, Jewel Flowers & Flourishes (Spellbinders)
Accessories: Embossing powder (Zing); Glossy Accents; Stickles; foam dots; sewing thread
Size: A2 (5.5" x 4.25")
Thanks for visiting my blog!
To have Ink Up delivered to your inbox,
subscribe in the box at the top right of the page.

Why I Love You


Hi Friends! Only four more cards to go in the SCS Love Fest Challenge, so I'm going to keep this short and sweet so I can get them all done today. :)
This one is for LOVEFEST2013K, sponsored by The Greeting Farm. The challenge is to create a love-themed card using dies. The sentiment is heat embossed with super fine embossing powder and there is a teeny pink rhinestone over the "i." The die I used on the front of this card is a new one I got at the Lawrenceville convention recently--Fantastic Flourish Two. It's actually an L-shaped corner die, but I cut it in half and clustered them together, then added Stickles for lots of sparkle (there are rhinestones in the lower right corner, also), so I'll be entering this in the Flourishes Timeless Tuesday #209 All That Glitters challenge, too! ;)

That bow is blinding in the photos, but it's very close to the real thing. My DD loves this card, simply because of the bow and the jeweled embellie on it. 

After all that intensity on the front, the inside, while still sparkly, gives your eyes a rest. :)

Thanks for stopping by, and have a great day!

I'll be entering this in the following challenges:

Splitcoaststampers Love Fest Challenge: LOVEFEST2013K (A Love to "DIE" For, sponsored by The Greeting Farm)
Flourishes Timeless Tuesday #209: All That Glitters (FTTC209)

~Hugs,

 
Stamps: Simply You (Ali Edwards); Signature Greeting II (Papertrey Ink)
Paper: Summer Song (My Mind's Eye); Tropical pad (Bazzill Basics); kraft cs
Ink: Distress Ink; Versamark
Dies: Fantastic Flourish Two, Labels Three (Spellbinders)
Accessories: Embossing Powder (Ranger); seam binding dyed with reinkers (Hug Snug); rhinestones; jeweled embellie; jute; Pearl Pen; Deco & Angle Corner Chompers
Size: A2 (5.5" x 4.25")
Thanks for visiting my blog!
To have Ink Up delivered to your inbox,
subscribe in the box at the top right of the page.

Path of Life

Sunday, February 24, 2013

I'm baaack. :)This is the smallest card I've made so far, and it took longer than any other to make because of the design. The Love Fest challenge I tackled this time is the one I thought might be the most difficult for me, and so far, it is. It's the Flip, Flap, or Oddles of Folds Challenge sponsored by Scor-Pal (LOVEFEST2013D). I think this would be called a Z-Fold card.
I used the Viva la Verve February 2013 Week 4 sketch, turning it on it's side and moving the flags to the bottom. I also relocated the sentiment. Other than that, I followed the sketch. The color palette is from ColourQ Challenge #177. The flags are cut from a cork sheet and adhered between the green scalloped edge and the card base (behind the butterfly dp) so that when the card is opened, the flags lie across the second (personalization) panel. The card is held closed with a magnet.

When the card is opened, there is a butterfly on the back panel. I cut it from dp, then embossed it twice with UTEE. The back panel was stamped with a butterfly background stamp in Versamark and heat embossed with 3 different colors of embossing powder, then I sewed the edges with a straight machine stitch. One magnet is behind the left wing of the butterfly, and a foam dot behind the right wing, to even the wings out. The other magnet is on the back of the first panel of the card. I wanted to hide it behind the dp, but the magnet was so thick, it caused a bulge, and I was afraid if it had to work with too many more layers of cards between them, the magnets wouldn't hold tight enough.
You can see the butterfly a little better here, and the panel on the left is for personalization. It is just a piece of white cs with the edges cut with a Deco Corner Chomper. Distress Ink was sponged along the edges, and the flourish stamps along the edges were stamped three times--in light blue, green, and red inks. It gives them a little bit of a three-dimensional look.

Here's a good look at the butterfly. I really like the look UTEE gives paper embellishments.

I'm entering this card in the following challenges:
Splitcoaststampers Love Fest Challenge: LOVEFEST2013D (Flip, Flap, or Oodles of Folds, sponsored by Scor-Pal)
Viva la Verve February 2013 Week 4 Sketch Challenge (VLVFeb2013)
ColourQ Challenge #177 (CQC177)

Thanks for stopping by!

~Hugs,
 
Stamps: Special Gifts Labels 29 (Just Rite Clear); Small Butterfly Background (Our Daily Bread)
Paper: Poetic Postage (The Paper Studio)
Ink: Distress Ink; Versamark; Memento
Dies: Labels Twenty-five, Nested Lacey Pennants (Spellbinders)
Accessories: Scallop Diamond Edger (EK Success); embossing powder (Zing; Recollections); pearls; cork sheet; Deco Corner Chomper; UTEE; magnets; foam dots
Size: 4" x 4.5" closed; 8" x 4.5" overall
Thanks for visiting my blog!
To have Ink Up delivered to your inbox,
subscribe in the box at the top right of the page.

Artichoke Thank You

Tuesday, February 5, 2013

Hi Friends! Hope you all had a great weekend. I did...I spent it with lots of friends and went to a stamp convention. But, more on that in a later post. ;)

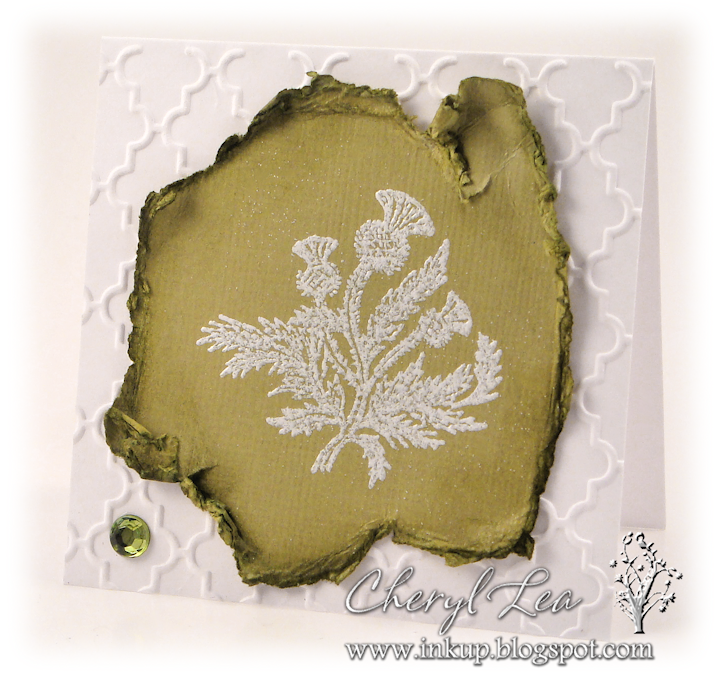
This will be short and sweet. I am selling off most of my knitting books and yarn, and I'm going to try to include a mini thank you card in each package when I ship it. Of course, as you know, being small doesn't mean it is any easier or quicker than a larger card--it just weighs less. :)

This was a fun card to make, and fortunately, I was able to make it in about 5 minutes, using an image I had already colored about a month ago, because I had to get the package in the mail, pronto. 
The stamp was in a set I found on sale at Hobby Lobby for $2! Isn't it pretty? I colored it with Prismacolor pencils and Gamsol. I wasn't pleased too much with how it turned out until I distressed it. That totally transformed it (or at least my opinion of it). ;) The background is just a piece of scrap dp that was off-white with light brown and pink lines on it. I embossed it, distressed it with Distress Inks, then dipped the edges in water so I could roll them a little, and finally glued it to the base. That was it. Easy peasy! I didn't have time to photograph the inside, but it was left plain except for a simple Thank You stamp. I need to get busy and make these in advance so I'm not so rushed, but sometimes I think I work better under a little pressure. :)

I'll be entering this in the following challenge:

Thanks for stopping by, and have a wonderful day!

~Hugs,

 
Stamps: Victory Garden (TCP Studio)
Ink: Memento; Distress
Accessories: Prismacolor pencils; Decorative Tile Embossing Folder (Cuttlebug)
Size: 3" x 3"
Thanks for visiting my blog!
To have Ink Up delivered to your inbox,
subscribe in the box at the top right of the page.