Our Craft Lounge--April Artist of the Month: Your Kindness

Monday, April 16, 2012

Hello Friends! It's Week 3 of my Our Craft Lounge April Artist of the Month gig, and I have a thank you card to share with you today. I made this for my very thoughtful, long-time writer friend, Linda, who recently surprised me with a lovely gift book: Charles Dickens: The Dickens Bicentenary 1812-2012. It's not my birthday, and this wasn't for a special occasion. Linda just knows that Charles Dickens is probably my favorite writer of all time, and he led a fascinating, albeit not always admirable life, that makes for very interesting biography material for me.  :)

So, here's the card:
I embossed the lavender cs with a Polka Dot embossing folder, then sewed all but the upper brown dp and sentiment with my sewing machine. The bronze "pearls" were made using a Pearl Pen. I used Our Craft Lounge's Thankful Flourishes stamp set for the flowers and sentiment. 

The sketch came from Verve's Viva la Verve April 2012 Week 2 Sketch Challenge, which I rotated for a horizontal layout, and the gorgeous color palette was this week's Color Throwdown Challenge 187.


I colored both flowers with Copic markers, then on the small flower used Lemon Drop Yellow Sparkly Fluff in the center. For the larger flower, I first added yellow Liquid Pearls around the perimeter of the center, then, after it dried, I used Sparkly Fluff inside that. I love that you can still see the detail of the stamps through the Sparkly Fluff. After fussy cutting both flowers, I popped the small one up on a tag, and the larger one over the edge of the sentiment.
Here's a look at the inside. I really liked the design on the dp, so I stamped the Thankful sentiment directly on the dp, then added a small piece of white cs for a personal message. The corners of the white cs were punched with an EK Success punch. 

Thanks for stopping by my blog today. If you have a minute, could you visit the Our Craft Lounge blog and leave a little love on my post there, too? ;)

I hope you all have a super wonderful week! 

I will be entering this card in the following challenges:

Big Hugs! 
 
Stamps: Thankful Flourishes (Our Craft Lounge)
Paper: Best of K&Co; Watercolor Bouquet (K&Co); Once Upon a Time (DCWV)
Ink: Memento; Distress Ink; Copics
Dies: Curved Rectangle, Classic Ovals Lg (Spellbinders); Classic Tags Template (Flourishes)
Accessories: Polka Dots embossing folder (Cuttlebug); Morocco Lace Edger Punch (EK Success); ribbon; rhinestones; button; sewing thread; twine (The Twinery); foam dots; Sparkly Fluff (Our Craft Lounge); Liquid Pearls; Pearl Pen
Size: A2 (4.25" x 5.5")
Thanks for visiting my blog!
To have Ink Up delivered to your inbox,
subscribe in the box at the top right of the page.

Tuesday Morning Sketch Challenge #141: Butterflies

Tuesday, April 10, 2012

Hi Friends! Have you played along with Tuesday Morning Sketches yet? If you have, you know how much fun it is, and if you haven't, this is the perfect time to start, because our intrepid leader, Melissa, has come up with a great sketch, Digital Delights is our fab sponsor,and this week is a judged challenge--not a random drawing! Being a judged challenge, there is a twist, too: Think Spring! You ready?!? Let's go!

Here's the sketch:


And, here's my take on it:
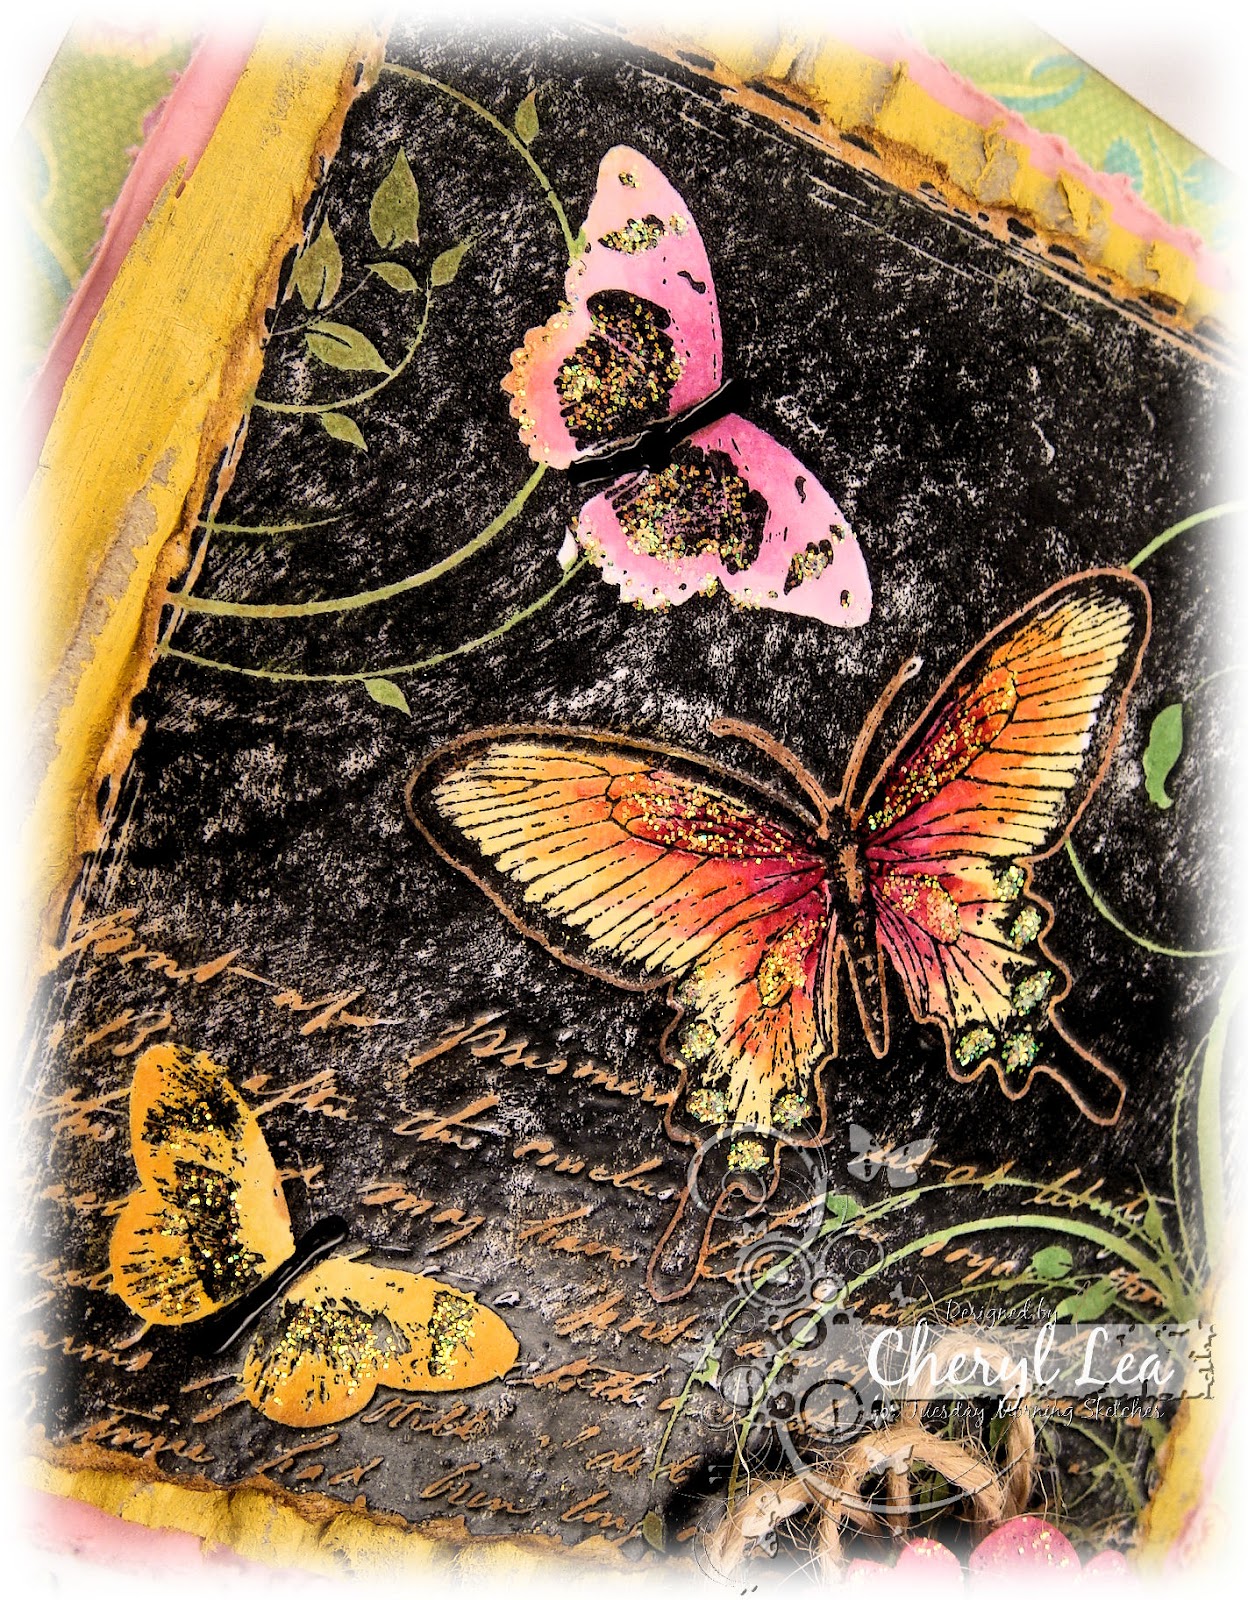
I rotated the sketch and tweaked it just a bit by tilting the main image panel and adding an embellie. The yellow corrugated layer is from a shipping box. I peeled off one side of the paper, painted it, then sanded it to give it a more distressed look. 

For the image, I stamped it in black ink, then embossed it with clear embossing powder. I wanted to use the current Kathy's Lily Pad Palette Challenge of pink, green, and yellow for this card, so I colored the leaves and vines green, one butterfly in shades of pink, one in shades of yellow, and the largest in both pink and yellow. I love how that one turned out, with orange in the blended areas. I added Stickles here and there for some sparkle--always essential in a girlie card. ;)

The sentiment is from Flourishes' Tiny Flowers and Tags set, and I used the coordinating Classic Tags Template die to cut it. See how the knots on the lace lined up perfectly with the eyelets on the white die cut border? I didn't know that was going to happen until I was actually putting it together. I love it when things work out just right, by pure chance.

As busy as the front of this card is, the inside was much more difficult for me to design. All I knew was that I wanted to use this Spellbinders Flying Beauties die cut. I've had the set for awhile, but never used it. You can't see it in the picture, but after sponging Distress Ink on the butterfly, I spritzed it with Shimmer Spritz, so it shimmers in the light. The flourish underneath the sentiment is from the In Flight stamp set from Our Craft Lounge--perfect since that is a butterfly set, too. 

Okay, that's it for my card. I sure hope you can join us at Tuesday Morning Sketches this week! And, for some fantastic inspiration, be sure to check out the rest of the DT to see how they interpreted this sketch. You may be so inspired, you'll want to make more than one card for the challenge! ;) I can't wait to see what you come up with!

I'll be entering this card in the following additional challenges:
Simon Says Stamp: Use Your Favorite Tool (Mine is the Big Shot!)
Little Darlings Challenge 20: Outside
Kathy's Lily Pad Palette Challenge: Pink, green, yellow
Flourishes Bring Back Beautiful Challenge 21: The Beauty of Friendship
Crafty Friends Challenge #1: Vintage

Thanks so much for visiting me today! Hope you have a wonderful week, and have fun with the challenge!

~Hugs!
 
Stamps: On Butterfly Wings (Hampton Art); Tiny Flowers & Tags (Flourishes); Sunny Days (Verve); In Flight (Our Craft Lounge)
Paper: Sweet Nectar (K&Co); cardboard
Ink: Copics; Colorbox; Distress Ink
Dies: Classic Tags Template (Flourishes); Fair Isle Border Petites, Fleur de Lis Rectangle, Flying Beauties (Spellbinders)
Accessories: Clear embossing powder; lace (Joann); acrylic paint; flower; twine; Stickles; Shimmer Spritz; Enamel Accents; sanding block
Size: A2 (4.25" x 5.5")
Thanks for visiting my blog!
To have Ink Up delivered to your inbox,
subscribe in the box at the top right of the page.
Our Craft Lounge--April Artist of the Month: Spring Up

Monday, April 9, 2012

Hello, Friends! I hope you had a wonderful Easter weekend, filled with family, worship, good food, and relaxing fun! If you have a little one, I'm guessing that the Easter Bunny made a visit to your house, too. He certainly made his annual stop to our house, to the delight of my DD. She has always loved the Easter Bunny.  We might miss getting a Santa photo on occasion, but we always make a trip to see the Big Bunny! So fun!

I'm back for Week 2 as Our Craft Lounge's April Artist of the Month, and the card I want to share with you today is an Easter card, featuring the cutest little bunny. He's from the stamp set, Hoppin' Into Spring.
To make this card, I first stamped the bunny, then masked him off before stamping the garden at his feet. Don't you just love his little coat? He reminds me of Beatrix Potter's Peter Rabbit.


I used my Copics to color everything, then masked the bunny and garden, hand drew a couple of cloud masks, then used my Copic airbrush to color the sky and ground. When I colored the sky, I used the blunt end of my Copic for a smooth finish. For the ground, I used the brush end of the marker to get a stippled look. I used a gold Pearl Pen to add a button to the jacket, and gave the eggs some sparkle with Stickles. I used a Scoring Board to score lines close to the edges of the image layer. Thanks, Shannon, for that fantastic idea!


For the "dirt," I used Brown Sugar Sparkly Fluff, which is quickly becoming one of my favorite products. I love that it completely covers whatever it is on, and it has just enough glitter to liven up your image without overpowering it. Plus, it is SO soft. I just ordered most of the colors and can't wait to find fun ways to use them!

The purple embellishment on my twine bow is another clay embellishment that I made. I made the mold from a Tim Holtz button. I used white clay, painted it with acrylic paint, then brushed just a little Distress Ink Reinker over that. After it dried, I used my gold calligraphy pen to add a few highlights, then I coated it in a satin gloss finish. It is hot glued on top of the bow.

The sentiment on the inside of the card is from the same stamp set. I added the lines under "you" with a black marker. 

The Hoppin' Into Spring stamp set is great for an Easter card, but one of the things I love about it is that it is really versatile. It includes a spring sentiment about dirt, several gardening images, and an adorable image of the bunny upside down in a watering can. Plus, if you make the eggs white or brown, or even add tiny dimensional flowers over the eggs in the basket, the image I used today could be used anytime, not just for Easter.

Well, that's all for me today. If you're not already a follower of the Our Craft Lounge Blog, you should check it out. They have fun challenges and the Design Team is super talented. And, you can see all the wonderful stamp sets and Sparkly Fluff colors here.

I'll also be entering this card in the Little Darlings Challenge 20: Outside.

Thanks for stopping by! I'll be back tomorrow with a new Tuesday Morning Sketches card. Hope to see you then. 

~Hugs,
 
Stamps: Hoppin' Into Spring (Our Craft Lounge)
Paper: Abrianna (K&Co)
Ink: Copics; Memento; Distress Ink
Dies: Big Scalloped Ovals Sm, Labels Thirteen (Spellbinders)
Accessories: Twine (The Twinery); Sparkly Fluff (Our Craft Lounge); Pearl Pen; Enamel Accents; Liquid Pearls; Stickles; handmade clay embellishment
Size: A2 (4.25" x 5.5")
Thanks for visiting my blog!
To have Ink Up delivered to your inbox,
subscribe in the box at the top right of the page.

Hey Lady!

Friday, April 6, 2012

Hello Friends! I'm heading out to the grocery store, so this will be short and sweet. The Flourishes Timeless Tuesday Challenge #163 this week is to create a birthday card. What great timing--I needed a birthday card for a friend next week! I went with a vintage look so I could join in the fun at Crafty Friends Challenges, a brand new challenge hosted by Beate Johns. If you haven't seen her work, be sure to check out her personal blog, Fresh & Fun. I assure you, you will be Wowed! She's also assembled a super crafty DT. I can't wait to see the projects they have in store for us!

For this card, I used the Deconstructed Sketch #46 for my layout.


And the color palette of CR84FN51.
And, here's what I came up with:
It's hard to see in the photo, but the layer behind the flowers is actually white card stock that was stamped with a floral background stamp in light blue.


This is my first time to use the dress form image, but it certainly won't be my last. I colored the pearl necklack with a pink Copic and the one hanging from the belt with a yellow Copic. Stickles are used on the chains, the "jewels" hanging from the belt, and also on the belt buckle.

And, on the inside:


I used the same floral background stamp on the inside that I did on the white panel on the front of the card. If you click on the photo, I think you'll be able to see it. It's actually a really pretty stamp.

I'll be entering this card in the following challenges:
Flourishes Timeless Tuesday Challenge #163
Crafty Friends Challenge #1: Vintage
Deconstructed Sketch #46
CR84FN51: Pink, Peach, Light Blue

And, that's it for me today. Thanks for stopping by, and I hope you have a wonderful weekend and a Happy, Happy Easter!

~Hugs,
 
Stamps: Feminine Charm (Flourishes); Fancy Floral Background (Stamp Camp)
Paper: Annalee (Prima); Sweetness (Pink Paislee)
Ink: Copics; Distress Ink; Colorbox
Dies: Fancy Tags Three (Spellbinders)
Accessories: Pearls; Flowers; Lace; Sewing Thread; Stickles
Size: A2 (4.25" x 5.5")
Thanks for visiting my blog!
To have Ink Up delivered to your inbox,
subscribe in the box at the top right of the page.

DYSU Challenge #66: Friendly Critters

Thursday, April 5, 2012

Hi there, Friends! A few weeks ago I was a Top 3 pick for the Do You Stack Up Challenge #62 with my Pear notecard set, and Joan invited to be a Guest Designer. Well, it's finally my week, and the challenge this week (DYSU#66) is Friendly Critters!

Joan sent me the cutest little critter for my card--a Mousey Seamstress from Dearie Dolls Digi Stamps. I had so much fun coloring her up with my Copics. I added some black Enamel Accents to her eyes and nose and Glossy Accents to her shoes and needle. For the spool, I printed the image a second time, colored the spool, cut it out, wrapped it in pink and white twine, and glued it over the main image. I didn't have to use foam dots--the twine was thick enough to pop it up just fine. I paper pierced the perimeter of the image rectangle and used a green Sharpie marker to "sew" between the holes.

On the inside, I used border punches on red and brown cs and topped them off with a piece of the same dp I used on the front, then I sponged Tea Dye Distress Ink around the edges.

I'll also be entering this in the following challenges:
Simon Says Stamp: Use Your Favourite Tool - My favorite tool is my Sizzix Big Shot

Thanks for stopping by today, and I hope you'll join us at the DYSU Challenge Blog this week for a fun challenge!  

~Hugs!
 
Stamps: Mousey Seamstress (Dearie Dolls Digi Stamps)
Paper: This & That (Echo Park)
Ink: Copic markers; Distress Ink; Sharpie marker
Dies: Classic Rectangles Sm, Classic Scalloped Rectangles Sm, Fancy Tags Three (Spellbinders)
Accessories: Postage Stamp border punch (EKSuccess); Daisy border punch (Martha Stewart); Polka Dots embossing folder (Cuttlebug); ruler twill ribbon (Taylored Expressions); Glossy Accents; Enamel Accents; Pearl Pen; Twine (The Twinery); paper piercer
Size: A2 (4.25" x 5.5")
Thanks for visiting my blog!
To have Ink Up delivered to your inbox,
subscribe in the box at the top right of the page.