Flip It Sketch Challenge: FLLCDEC13

Friday, December 6, 2013


Welcome to the kick-off of Flourishes December releases! Today two of the Flourishes Design Teams are ushering in a challenge and YOU could walk away winning all of our new sets for December! Here’s how to get in on the fun. All you need to do is play in the…..Flip it Sketch Challenge!

Dec-Sketch1


Dec-Sketch2
   
Next week we’ll be bringing you our December edition of new Flourishes Stamps, that we know you’ll love! Because we know you want a chance to win these great sets, We have two fantastic angled sketches for you to play with. All you need to do is pick one of them and create! Play in the challenge and you could win our whole December Release! THE OFFICIAL RULES:
  • Simply create a card or project inspired by either of the sketches above.
  • Entries need to be in by Friday December 13 at 5 PM EST
  • Those entries using Flourishes Stamps will be counted twice
  • You must link your creation on our InLinkz Widgit to be counted
  • You must have a link to our challenge in your blog post or gallery post
  • Please DO NOT combine challenges from other sites or locations. Only those entries that don’t combine will be in the running. Because this challenge means winning new Flourishes sets we want to see your beautiful creations made specifically for this challenge.
  • If you upload to SCS please use the keyword FLLCDEC13A or FLLCDEC13B
  • We’ll announce the winners on Saturday in our Winner’s Circle Post here on the blog on Saturday December 14th, so check back then to find out if you are a winner!
I chose sketch "B" for my card:
I used the beautiful Peace & Joy stamp set, colored it with Copics, and added Stickles for some festive sparkle on the ornament (which I cut using Flourishes' handy dandy Silhouette cut file!) I used a score board to make the scored lines on the white cs, embossed the front of the Sea Salt card base, from the Emerald Coast Paper Collection, and layered everything up.
After coloring the holly leaf, I covered it with Glossy Accents, then added some sequin berries.

Thanks for stopping by today and we look forward to seeing what you create! We’ll see you on Wednesday December 11th when our beautiful December Sneak Peeks start! Have fun creating! And now for some wonderful Sketchy Inspiration, our Design Teams have some great angles to show off to you:
I'm entering this card in the following challenges: 

Supplies Used:
PLUS these individual Copics: BG49, G02, G05, G07, YG00
Thanks for visiting my blog!
To have Ink Up delivered to your inbox,
subscribe in the box at the top right of the page.

Chalkboard Christmas JOY!

Thursday, December 5, 2013

I hope you've been having a good week. I've been busy, and I'm sure you have been, too, so I won't keep you but a sec! :)
I used the Mojo Monday Sketch #322 for this Christmas card, and the cute stamp is from Taylored Expressions. I heat embossed it with white ep, then stamped over it with white pigment ink, for the chalkboard look.
The inside was decorated with scraps from the front of the card.

And, that's it for now. Betcha didn't think I could do it. ;) Thanks for stopping by!

I'm entering this card in the following challenges:
Mojo Monday Sketch Challenge #322
Paper Issues: It's Beginning to Look a Lot Like Christmas
613 Avenue Create: Challenge #48: Anything Goes or Twist of Gift Packaging
Corrosive Challenge #188: Happy Holidays
Curtain Call Inspiration Challenge: Christmas Countdown

~Hugs,
 
Supplies Used:

Thanks for visiting my blog!
To have Ink Up delivered to your inbox,
subscribe in the box at the top right of the page.

Timeless Tuesday #249: Stitch It Up!

Tuesday, December 3, 2013

Hey there, all you Flourishes fans! I hope you had a very Happy Thanksgiving. Now, it's time to really ramp up for Christmas--just a mere 22 days away! So, let's get right to the Timeless Tuesday Challenge, and not waste a single minute!


Back in October we had a special Timeless Tuesday challenge that actually had four winners, and besides winning a fab stamp set from Flourishes, each of those winners won the opportunity to be our Guest Hostess for a week during the month of December! 
So, to start the month off, Kerin Sylvester is our first Guest Hostess, and she has a super fun challenge for us. She is challenging everyone to... 


I love stitching on my cards, and I usually just use it around the edges of my layers, but for this challenge, I actually incorporated it into the image.
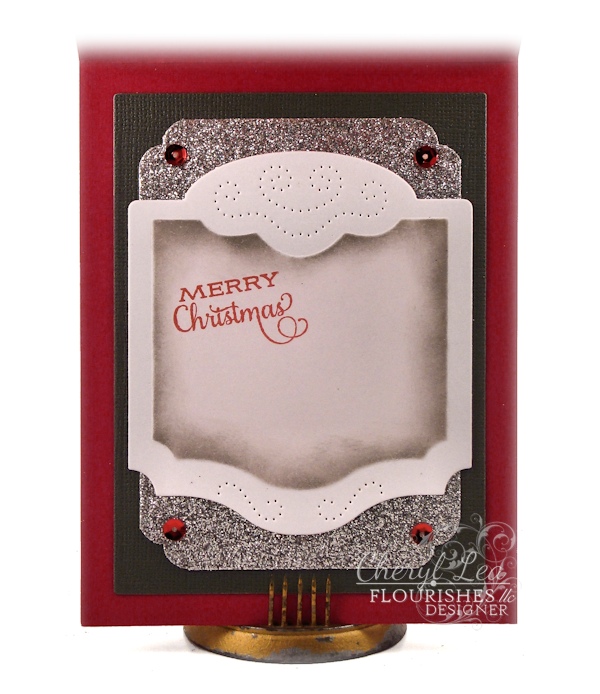
I began by stamping the tree trimming image from Flourishes' A Season of Celebrations stamp set in VersaMark ink, onto the smooth side of a panel of Cinder, from the Cool Neutrals Paper Collection. After heat embossing it with white embossing powder, I used my sewing machine and stitched a gold star and red strands of tinsel (or maybe Christmas lights) on the Christmas tree, and added little bitty dots of Candy Cane Stickles along the stitching for sparkle. I used a silver Pearl Pen to create the tree decorations. To create a wallpaper background for the scene, I stamped an image from the new So Distressed stamp set in red ink onto the rest of the layer. For the sentiment, I die cut a shape from Classic White Cardstock, using the Perfectly Pierced Classic Frames Die Set and sponged Pumice Stone Distress Ink inside the die. The sentiment is from the Country Time Christmas stamp set. Finally, I covered the outer edge of the die cut with silver Stickles, then added dots of the Candy Cane Stickles over that. At the last second, literally as I was about to glue the sentiment to the card, I remembered this red and silver ribbon and added it underneath the die cut. A few sequins later, I matted the panel with silver glitter cs, and again with a card base of Red Devil, from the Poppy Paper Collection.
The silver cs rectangle on the inside of the card was cut from the center of the piece I used on the front of the card (no need to let pretty glitter go to waste all covered up!). I punched the corners with a Corner Chomper. The Classic White Cardstock die cut is the other die in the Classic Frames die set. I sponged Pumice Stone ink around the edges while it was still in the die, then stamped the Merry Christmas sentiment from the Trimmed With Love stamp set.

I hope you'll play along with us this week! For your stitching, you can use a sewing machine, stitch by hand, or draw faux stitches--just do some kind of stitching. No sewing machine or sewing experience required! ;) Couldn't be easier. And, you don't have to use Flourishes stamps, but if you do, you get two ballots toward the weekly prize! You can find all the details for the challenge here.

Be sure to take a moment to be inspired by all our designers' blogs, as well as Kerin's blog, and leave some love for them, too! :) 

~Hugs,

Supplies Used:

Thanks for visiting my blog!
To have Ink Up delivered to your inbox,
subscribe in the box at the top right of the page.

Timeless Tuesday #248: Score It, Pierce It, Color It

Tuesday, November 26, 2013


I can hardly believe it's the last Tuesday in November! Just 29 days until Christmas!!! So the holiday frenzy officially begins this Friday. Just sayin', ya know. ;~)


In the meantime, ready for a little Timeless Tuesday challenge? Connie MacFarlane is our Guest Hostess this week, and you're going to love her challenge. It's one that can be incorporated into just about any card or project you have in mind:

Here's my take:
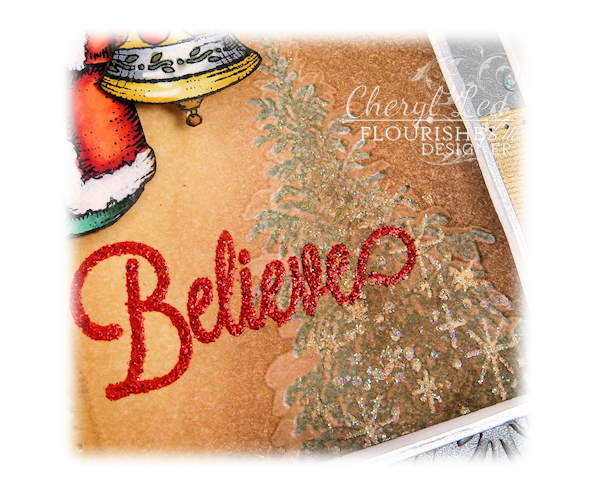
I used the Viva la Verve November 2013 Week 1 sketch for this card, substituting cute ornament images, from Flourishes' Holiday Sparkle stamp set, for the fishtail banners. After coloring them with Copics, I did some fussy cutting and glued twine to the back so I could "hang" them from the top of the card. For the next layer, I die cut a square from Classic White Cardstock, then sponged Vintage Photo and Scattered Straw Distress Inks over the entire square. Next, I spritzed water onto the pine tree stamp from the Forest of Trees stamp set, and stamped on top of the sponged ink, giving me a light colored silhouette of the image. After drying the water, I stamped the tree in a white pigment ink, then again, offsetting the stamp just a little for a hint of frost, using Memento Bamboo Leaves ink. I gave it some sparkle by stamping the little snowflake images from the Snow Scenes stamp set onto the tree with Versamark Ink and heat embossed with a glitter embossing powder. I then stamped "Believe," from the Handmade Snowflakes stamp set, and heat embossed it with red glitter embossing powder. To finish off the layer, I scored two parallel lines down the left side of the square and across the top and did some paper piercing between the lines. I matted that layer onto a square of white cs, which I edged with a Krylon silver leafing pen. The gold horizontal strip is a piece of textured white cs which I pierced along the top and bottom, then colored with a Krylon gold leafing pen. Finally, for the bg, I dry embossed snowflakes on a piece of shimmer cs and added Diamond Stickles for sparkle. To hang the ornaments, I first attached them to the front of the card, then taped the twine to the back of the bg layer before adhering it to the card base. 
Here's a better look at the sparkle on the tree.
On the inside, I embossed the same snowflake embossing folder on shimmer paper, but left the Stickles off. After die cutting a rectangle of classic white cardstock, I sponged Scattered Straw Distress Ink inside the die, then added two sentiments from the Sentimental Christmas and Star of Bethlehem stamp sets.

Did you happen to notice how many different stamp sets I used on this simple card? I was certainly surprised when I realized how many there were. When I make a card, I often just pile up stamps, dies, and all the other supplies as I use them, so I can remember what I used when it comes time to write up my supply list. So, when I went through the pile for this card, I did a double take when I saw that there were six--yes, that's right, SIX--stamp sets used on this one simple card. But, I shouldn't have been surprised at all. One of the things I've always liked about Flourishes' stamps is that they work so well together. 

And, speaking of working well together, you have got to check out what the rest of the Design Team has for your viewing pleasure! Visit their blogs, leave a little blog love, then put all that juicy inspiration into your own creation and play along with us. You don't have to use Flourishes stamps, but if you do, you get two ballots toward the weekly prize! You can find all the details for the challenge here.
Thanks for stopping by, have a wonderful week, and for those in the U.S., Happy Thanksgiving! Gobble, Gobble! :)

I'm entering this card in the following challenges:
Viva la Verve November 2013 Week 1 Sketch Challenge
Simon Says Monday Challenge: Countdown to the Holidays
Corrosive Challenge #188: Happy Holidays
Paper Issues: It's Beginning to Look a Lot Like Christmas

~Hugs,
 
Supplies:
PLUS these individual Copics: R21, R22, G17, YG03
Thanks for visiting my blog!
To have Ink Up delivered to your inbox,
subscribe in the box at the top right of the page.

Vintage Santa

Monday, November 25, 2013

 
I'll make this a really quick post. It's time to finish up with the Viva la Verve sketches for November, so I made a Christmas card with the Week 4 sketch.
I used a new-to-me Tim Holtz Christmas stamp for this card, heat embossing it with clear ep, on kraft cs, then sponged red and green Distress Inks over parts of it. The green layer is a paper doily that I misted with Dylusions Ink Sprays. I like the color, but every time I look at this card, I think of lettuce! ;-) For the bg, I die cut a piece of glitter cs and topped it with a text dp die cut. The fishtail banner was hand cut. I layered raffia and twine bows and topped it off with a brad that I made with my I-Top Brad Maker.
Here's the inside. The red and white striped edges were from the same chevron dp that I cut the fishtail banner from. I just cut it right on the points to make it look striped. The sentiment and Christmas bell are from a Recollections stamp set called Vintage Christmas.

And, there you have it. Short and sweet! :)

Thanks for stopping by, and enjoy your week!

I'm entering this card in the following challenges:
Viva la Verve November 2013 Week 4 Sketch Challenge
The Corrosive Challenge #188: Happy Holidays
Simon Says Monday Challenge: Countdown to the Holidays
Paper Issues: It's Beginning to Look a Lot Like Christmas

~Hugs,
 
Supplies: 

Thanks for visiting my blog!
To have Ink Up delivered to your inbox,
subscribe in the box at the top right of the page.