Sharing Happy News!

Wednesday, February 25, 2015


Happy Happy Day! I've got exciting news to share!!! I am one of the newest members of the Paper Sweeties Design Team! Whoo Hoo!!! Debbie Marcinkiewicz is the owner of Paper Sweeties, as well as the creator of The Shabby Tea Room Challenge, and I had the honor of meeting her in person at a stamp convention recently. What a treat for me! She truly is sweetness personified! And, on top of that, I also got to experience her adorable booth filled with all the fabulous Paper Sweeties Stamps, Sweet Cuts dies, and accessories! It's a pink and white polka dot oasis! :D

Thank you, Debbie, for inviting me to join your team! I'm looking forward to creating with your sweet stamps and working with you and everyone on the Paper Sweeties team!

Thanks for stopping by, and have a Sweet week!

~Hugs,

Thanks for visiting my blog!
To have Ink Up delivered to your inbox,
subscribe in the box at the top right of the page.

Faux Leather Blank Book & Slipcase

Saturday, February 14, 2015

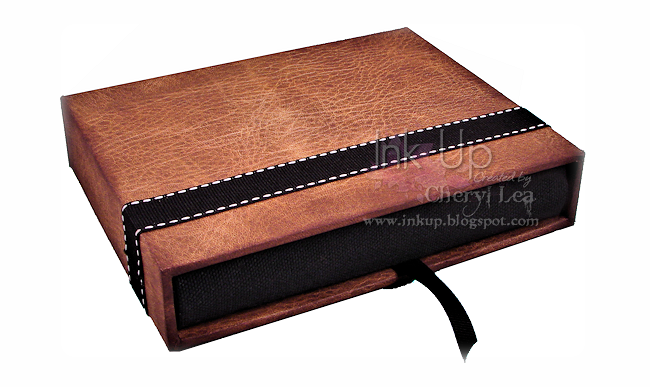
I'm back with another blank book, and this one has its own slipcase.
I needed a masculine thank you gift, and while I'm not sure how many men use blank journals, I thought it might work if it was made of leather. Unfortunately, I don't have any leather, nor do I even know how to cover a book with it, but I did have some paper with a nice leather design on it. Visually, it really does look like leather! 


pic name pic name
This is what the book looks like inside the sleeve. The sleeve measures about 5" x 6", so it's fairly small. The book slides out easily if you turn the slipcase upside down, but I added a ribbon pull to make it easier. When you pull the ribbon, the book comes right out.
I also added a ribbon bookmark.
When you buy a book nowadays, the endbands along the top and bottom of the book are just pieces of twill tape with a border on one side that is glued to the ends of the book. On this book, I made my own endbands by sewing them onto the pages, over a strip of leather. This helps hold the book together, protects the spine if the book is on a shelf and gets pulled out by tugging on the top of the spine, and it looks good, too.
I lined the inside of the slipcase and the inside of the front and back covers of the book with a nice bargello patterned paper, then used turquoise colored paper for the pages. There is a piece of thin brown cardstock on the outside of each signature (folded group of pages).

On each of the brown pages, I stamped various designs and inspirational sayings in Rich Cocoa ink.

I hope it's "manly" enough, but if it isn't, perhaps the recipient's wife will enjoy it!

Thanks for stopping by, and Happy Valentine's Day!

~Hugs,

Supplies Used:

Thanks for visiting my blog!
To have Ink Up delivered to your inbox,
subscribe in the box at the top right of the page.

You Blow Me Away

Friday, February 13, 2015

If you love purple, then this is the card for you! I colored this cutie with Copics, but she didn't turn out quite like I intended. 
You see, it was one of those 3AM coloring sessions that we all have sometimes, and I was feeling all geared up to color this dragon with reds and pinks for Valentine's Day. I had colored maybe 5 minutes when I decided to add just a touch of green. With green marker in hand, I promptly dozed off! Well, I must have been dreaming in color, because when I woke up, I had colored on top of the red, and it wasn't pretty. Not one to throw an image out if I can help it, I worked to remedy my "mistake." In the end, I like it much better than a red dragon, and all the different layers of color (various YGs, Rs, RVs, & Ys) give the skin a sort of translucent look that is pretty cool. The heart embellie is made from four sizes of heart die cuts, cupped with a stylus, layered, then coated with UTEE.
On the inside, along the bottom of a white panel, I used a circle border die that doesn't always cut all the circles out with just one pass through the machine. I removed a few random circles and filled those with Diamond Stickles.

Stay warm this weekend!

I'm entering this card in the following challenges:
Sugar Pea SugarSketch Challenge #20: SPDSS20
Simon Says Stamp Wednesday: All Creatures Great and Small
The Shabby Tea Room #245: 'I {heart} You'
613 Avenue Create Challenge #110: Anything Goes
Kit & Clowder February Challenge: Love
Paper Issues: Let's Get This Party Star-Ted and Par-Ty Heart-y with SugarPea Designs

~Hugs,

Supplies Used:

Thanks for visiting my blog!
To have Ink Up delivered to your inbox,
subscribe in the box at the top right of the page.

Clip Heart

Thursday, February 12, 2015

This was a fun card to make, and super simple, too! Who knew basic office supplies could look so pretty, right? 
To make the main portion of this card I used a handful of round paper clips and two jumbo paper clips. (I actually still call the double oval clips, "Gem clips," but usually no one knows what I'm talking about. What do you call them?) After making two heart shaped clips from a jumbo paper clip, I cut the excess wire off one heart for embossing, then laid out the round paperclips and the modified heart shaped clip on a die cutting plate, placed a piece of white cardstock over them, then topped that with an embossing pad and another cutting plate, and ran it through my Big Shot. I colored the paper by sponging several colors of Distress ink over the embossed areas, blending the colors in between. After die cutting the paper with a distressed edge die, I sponged more ink along the edges, then distressed further by spritzing water onto the paper. Finally, I sprinkled some chunky white embossing powder onto the paper and heated it from the back side (to keep from blowing the powder off before it had a chance to melt and stick to the paper). After assembling the card front, I attached the 2nd heart clip to the top of the card.
To tie in with the front of the card, I embossed just the modified heart clip in the corner of a white die cut, then sponged Distress ink over that, and also over the entire die cut, while it was still in the die.

See? Easy peasy! Have a great day!

I'm entering this card in the following challenges:
Simon Says Stamp Monday Challenge: Red + Pink
Oddball Art Stamp: Add Some Sparkle Challenge
Robyn's Fetish Challenge #250: Valentine Cards
TCP Tuesday Challenge 283: Anything Goes

~Hugs,

Supplies Used:

Thanks for visiting my blog!
To have Ink Up delivered to your inbox,
subscribe in the box at the top right of the page.
New Facebook Page

Hi Friends! 

If you and I are Friends on Facebook, but you only want to see my paper creations, with no personal, political, or Common Core posts, I have created a new Facebook page just for Ink Up. Just click on the Facebook icon here or in my sidebar and "Like" my page.


If, on the other hand, you want to see my other posts, feel free to stay with my personal page. My Ink Up posts will continue to show up there, also!

~Hugs,

Thanks for visiting my blog!
To have Ink Up delivered to your inbox,
subscribe in the box at the top right of the page.

To the Moon & Back

Monday, February 9, 2015

One of my favorite techniques is the chalkboard technique. Just the idea of chalkboards makes me a little nostalgic. I used to love washing the chalkboard in the afternoon at the end of a school day. Now kids just turn off the smart board--that's no fun! ;)
For this chalkboard card, I die cut a Classic Hourglass shape from black cs, then heat embossed the "Hello My Dear" stamp using a white detail ep. Then, I stamped over that, slightly offsetting it for a shadow effect, using a white pigment ink. Before the ink dried, I smeared it across the cs for a chalky look. After the pigment ink dried, I added tiny bits of color with Prismacolor pencils: I colored in the heart, added a green line under "Forever & Ever," blue lines on either side of the "Moon & Back," and added two little "XO's." The rest of the card is just popped up, layered die cuts, with magenta glitter brads added to the checkered cs die cut. The card is on a lime green cs base. You might notice some darker green markings on the lime green base. I used a newsprint stamp to give the cs a little more texture, but in the end, so little showed, I'm not sure it made a difference. I rounded all four corners of the card, just slightly, with a 1/8" corner chomper.
On the inside, I stamped the same newsprint image on the lime green base, then using the negative from the "chalkboard" die cut on the front of the card, I turned it sideways and added skinny strips of dp left over from the front of the card. This time I wanted at least a little of the text stamp to show, so I chose a Labels 18 die that would give me enough room to personalize the card, yet not completely cover the negative opening. I sponged Spun Sugar Distress Ink inside the die of the Labels 18 die cut before gluing it to the card. Then I added a few dots of Magenta Stickles just to brighten things up. 


Thanks for stopping by today!

I'm entering this card in the following challenges:

~Hugs,

Supplies Used:

Thanks for visiting my blog!
To have Ink Up delivered to your inbox,
subscribe in the box at the top right of the page.

Sweet Valentine

Sunday, February 8, 2015

Valentine's Day is right around the corner, so I used a stamp I've had for awhile to make a card for my daughter.

The image is colored with Copics and I used a white gel pen to add highlights to the cherries/hearts. I used this week's Mojo Monday sketch for the card design, substituting the flourish die cut for one of the fishtail banners. The flourish is covered with Diamond Stickles, but it's hard to see here. It's more visible in the banner at the top of the post. The "dots" are enamel dots, rhinestones, and melted beads. On the distressed rectangle die cut, I sponged Picked Raspberry ink around the edges and stamped a news print stamp in Dried Marigold ink while it was still in the die.
The inside of the card uses a similar distressed rectangle, with the sentiment and conversation hearts stamps coming from an old Hero Arts stamp set.

Thanks for stopping by, and have a wonderful week!

I'm entering this card in the following challenges:
Mojo Monday Sketch Challenge #383
Simon Says Monday Challenge: H is for....
Simon Says Wednesday Challenge: All Things Bright and Beautiful
613 Avenue Create Challenge #110: Anything Goes w/Optional Twist Color Bingo (pink/purple/blue)
Chocolate, Coffee & Cards Challenge #84: Love is in the Air
Fresh Brewed Designs: Feb 4-10 Challenge--Pink, Hearts, or a Valentine
Paper Issues: The Perfect Pairing
Robyn's Fetish Challenge #250: Valentine Cards

~Hugs,

Supplies Used:

Thanks for visiting my blog!
To have Ink Up delivered to your inbox,
subscribe in the box at the top right of the page.

Home Sweet Home & a DT Call!

Monday, February 2, 2015

Have you heard...Paper Sweeties is having a DT call! You have until February 21 to apply. I bought a Paper Sweeties stamp set at a stamp convention this past weekend, and I'm throwing my hat in the ring with this card...
I used stamps from the Home Sweet Home stamp set and chose my colors from the February Paper Sweeties Inspiration Challenge. The card design is from this week's MFT Wednesday Sketch Challenge. For the 3-D heart, I die-cut three red cardstock hearts, stitched them through the center, folded the layers up, and added red Stickles to the center. I put a tiny bit of 3-D glue between the layers to make sure they stayed where I wanted them. It won't lie flat for mailing, but I'd rather have it fixed so the recipient sees it the way I envision it.


papersweeties-inspiration#28

I scored lines in the blue cardstock to mimic the beadboard lines in the inspiration photo, but it is hard to see them in the photo of my card. The dots in the lower right corner are all different. The white dot is an enamel dot from Michael's bargain bin, the blue dot is a Glass Effects Gel pen, and the pink dot is an "enamel" dot I made from melting a mini pony bead. It's the first time I've made them, and they turned out great, but holy moly do they smell bad! I won't be making any more of those until it warms up enough to take the toaster oven outside!
On the inside I used a Blueprints die set for the angled personalization panel, and also for the red heart. I'm leaving the inside blank, as this card could be used for any number of occasions.

Now, hurry on over and check out that Paper Sweeties DT Call

Stay warm, wherever you are, and have a sweet week!

I'm entering this card in the following challenges:
Paper Sweeties Inspiration Challenge #28: Sweetheart
The Shabby Tea Room Week #245: I {heart} You
My Favorite Things Weds Sketch Challenge #213
Simon Says Stamp Monday: H is for...
613 Avenue Create Challenge #109: Anything Goes
Really Reasonable Ribbon Challenge #110: Hearts and Ribbon Theme
Paper Issues: The Perfect Pairing with Epiphany Crafts
Robyn's Fetish Challenge #249: Anything Goes

~Hugs,

Supplies Used:

Thanks for visiting my blog!
To have Ink Up delivered to your inbox,
subscribe in the box at the top right of the page.