Elegant Paisley Case Bound Journal

Saturday, November 28, 2015

A case bound book is the kind of book most people are used to seeing. It's also the first kind of book I learned to make many years ago. I like case bound books because of the sturdy supported spines and more "finished" look, especially when you add in hand sewn headbands, which I've done in this example.   
Size: 4.25" x 5.50"
# of Sections: 12, with 4 folios in each
# of Pages: 192
Stitches: Coptic, Kettle, Long over tapes
Closure: None
Cover Material: Cotton Fabric
Thread: Linen (textblock); Silk (headbands)
I positioned the fabric so that the design would be centered over the spine. Also, it's hard to make out in the photos, but there is a tremendous amount of gold sparkle in this fabric. Everywhere you see a golden brown outline is actually gold, glittering thread. 
I sewed a basic headband (often refered to as endbands) to the top and bottom of the spine using olive green and white colored silk threads. Most headbands nowadays are just decorative--a strip of fabric with a pre-sewn headband along one edge that is glued to the top and bottom of a text block. A handsewn headband, however, actually serves to reinforce the spine of a book, and it looks pretty, to boot.
The spine of the textblock is not glued to the case. Instead, the spine is "hollow," so that the pages can operate independently of the case.

Thanks for taking the time to visit my blog! I hope you've enjoyed all the books I've posted recently. There will be many more to come in the future--I'm sure! ;)

~Hugs,
Thanks for visiting my blog!
To have Ink Up delivered to your inbox,
subscribe in the box at the top right of the page.

The Names of God--More Handbound Journals

The fabric I used for these journal covers are the names of God in a chalkboard style, The pages are blank inside. The books are identical except for the color of thread, elastic, and patterned paper. Two of them are for gifts, but I had extra bookcloth left over, so I went ahead and made a third one. 
Size: 4.75" x 6"
# of Sections: 10, with 4 folios in each
# of Pages: 160
Stitches: Coptic, Kettle, Gathered Long Stitch
Closure: Elastic
Cover Material: Cotton Fabric
Thread: Linen 
The patterned papers on the inside of each of these books is exactly the same except for the color. The polka dot paper covers the first and last sections just to add a little more interest to the spine.

The polka dot patterns line up on the outer sections, and I made sure to fold each of the polka dot folios down the center of a line of dots so that I could get as much color on the spine as possible.

If you are looking for 1/4" colored elastic, I found lots of different colors at The Ribbon Retreat. They have excellent customer service, as I accidentally ordered 1/8" elastic initially and they took it back for a store credit so I could turn around and order the 1/4" elastic quickly. This ribbon is much thinner than I am used to. It has a smooth texture and a looser elasticity than the thicker, ribbed elastic that I found at the craft store. I was afraid there wasn't enough spring to this elastic, but it actually works perfect for a book closure.

One more book left to share with you soon--a traditional casebound book.

~Hugs,
Thanks for visiting my blog!
To have Ink Up delivered to your inbox,
subscribe in the box at the top right of the page.

Floral Handbound Journal

For the binding in this book, I used Kettle Stitch, French Link Stitches, Long Stitches (Twisted), and Weaving. 

Size: 4" x 5.25"
# of Sections: 10, with 5 folios each (outer folio of each section is patterned paper)
# of Pages: 200, including patterned pages
Stitches: Kettle, French Link, Twisted Long Stitch with Weaving
Closure: None
Cover Material: Patterned Paper
Thread: Linen

Thanks for stopping by!

~Hugs,
Thanks for visiting my blog!
To have Ink Up delivered to your inbox,
subscribe in the box at the top right of the page.

Bookbinding Soothes the Soul

Friday, November 27, 2015

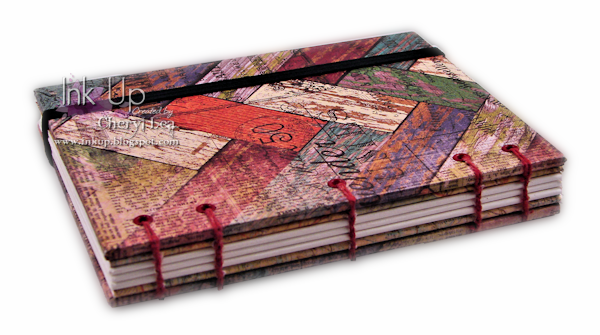
I mentioned in my previous post that I've been binding books for the past few weeks, but I haven't felt much like putting them on my blog until now. As I get the photos edited, I'll post them. There won't be much information beyond photos, size, and types of stitches I used. If you have any other questions about the books, just leave me a comment and I'll be happy to answer them as well as I can.
Size: 4" x 5.25"
# of Sections: 5, with 7 folios in each
# of Pages: 140
Stitches: Coptic, Kettle
Closure: Elastic, attached with eyelets
Cover Material: Patterned Paper
Thread: Linen (Faux Wood Book); Hemp (Newsprint Book)
Faux Wood Book - Covers

Newsprint Book - Covers
Faux Wood Book - Front
Newsprint Book - Back
Faux Wood Book - inside cover and first page
Newsprint Book - inside cover and first page
Faux Wood Book - Spine

Newsprint Book - Spine


Here's a look at the books I'll be posting to my blog soon. The tall lavender book with orange gathered stitches is the only one that won't have it's own post. It's a checkbook register exactly like this one except the cover and stitch color are different.

I'm entering this project in the following challenge:
Sweet Stamps November Anything But a Card Challenge

~Hugs,
Thanks for visiting my blog!
To have Ink Up delivered to your inbox,
subscribe in the box at the top right of the page.

Be Merry and Bright Card Set

I hope everyone had a Happy Thanksgiving yesterday. Are you still sleeping off all the turkey and trimmings? I definitely ate way too much! ;)

A friend saw a card I made last year and asked me to duplicate it as a card set. I'm not good with making multiple cards exactly alike, and I have almost completely lost my cardmaking mojo since saying goodbye to my little Silkie, Ozzy, 2 weeks ago, so I wasn't sure I would be able to do it. Ozzy was always underfoot when I worked in my craftroom in the middle of the night, and it's just not the same without him around. Since I haven't been able to find my get-up-and-go to design any cards at all, I thought CASing my own card a few times might help me get back in the groove again. 
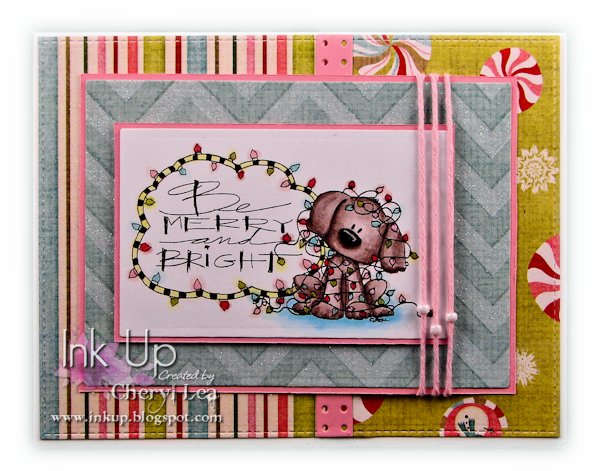
Here's the entire set. I basically just chose four different groupings of paper, twine, and beads, then colored the image to match it's card. I like how they turned out. You can't tell in the pics, but all the Christmas lights have clear Wink of Stella sparkling on them, and the little puppies' noses are all dimensional with Glossy Accents. Close ups of each one follow:
I didn't take pics of the insides, but they all have the same sentiment and 3 flags in the corresponding papers either sewn or stapled to the card. If you want to see an example of what I did, I do have a pic of the inside of my original card here.

While I haven't made any cards in a few weeks, I have been busy making books. Now that I don't have to reference a book or video every time I want to make a book, I can make them without having to concentrate a lot, for most of the process. I'll post pics of them soon.

In the meantime, thank you for visiting my blog today, and BIG HUGS to all my Paper Sweeties Design Teammates, Facebook friends, and real life friends who have sent me such wonderful messages of condolence. I know Ozzy was "only" a pet, but, to me he was as much a part of my family as anyone else in it, and if you've ever lost a beloved pet, I know you understand how devastating it can be. :'‑(

Have a wonderful weekend!

I'm entering this card in the following challenges:
Simon Says Wednesday Challenge: Anything Goes
Your Next Stamp Color Challenge #28 (the first card fits the challenge)
Sugar Pea Color Challenge #7: CCC7 (the first card fits the challenge)
TCP Tuesday 304: Anything Goes
Tiddly Inks Challenge #171: Anything Goes!
The Paper Shelter Challenge #229: A Christmas Card
DoubleClick Skittles Challenge: Christmas Holiday Challenge
Sweet Stamps November Anything Goes Challenge

~Hugs,

Supplies Used:

Thanks for visiting my blog!
To have Ink Up delivered to your inbox,
subscribe in the box at the top right of the page.

Paper Sweeties November Release Countdown!

Saturday, November 14, 2015

Have you started your Christmas countdown yet? Too early? Good! Then, you still have time to make your very own Christmas Advent Calendar! Here's a look at mine, made using Paper Sweeties new Days Until stamp and Sweet Cuts die sets that will be available in the Boutique starting tomorrow ...
This calendar was one of my happy accidents, where I started out making one thing and ended up with something I never could have dreamed up if I was trying. I originally intended to make a Christmas card using the "Days Until" stamp and die sets, and I got it in my head that I wanted to use corrugated cardboard on it somewhere. But, by the time I finished doctoring up the cardboard, I had smooshed it flat and got so frustrated I almost threw it away, when I realized the flattened cardboard looked a little like a shutter, and it might hold numbered squares the same way people display their Christmas cards on a real shutter. And, sure enough, it worked!
The "doctoring" I did was to add red, green, and gold Inka Gold to the flutes. To get the nice metallic Inka Gold sheen, it has to be burnished with a paper towel or cloth, which, of course, flattened it. 

Once the cardboard is flattened, the rest of the project is pretty straightforward. I distressed the edges of a piece of peppermint patterned cardstock with gold Inka Gold and black acrylic paint, then adhered that, and the cardboard piece to strips of black cardstock, leaving small black borders around each. A 1/8" black border around the peppermint piece is sufficient to be able to glue the flourished pieces to the top and bottom of the project. Those pretty flourishes are also part of the Days Until stamp and die sets, as is the "Days Until" text.

For the numbered date squares, I just stamped 24 squares onto a piece of cardstock, then stamped the numbers into the squares. A square die, exactly the right size for these squares is part of the Days Until Sweet Cuts die set. Debbie thought of absolutely everything when she created this fun set!

I added a chipboard easel stand to the back of this piece so it could stand, but I had to trim a little off the bottom of the stand to allow it to lean back more so the squares wouldn't fall out. (If I made this project again, rather than using corrugated cardboard, I would probably just fan fold a strip of kraft cardstock instead, which would create a deeper channel to put the squares in, so they would stay in better.)

To have a place to store the numbered squares as they are removed, I made a tiny cardstock box, glued a metal washer to the inside center bottom and added an earth magnet to the side of a chipboard easel stand so the box could be attached, but removed easily every day to add another square.

Most advent calendars I have seen have a whimsical look to them. I love that this one is more elegant. It fits right in with the rest of my Christmas decor!

Now, you seriously need to visit the rest of the Paper Sweeties Design Team for inspiration for everything from cards to home decor! There's even another countdown calendar, too! They have really gone all out for this release!


Thanks for stopping by, enjoy your weekend, and get your ready to shop in the Paper Sweeties Boutique first thing tomorrow! I predict this release is going to sell out fast!

~Hugs,

Supplies Used:

Thanks for visiting my blog!
To have Ink Up delivered to your inbox,
subscribe in the box at the top right of the page.

Paper Sweeties November Release Sneak Peeks!

Friday, November 13, 2015

With only 42 more sleeps until Christmas, it's about time to be thinking about Christmas cards, and the November New Release stamps and Sweet Cuts dies at Paper Sweeties are just in time to help you get your Christmas cards made.
I used the adorable new stocking die in the Stitched Tags #3 Sweet Cuts Die Set for this card. I cut the stocking once in red and once in white, then put the white cuff on the red stocking. I embossed the stocking and added a Snow Marker to the cuff for lots of texture. I love that the die set includes the dainty hanger, too. The stocking is hanging from a "garland" cut from the new Dear Santa Sweet Cuts Die set, and the sentiment is from the coordinating Dear Santa Stamp Set, also.
The sentiment on the inside is from a previous stamp set, Ho Ho Ho. I stamped it in red, then colored in the letters with Spica pens.

Be sure to check out the creations from the rest of the DT for tons of inspiration.


We'll be back tomorrow for our Countdown posts, and I can't wait to share my "Countdown" project made with the new Days Until Stamps and Sweet Cuts Dies.

~Hugs,

Supplies Used:

Thanks for visiting my blog!
To have Ink Up delivered to your inbox,
subscribe in the box at the top right of the page.

Flower Power Coptic Book

Sunday, November 8, 2015

I was never a "flower child." Even as a young child, I was probably too conservative to have fit in with that crowd. But, I did enjoy the fun flower art the movement inspired. The flowers on this book remind me of that, in design and color. I used matching orange, pink, green, and white paper to make the twelve 16-page sections (192 pages total). 
This book looks very similar in construction to my address book, with it's French Link and Long Stitch Weaving, but the thread is wrapped twice through the cover here. 

When I first saw books whose covers were attached with two threads, I thought they just went through each station of the cover twice. Oh my gosh, was I wrong! This stitch requires 9 steps! But, according to Keith Smith, in his book, Exposed Spine Sewings, this particular attachment (Type 5 Board Attachment Lark Spur, page 217) has "ideal" hinging action, so the extra work was worth it.
The inside cover


Since this is a small book (4" x 5.25") I had less weaving to do, but I packed it much tighter than on my address book.
And, here is the cover to cover pic. Because this book is covered in paper rather than cloth, the recessed grove for the elastic, on the front cover, is easy to see. Oops! I see now that I forgot to make grooves on the back cover for the small bits of elastic there. =$ Not to worry, though. I think my "signature" on all my books will be to include at least one purposeful mistake, just so there is no question that it is handmade. I just need to make sure I don't "sign" a book in too many places at once. ;)

~Hugs,
Thanks for visiting my blog!
To have Ink Up delivered to your inbox,
subscribe in the box at the top right of the page.

Custom Handbound Address Book

Wednesday, November 4, 2015

If you saw my last post, and actually made it to the end, you know that I have been working on a project for myself--a new address book. I almost gave up on it before I ever got to the binding part because getting the pages printed right was so difficult, but I persevered, and here it is! (Lots of photos!)
Most of my books are approximately 4" x 5", but this one is larger--5" x 7".  It is bound very similar to my journal from Monday, with a groove for the elastic band and Coptic and French Link Stitches over tapes, but I added Long Stitches with weaving, also.
Since this book has a longer spine, I was able to use wider ribbon for the French Link stitches, and I had a fairly large area for the long stitches. 
Here's a better view of the spine, especially the weaving. Weaving like this is simple, but given that I had 2" of Long Stitches to cover, and the thread was not very thick, it took awhile. And, since I don't have a lying press, I had to hold the book between my knees and sit all scrunched up while I worked on it, which did not make my neck happy at all! What a relief when I finally got to the last row!
I covered the inside covers with a calm, dark green paper. I like pink, but can only take so much of it at once. You can also see the first divider. I used white 65 lb. cardstock and added die cut tabs. The text on the tabs was made with a label maker. The black and white strip is Washi tape. I love how it looks, but I mainly used it to cover the part of the tabs that is glued to the divider. It didn't look too good sitting there all naked. ;D 
The best part of making your own address book is getting to put anything you want in it and leaving out things you don't need. These are the sections in my book. There are 15 in all, and I divided them by wrapping every other section with a cardstock folio. In all, each section has 12 pages--a total of 180, not including the dividers. You might be wondering if I'll ever get around to showing you the actual pages, right?
This is my title page. The pretty floral paper is a digital paper by Juliana Kneipp, called Old Sweet Times. Unfortunately, she no longer makes or sells digi paper, so I don't think it is available anymore. I used this particular image because it was only a border. Since I was printing this on my printer, I didn't want something that was going to drink up all my ink.
The entire book was created in Word, using tables. Here's my Personal Information page. I used that same floral image on every page in the book, adding a text box over it for the tables I made for the information. 
One of the things I really wanted in this book was a place to put things like the paint colors we've used, and major appliance information. I don't need to access it very often, but when I do need it, I can never find it. On the facing page, there is room for favorite babysitters, restaurants, theaters, parks, and libraries. 
The actual address section has 6 pages per letter, with room for 4 addresses on each page, except for a couple of combined sections (t,u,v and x,y,z). I can't imagine ever having more than 24 addresses under one letter of the alphabet, so I think I'll be able to use this book for a long time.
The last section is just a place for notes. All the pages in this section are set up the same, but 4 of them have a blank writing area, 4 have a lined writing area, and 4 have a grid writing area. You never know what you'll need to write in there. It probably looks like the text on every page in this book is printed in a different color. It's not. I can never get photos with lots of white to turn out right--especially when there is a lot of red in the photo, too. 
I see pics of handmade books with the pages fanned like this. Why? I have no idea. But, I figured I'd do it, too. :D

And, this is my favorite shot of a handbound book with an exposed spine. One that shows both covers and the spine at the same time.

After working on this for several weeks, now I need to fill it with information. I hope I can bring myself to actually write in it! I might need to work on my penmanship first. ;~/

Hope you are having a stellar week! Thanks for stopping by!

I'm entering this book in the following challenges:
613 Avenue Create #148: Anything Goes
Color Throwdown #367 (CTD#367)
Craft Your Passion Challenge #286: Always Anything Goes

~Hugs,
Thanks for visiting my blog!
To have Ink Up delivered to your inbox,
subscribe in the box at the top right of the page.