Showing posts with label Bring Back Beautiful Challenge. Show all posts

Happy Snuggles!

Sunday, July 8, 2012

Hi Friends! Have you had a good weekend? My DD came away from her birthday party yesterday with a big grin, and she's spent the day today putting together her new Friends Lego House (finally, Lego came out with decent girl sets!). So, our weekend was great!

I hope you don't get tired of seeing new baby wall hangings. I've got another one to share with you today, and I still have four more to make. This one is adorable, and a little unusual, so I think you'll enjoy it.


I talked to one of my nephews at the birthday party, and he said he and his wife don't really care for pink and frills for their new daughter's room, so they are going with a forest friends theme, and are using reds, blues, and whites as the main colors. I had just bought a digital paper pack from Print Candee called Forest Friends, and it is almost exactly what my nephew described. Also, I just got a baby shower invitation from them, and it has the cutest little group of owls across the top, so the owl from Paper Smooches' Chubby Chums set was an obvious choice.


I used the Viva la Verve July 2012 Week 2 sketch for this creation, but I made mine square and used a twig for the narrow strip in the center.


And, the Color Throwdown Challenge CTD199 fit right in with the nursery color theme!

I colored the owl with Copics, used Glossy Accents for the eyes, and put Stickles on the beak. Then, I went outside and found a little twig to stand him on. I tied the twig with twine, but also used some Glossy Accents to hold it in place.

I didn't want to add any rhinestones or pearls, since it's a nature theme, so to give it a little more girly feel, I added some white cotton lace and some dangling, gold sparkly trim.


As I did for the last baby wall hanging, I decorated the back so I could use this as my shower gift card, too. The sentiment was created in Word, printed on a transparency, and rubbed onto the cs. Oh, and I got the sentiment from the book, Words to the Rescue 2.

This was so much fun to make! Now I need to find out what my other nieces and nephews will be doing in their nurseries!

Thanks so much for stopping by today! Hope you have a wonderful week. :)

I'd like to enter this in the following challenges:
Viva la Verve July 2012 Week 2 Sketch Challenge
Color Throwdown CTD199
Flourishes Bring Back Beautiful BBB24: The Beauty of Winged Things
Stampin' Sisters in Christ Challenge #147
Sentimental Sundays Challenge #110: BINGO (Lace-Flowers-Diecut)
Catch the Bug Challenge-July: Anything Goes
Craft Your Days Away #49: Doilies and Lace
Crafty Ribbons Challenge #23: Photo Inspiration

~Hugs,

 
Stamps: Chubby Chums (Paper Smooches); Hello Baby (Flourishes); Burlap background (Stamp Camp); Welcome Baby (Recollections)
Paper: Forest Friends, Hexagon Colorful digital papers (Print Candee); corrugated cardboard; chipboard
Ink: Distress Ink; Memento; Copic markers
Dies: Floral Ovals, Romantic Rectangles, Labels Twenty-Five (Spellbinders); French Pastry Doily (Cherry Lynn Designs)
Accessories: Designer Pine punch (McGill); embossing powder (Zing); lace; gingham ribbon; flower; eyelets; twine; sewing thread; twig; Glossy Accents; Stickles; foam dots
Size: 6.25" x 6.25" (not including lace trim)
Thanks for visiting my blog!
To have Ink Up delivered to your inbox,
subscribe in the box at the top right of the page.

You're a Peach!

Tuesday, May 8, 2012

Hi Friends! My DD wanted to give her teacher a gift for teacher appreciation week, so, of course, I just had to make a card for the occasion, also. 


I love mixing dp's, and the Viva la Verve May 2012 Week 2 sketch is a good one for that.

And, this pretty color palette is perfect for peaches!
I found a peach-scented candle that smells heavenly, so I used a Flourishes peach stamp set to make a coordinating card. I meant to add three staples above the image, but forgot to do it before I glued everything together, darn it!


My DD had a really good 2nd grade year, so I left plenty of room for her to thank her teacher and sign her name. :)

Thanks for stopping by, and have a wonderful week!

I'll be entering this card in the following challenges:
Viva la Verve May 2012 Week 2 Sketch Challenge
ColourQ Challenge #136
Flourishes Bring Back Beautiful Challenge 22: The Beauty of the Garden
Crafty Friends Challenge #3: Inspiration Challenge
Crazy 4 Challenges #135: Gardening or the Great Outdoors
Do You Stack Up Challenge #70: Circles
Moving Along With the Times: Summer Sunshine
Great Impressions Rubber Stamps Challenge #3: Anything Goes
The Emerald Fairies Challenge #23: Anything Goes

~Hugs!
 
Stamps: Cherries & Peaches (Flourishes)
Paper: Farmhouse (Crate Paper); Sweetness (Pink Paislee); Best of K&Co
Ink: Distress Ink; Memento; Copic markers
Dies: Std Circles Sm, Classic Scalloped Circles Sm (Spellbinders)
Accessories: Postage Stamp edge punch, Binding Edge edge punch (EK Success); lace (Joann); grosgrain ribbon (Taylored Expressions); rhinestones; Stickles; foam dots; sewing thread
Size: A2 (4.25" x 5.5")
Thanks for visiting my blog!
To have Ink Up delivered to your inbox,
subscribe in the box at the top right of the page.

Tuesday Morning Sketch Challenge #141: Butterflies

Tuesday, April 10, 2012

Hi Friends! Have you played along with Tuesday Morning Sketches yet? If you have, you know how much fun it is, and if you haven't, this is the perfect time to start, because our intrepid leader, Melissa, has come up with a great sketch, Digital Delights is our fab sponsor,and this week is a judged challenge--not a random drawing! Being a judged challenge, there is a twist, too: Think Spring! You ready?!? Let's go!

Here's the sketch:


And, here's my take on it:
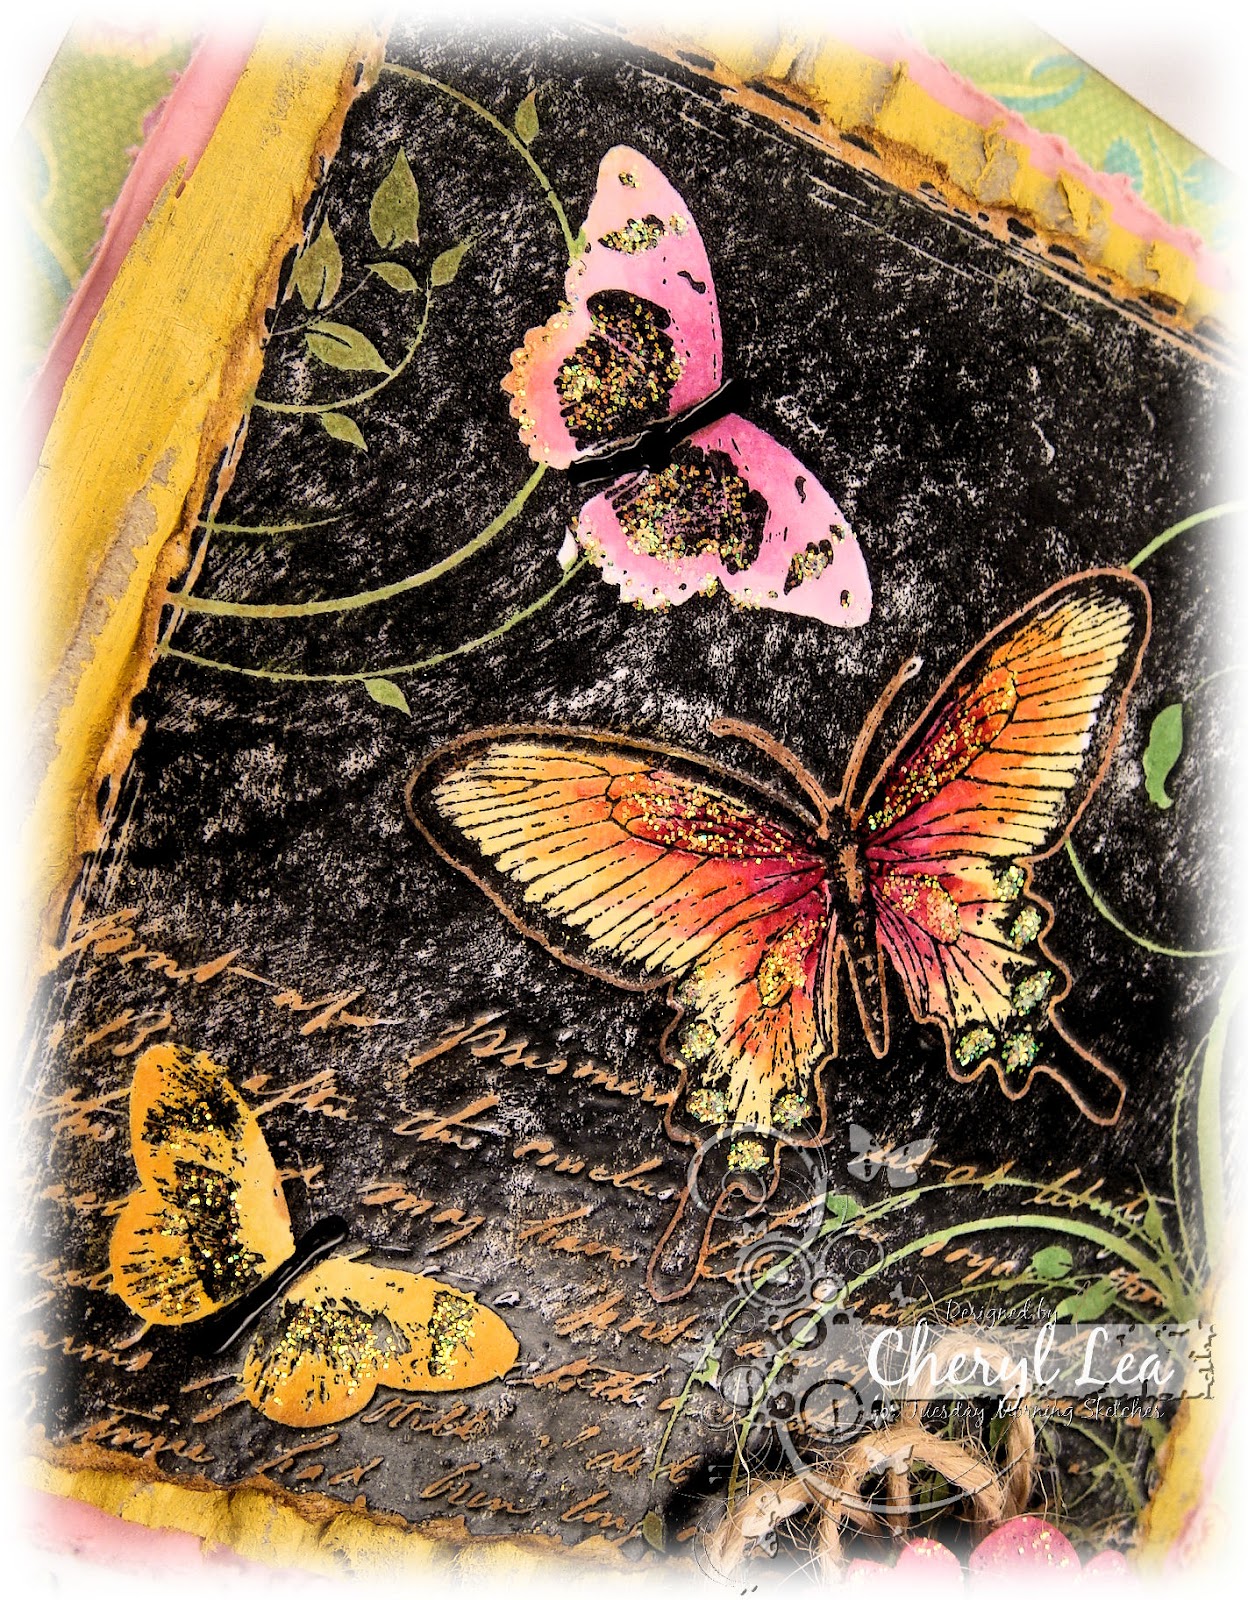
I rotated the sketch and tweaked it just a bit by tilting the main image panel and adding an embellie. The yellow corrugated layer is from a shipping box. I peeled off one side of the paper, painted it, then sanded it to give it a more distressed look. 

For the image, I stamped it in black ink, then embossed it with clear embossing powder. I wanted to use the current Kathy's Lily Pad Palette Challenge of pink, green, and yellow for this card, so I colored the leaves and vines green, one butterfly in shades of pink, one in shades of yellow, and the largest in both pink and yellow. I love how that one turned out, with orange in the blended areas. I added Stickles here and there for some sparkle--always essential in a girlie card. ;)

The sentiment is from Flourishes' Tiny Flowers and Tags set, and I used the coordinating Classic Tags Template die to cut it. See how the knots on the lace lined up perfectly with the eyelets on the white die cut border? I didn't know that was going to happen until I was actually putting it together. I love it when things work out just right, by pure chance.

As busy as the front of this card is, the inside was much more difficult for me to design. All I knew was that I wanted to use this Spellbinders Flying Beauties die cut. I've had the set for awhile, but never used it. You can't see it in the picture, but after sponging Distress Ink on the butterfly, I spritzed it with Shimmer Spritz, so it shimmers in the light. The flourish underneath the sentiment is from the In Flight stamp set from Our Craft Lounge--perfect since that is a butterfly set, too. 

Okay, that's it for my card. I sure hope you can join us at Tuesday Morning Sketches this week! And, for some fantastic inspiration, be sure to check out the rest of the DT to see how they interpreted this sketch. You may be so inspired, you'll want to make more than one card for the challenge! ;) I can't wait to see what you come up with!

I'll be entering this card in the following additional challenges:
Simon Says Stamp: Use Your Favorite Tool (Mine is the Big Shot!)
Little Darlings Challenge 20: Outside
Kathy's Lily Pad Palette Challenge: Pink, green, yellow
Flourishes Bring Back Beautiful Challenge 21: The Beauty of Friendship
Crafty Friends Challenge #1: Vintage

Thanks so much for visiting me today! Hope you have a wonderful week, and have fun with the challenge!

~Hugs!
 
Stamps: On Butterfly Wings (Hampton Art); Tiny Flowers & Tags (Flourishes); Sunny Days (Verve); In Flight (Our Craft Lounge)
Paper: Sweet Nectar (K&Co); cardboard
Ink: Copics; Colorbox; Distress Ink
Dies: Classic Tags Template (Flourishes); Fair Isle Border Petites, Fleur de Lis Rectangle, Flying Beauties (Spellbinders)
Accessories: Clear embossing powder; lace (Joann); acrylic paint; flower; twine; Stickles; Shimmer Spritz; Enamel Accents; sanding block
Size: A2 (4.25" x 5.5")
Thanks for visiting my blog!
To have Ink Up delivered to your inbox,
subscribe in the box at the top right of the page.

Love You Always

Monday, February 13, 2012

Hi Friends! I have another Valentine's Day card to share with you today. This one is for my DD to give to her daddy, my DH. She calls him Papa, and she absolutely adores him. She's in the second grade, and reads at a sixth grade level, but she still wants her Papa to read to her every night. It's their "thing." Their plan is to do this until she grows up and moves away. Isn't that sweet?

I used another older Mojo Monday sketch (#170) for my layout. The theme for Our Craft Lounge OCL104 is Vintage Love, and the Flourishes Bring Back Beautiful challenge this month is BBB19: The Beauty of Love, so I think this card handles both of those pretty well.

I am loving my new By Lori Designs digital images. This one is Suzy, and she reminds me of my DD, with all that curly hair and demure expression.
I colored Suzy with Copic markers, fussy cut her out, added little dots of Liquid Pearls for buttons, then popped her up with foam dots. After stamping the hearts beside her, I sponged Victorian Velvet Distress Ink in them and added pink rhinestones for sparkle. I used a Pearl Pen for the pearls on the Fleur de Lis Rectangle die cut. The Valentine ticket is stapled onto the card with a mini stapler.


After die cutting the blue heart, I sponged Victorian Velvet Distress Ink around the edges while it was still in the die. Then stamped a burlap design on it in Stormy Sky Distress Ink. Using my Distrezzer, I distressed the edges of the heart, ticket, and main panel, sponged Walnut Stain, then randomly dabbed water here and there to smear the ink, rolling up some of the edge, too. I stitched the main layers by randomly changing between zigzag and straight stitching, and also changed up the width and length of the stitches as I sewed.

The inside is a little unusual. See what you think, then I'll explain my thoughts behind it:


Since this card is from my DD, I wanted it to "feel" like it was from her. When she makes cards, she tends to get really carried away when she likes a particular stamp or ink or glitter glue (I may have to put my Stickles under lock and key!)  So, when I decorated the inside of this card, I used the "lots & lots of love" sentiment, then stamped the "Happy Valentine's Day" sentiment lots & lots of times, along with that little heart stamp. To my DD, the more she emphasizes something, the more it means to her, and she would really, really, really, want her Papa, my DH, to know that she loves him and wants him to have a Happy Valentine's Day. She's such a Sweetheart!

Well, that's it for today! Hope your day is filled with crafty fun!

~Hugs,
 
Stamps: Puddle Jumper-Suzy--Digi Stamp (By Lori Designs); Valentine Savings (Hero Arts); Burlap background (Stamp Camp)
Paper: Kissing Booth, Oxford (Basic Grey); Vintage Style Valentine Tickets (Miss Cutiepie Inspiration)
Ink: Copic Markers; Distress Ink
Dies: Classic Hearts, Classic Scalloped Hearts, Fleur de Lis Rectangles (Spellbinders)
Accessories: Ribbon (Offray); pearls; sewing thread; Glossy Accents; Liquid Pearls; rhinestones; Pearl Pen; mini staples
Size: A2 (4.25" x 5.5")
Thanks for visiting my blog!
To have Ink Up delivered to your inbox,
subscribe in the box at the top right of the page.

Give Thanks

Wednesday, October 5, 2011

Hello everyone! I've missed you the past few days. I've been busy behind the scenes on a couple of things, but I'm hoping to get things caught up around here soon so life can get back to normal.

My card today is in shades of fall again. It's not hard to find a challenge incorporating this beautiful season in it in some way right now, and I'm glad, because all those warm autumn colors are spectacular. But, do you see that pink twine and the pink rose? Pink...for fall? Keep reading to see what's up with that. ;)


The sketch today is the Tuesday Morning Sketch #114, and the challenge is dedicated to my sweet friend, Theresa, at My Sassy Cards. Tomorrow is her birthday! Happy Birthday, Theresa!!!

But, October is also Breast Cancer Awareness month, and Theresa is a four-year breast cancer survivor, so Melissa (Theresa's sister), at TMS, is dedicating all the challenges in the month of October to Theresa. To participate this month, you must play every week, your creation must have pink added to it, and it can be linked to no more than two other challenges. This is definitely a fall-colored card, but I added Petal Pink Liquid Pearls to the Beaded Circles Spellbinders die cut, a pink paper rose, and pink and white twine.

You might think that pink is out of place on a fall card, but this card is also for two Flourishes challenges: Bring Back Beautiful: Beauty of a Technique Challenge #15 (I'll get to that in a minute), and Timeless Tuesday #138. Here's the inspiration photo for the Timeless Tuesday challenge:


Just look at that gorgeous photo, and low and behold, I see pink! Perfect! For the technique challenge, I used the faux silk technique that Beate Johns demonstrated at SCS. I used white tissue paper, stamped a background text image, then adhered it to cardstock that is orange with brown leaves on it. I sponged Vintage Photo around the edges before removing the Spellbinders die. What a great look--and so easy!

The inside of the card is a simple "Happy Thanksgiving," with a Flourishes leaf as an accent.

So, have you played in any of these challenges yet? If not, there's still time. Just click on over to Tuesday Morning Sketches or Flourishes (or both) to charge up your creative self with some fab inspiration by their respective Design Teams. And, be sure to stop by My Sassy Cards with Happy Birthday wishes for Theresa! She is one special lady.

Thanks for stopping by, and Happy Crafting!!!
 
Stamps: Sweet Nature, Falling Leaves (Flourishes); Fall Mini Assortment (Studio 112)
Paper: Forever Fall Collection (Bo Bunny); Que Sera Sera (K&Co); tissue paper
Ink: Memento; Tim Holtz Distress Ink
Dies: Classic Scalloped Circles Lg, Std Circles Lg, Beaded Circles (Spellbinders)
Accessories: Twine (The Twinery); Liquid Pearls; flowers (Recollections); glitter; foam dots
Size: 4.25" diameter
Thanks for visiting my blog!
To have Ink Up delivered to your inbox,
subscribe in the box at the top right of the page.

When it Rains

Thursday, September 8, 2011

Good Morning! My house needs some serious cleaning, so this is going to be short and sweet.

I've made another card for Flourishes Bring Back Beauty Challenge #14: The Beauty of Color. This one is blue--never my first choice, but since the Timeless Tuesday Challenge #134 is "Keep Calm and Play With Water," blue made sense. Can you see my glittery rain down by the sentiment?

The layout is Taylored Expressions Sketch #145 turned sideways.

I used Flourishes April Showers stamp set for the boots and sentiment on the front of the card, and also for the cloud and sun on the inside. Verve's Sunny Days set was perfect for the inside sentiment.

On the inside, I sponged just a little Wild Honey Distress Ink on the sun.


Now, where is that vacuum cleaner?

Thanks for stopping by, and have a Scrappy Day!

 
Stamps: April Showers (Flourishes); Sunny Days (Verve); Distressing (Glitz)
Paper: Watercolor Bouquet (K&Co)
Ink: Tim Holtz Distress Ink; Memento; Colorbox; Copics
Dies: Large Labels, Labels Four, Curved Rectangles (Spellbinders)
Accessories: Embossing powder (Stampendous); ribbon (Michael's); rhinestones; twine; button; foam dots; glitter; sewing thread
Size: A2 (4.25" x 5.5")
Thanks for visiting my blog!
To have Ink Up delivered to your inbox,
subscribe in the box at the top right of the page.

Tomato Soup

Wednesday, September 7, 2011

Good Morning to you! I hope your week is a good one so far. 

Before I tell you about today's card, a quick Thank You to Lydia (Understandblue at Splitcoaststampers) for posting my Spooky Tree Halloween card on Facebook yesterday. It generated 1,500 views to that particular card in just one day! Wow! I didn't even know that was possible. 8~D

I made today's card using the Sweet Sunday Sketch Challenge #133. It follows the sketch fairly closely, except that I put copper brads at both ends of the rickrack, and where 3 small embellies would be in the upper left corner, I used a Leafy Sprig die cut, and I put a smaller one in the lower right corner to balance it out. They look a little bit like tomato leaves when they are cut without using the coordinating stamp, don't they?

I'm also playing along with the Flourishes Bring Back Beauty Challenge #14. This month's theme is "The Beauty of Color," and the challenge is to make a monochromatic card. I couldn't begin to tell you what the color of my card is, but since it features tomatoes, I'm calling it tomato soup. Even the rickrack looks like it's been colored with tomato soup. Okay, I know that the leaves are green, but I couldn't find a way around that. :D  I was a little bit concerned that I wouldn't be able to do this stamp justice because of all the red I would be using, but it turned out okay. I did have to use yellow and white colored pencils with mineral spirits to highlight the bumps on the tops of the tomatoes. I never seem to leave enough room for highlights when I'm using Copics.

For the inside of my card, I stamped the tomato image in Rusty Hinge Distress Ink. I stamped off onto scrap paper one time before stamping my card so the image would be light enough to be able to write a message over it. I love the look of this stamp--even when it's left plain it's beautiful.  

Thanks for stopping by! Have a great day!!!

Stamps: Italian Garden, Garden Fresh (Flourishes)
Paper: The Breathe Paper Collection (Prima)
Ink: Tim Holtz Distress Ink; Memento; Staz-On; Copic markers
Dies: Std Circles Lg; Lotus Pendant (Spellbinders); Leafy Sprigs (Verve)
Accessories: Diamonds in Diamonds embossing folder (Sizzix); rickrack (Fancy Pants Designs); antique copper brads (Making Memories); colored pencils; sewing thread; Corner Chomper
Size: A2 (4.25" x 5.5")
Thanks for visiting my blog!
To have Ink Up delivered to your inbox,
subscribe in the box at the top right of the page.
Peas to meet you

Tuesday, August 2, 2011

I'm back with another card. This one is for Flourishes Bring Back Beautiful Challenge #13. The challenge is CAS--not my strong suit, but here goes.

I colored the pea stamp with Copics, cut it with a Spellbinders oval die, and backed it with a SB Parisian Accent die that I cut in half. Since the green accent blended in almost completely with the background paper, I cut another larger white oval to put behind that. I really like the background paper with this stamp because the leaves on it look just like the leaves in the stamp. Besides the Copics, the only ink I used was on the edge of the background paper and to accent the embossing on the Parisian motif. I considered just one strand of twine with a simple knot around the card, but I tried it, and it actually took away from the rest of the card, so I scrapped that idea.

We are going to Open House at my daughter's school tonight, and her new teacher is one whom she hasn't actually met yet, so I thought, with the right sentiment, this would be the perfect card. I typed one on the computer and printed it directly onto white cardstock:
Before adhering the sentiment panel to the inside of the card, I used my scoreboard and scored two sets of lines around the edge. It's faint in the photo, but it's visible if you look close enough.

I wasn't sure my daughter, who is only seven, would like this as a card for her new teacher, but she loves it. She even liked it before she read the sentiment, which she thinks is a cool joke.

So, there you have it--my version of CAS. I wasn't sure I was up to the challenge of a clean and simple card, but it was fun. (Is there anything about cardmaking that isn't fun?) After I colored the stamp for this card, I realized the color of the basket is the same as a fresh radish. Well, low and behold, there is a stamp of radishes (or is it beets?) in the same set as the peas, so my next card may end up being CAS, too.  :D

Thanks for stopping by, and I hope you'll visit again soon! Have a nice evening.

Stamps: Garden Fresh (Flourishes)
Paper: Summer Song (My Mind's Eye); Recollections
Ink: Tim Holtz Distress Ink; Memento; Copics
Accessories: Dies: Classic Ovals Lg, Parisian Accents (Spellbinders); Score Board (Martha Stewart); sentiment generated on computer and printed on cardstock
Size: A2 (4.25" x 5.5")
Thanks for visiting my blog!
To have Ink Up delivered to your inbox,
subscribe in the box at the top right of the page.