Birthday Fishes Tag

Saturday, June 30, 2012

Hi Friends! Hope you're having a great weekend! I'll be taking a little break during the summer from the Tuesday Morning Sketches DT, in order to spend more time with my DD, but I'll still be posting cards occasionally.

Today, I've got a birthday tag for a boy. Going with a fish and water theme, all the layers have circles, bubbles, or dots on them--including the fish!


I used this week's Viva la Verve sketch, rotated 90 degrees.

And, my color palette came from this week's Color Throwdown palette--perfect for a fishy tag.


Paper Smooches Sparks Challenge: Picture Perfect looks like it has water in the background, and I trimmed my ribbons to look like the little flags in the cupcakes. 
Here are closeups of the ribbons and glittery fish:


Thank you for all your sweet comments on my blog recently. If I haven't commented on your blog in the past couple of weeks, I'll be by very soon. My daughter and I have had a couple of weeks of visiting family and friends, so my computer time has been very limited. But, I'm home for awhile now, and can get caught up. :)

I'd like to enter this tag in the following challenges:


That's it for me today! Thanks for stopping by! 

~Hugs!
 
Stamps: Birthday Buddies (Paper Smooches)
Paper: Cafe Mediterranean, Mango Frost (DCWV)
Ink: Colorbox; Copic markers; Sharpie markers
Dies: Classic Ovals Lg (Spellbinders)
Accessories: Circles Lg. Edger punch, 5/8" circle punch (EK Success); Seeing Spots embossing folder (Cuttlebug); ribbon; colored pencils (Prismacolor); Corner Chomper; mini round gems (Recollections); eyelet; buttons; foam dots; Glossy Accents; Stickles; Liquid Pearls
Size: 3-5/8" x 5-5/8"
Thanks for visiting my blog!
To have Ink Up delivered to your inbox,
subscribe in the box at the top right of the page.

TMS #152: Hello Treasured Friend

Tuesday, June 26, 2012

Hi Friends! It's Tuesday Morning Sketch time! This week, our sponsor is Paper Garden Projects, and if you haven't visited their site yet, you should. They carry clear, rubber, and digital stamps, as well as other products. The coneflower image on my card today is one of their free digi stamps, as is the "Treasured Friend" sentiment. Isn't it beautiful!

Melissa has a fab sketch for us, again. I really like this one, as it lends itself to either a card or a tag.

I've been seeing a lot of white on cards lately, so I decided to give it a try, too. The coneflower image and sentiment was printed on my printer. It's hard to see in the photo, but the swiss dot rectangle also has a pale blue background stamp on it in blue. The bow is made from seam binding that I dyed with reinker a few months ago, and my layers are popped up.

I colored the image with Copics, then coated the bottle in Glossy Accents.

The coneflower stamp on the inside is from the With Gratitude stamp set from Flourishes that you can only order through their FLIP program, and the sentiment is another Flourishes set called Sweet Nature.

Be sure to take a look at what the rest of the DT has created this week, for some fab inspiration, then create your own project and link up on the Tuesday Morning Sketch Challenge blog! I can't wait to see what you create!

I'd like to enter this card in the following challenges:
Whimsy Stamps Inspiration Challenge 44: White on White
The Shabby Tea Room Week #120: Soft and Sweet
Cute Card Thursday Challenge #222: Here Comes Summer

Thanks for stopping by, and enjoy the week!

~Hugs,
 
Stamps: Coneflowers Digital Stamp Set (Paper Garden Projects); Dots & Flowers (Hero Arts); Sweet Nature, With Gratitude (Flourishes)
Ink: Copics; Colorbox; Memento; Distress Ink
Dies: Labels Fourteen, Classic Ovals Lg (Spellbinders)
Accessories: Mystic M-Bossabilities embossing folder (Spellbinders); Swiss Dots embossing folder (Cuttlebug); seam binding--dyed with reinkers (Hug Snug); button (Bazzill Vintage); pearls; Glossy Accents; Memory Thread (DMC); Corner Chomper
Size: A2 (5.5" x 4.25")
Thanks for visiting my blog!
To have Ink Up delivered to your inbox,
subscribe in the box at the top right of the page.

TMS #151: Pastel Happy Birthday

Tuesday, June 19, 2012

Hi Friends! Well, here it is...Tuesday again! That means it's time for another Tuesday Morning Sketch challenge! This week our sponsor is The Beary Scrap. They have all kinds of craft supplies, plus the super cute "Tear Bears." I love the fuzzy look you get with them.

Here's this week's sketch, created by our own Kathy Curry.
And, here's my interpretation. This card was a lot of fun to make, and although I'm not a huge fan of pastels, I was pleased with how it turned out. I think my DD is going to send this to her new friend in Texas, for her birthday next month. It's a perfect girly card.

After leafing through the latest Paper Crafts Magazine, I got the idea to use watercolor paper to make my own background paper. My first attempt was horrible, because I didn't have any watercolors (my DD does, but I'd forgotten about those until I was finished with the card), and tried substituting with reinkers which don't create the same effect. But, I tried again, this time, with sponge daubers and Distress Ink. On the top half, I just daubed different light shades of ink on the paper, directly from the ink pad. On the bottom half, I used my sponge daubers and made stripes of the same colors. After I glued both halves together onto a piece of cs, I ran the entire piece through my Big Shot using an embossing folder (my entire card recipe is at the bottom of the post). The colors were a little bright for what I had in mind, so I used white acrylic paint and brayed across the raised portions, which lightened it up considerably.

For the butterfly, I punched one butterfly from plain cs, and a second from cs scrap that had previously been dry embossed. I loved the texture of the embossed butterfly, but the embossing had weakened the paper so much, the butterfly wings were as delicate as a real butterfly's wings, so I covered that one with Glossy Accents to help hold it together. The body of the butterfly is made of Liquid Pearls.

I made the flower and leaves with the Rose Creation die set, and used a yellow brad in the center to hold it together. Then I covered the brad with glue and used a little Sparkly Fluff to cover it, and edged the petals with Stickles.
Did you notice the flower stamped in the center of the sentiment on the front of the card? Well, for the inside, I decided to use that same stamp, in all the colors I used on the bg paper. Distress Ink stamps pretty dark, so I stamped off at least one time before stamping onto the inside. 

Be sure to check out what the rest of the DT has created for loads of inspiration, then create your own project and link up at Tuesday Morning Sketches. Oh, and if you haven't seen the TMS blog in the past week or so, you should definitely check it out. Melissa and Theresa have given it a complete overhaul, and it's gorgeous!!!

I'd like to enter this card in the following challenges:
Flourishes Bring Back Beautiful BBB23: Beauty of the Rainbow
Simon Says Stamp: Joy's Summer Inspiration
Cute Card Thursday Challenge 221: Punch Drunk (use a punch)

Thanks for stopping by my blog, and have a crafty week!!!

~Hugs,
 
Stamps: Big Birthday WishesFabulous Florals (Our Craft Lounge)
Paper: Watercolor paper
Ink: Distress Ink; Memento; Sharpie pen
Dies: Classic Scalloped Circle Sm, Std Circle Sm, Rose Creation (Spellbinders)
Accessories: Monarch Butterfly Lg (Martha Stewart); Bloom Dots embossing folder (Cuttlebug); ribbon (Michaels); Acrylic Paint; pearls; brads; sewing thread; foam dots; Sparkly Fluff; Glossy Accents; Stickles; Liquid Pearls
Size: A2 (5.5" x 4.25")
Thanks for visiting my blog!
To have Ink Up delivered to your inbox,
subscribe in the box at the top right of the page.

Bird & Flowers

Sunday, June 17, 2012

Hi Friends! My posts are often long, but tonight, I'm going to give S&S (Short & Sweet) a try. ;)  Let me know what you think. Do you prefer photos and description/details about my cards, or just photos?


Inside
Thanks for stopping by, and have a fantastic week!

I'd like to enter this card in the following challenges:
Simon Says Stamp Challenge: Joy's Summer Inspiration
Stampalot Challenge: June, Bingo (Lilac/Purple, Polkadots, Bling)

 
Stamps: Birds & Flowers (Recollections); Essential Messages (Hero Arts)
Paper: Que Sera Sera (K&Co); Shimmer Stack (DCWV)
Ink: Staz-On, Distress Ink; Sharpie markers
Dies: Lattice Pendants, Lattice Border, Classic Ovals (Spellbinders)
Accessories: Embossing Powder (Zing); rhinestones; ribbon; foam dots; Stickles; Glossy Accents
Size: A2 (4.25" x 5.5")
Thanks for visiting my blog!
To have Ink Up delivered to your inbox,
subscribe in the box at the top right of the page.

One Touch of Nature

Thursday, June 14, 2012

Hi Friends! I'm back again, with another card using this week's Tuesday Morning Sketch.
I used the TMS #150 for the card design. This was my original DT card until I realized that I didn't follow the "twist" of kraft, black, and one other color!  No worries! I just made another card for the TMS post. :)

I used the viola stamp from the Flourishes Botanical Bookplates Vol. I set for my main image. Now, I love flowers, but I don't know a thing about them. If Flourishes didn't always put the names of the flowers on their blog, I wouldn't have a clue about what they are. So, after reading that these are violas, I went to the internet to see what they are supposed to look like, and lo and behold, there is a variety called Chocolate Violas! Being the chocolate lover that I am, that's what I decided these are. I colored the image with Copics and added background shading with Distress Ink. The gold centers, as well as the gold dots on the scallops, are from a Pearl Pen.

I picked up these gold foil filigree corners at the stamp convention I went to a few months back. 
I used Versamark ink and the same viola stamp on the inside, as a watermark. It's almost impossible to see in the photo, but it's really pretty in person. The sentiment is perfect for the purpose of this card. It's a thank you to a couple who allowed me to share in their amazing personal collection of nature's beauty.

On my recent trip to Texas, my friend, Carolyn, honored me with a visit to a friend's home. The home was spectacular, but the real treat was not the actual house--it was what was inside! The couple who lives there are both--yes, both the husband and wife--big game hunters. I made this card as a thank you for the owners of the home, who were away at the time, for allowing me to get a glimpse of the most awesome collection of big game trophies I've ever seen--or even imagined! It was a big highlight of my trip!

I'd like to enter my card in the following challenges:

Thanks so much for stopping by, and enjoy the rest of your week!

~Hugs,
 
Stamps: Botanical Bookplates Vol. 1 (Flourishes)
Paper: A Beautiful Life (My Mind's Eye)
Ink: Distress Ink; Versamark; Memento; Copic markers; gold opaque paint marker
Dies: Classic Ovals Sm, Classic Scalloped Ovals Sm, Classic Scalloped Rectangles Lg (Spellbinders)
Accessories: Abstract Flower Punch (EK Success); gold foil corner stickers (Starform); sewing thread; Pearl Pen
Size: A2 (4.25" x 5.5")
Thanks for visiting my blog!
To have Ink Up delivered to your inbox,
subscribe in the box at the top right of the page.

TMS #150: Eiffel Tower Birthday

Tuesday, June 12, 2012

Hi Friends! It's time for the Tuesday Morning Sketches Judged Challenge, with a twist! Our sponsor for this challenge is Designed 2 Delight Digital Stamps. They have some really cute stamps. I didn't have one to use this time, but the rest of the team did, so be sure to visit the TMS blog to see how they used them.


Melissa gave us a fab sketch, and the "twist" is: Kraft, Black +1 (other color). I went with shades of lavender for my +1.
I turned the sketch vertically, added a gussied-up bow, and made the center panel a rectangle instead of an oval. Also, the corner triangles are embossed with silver glitter embossing powder. Can you see the sparkly Stickles dots around the Eiffel Tower? I was envisioning an evening sky, filled with stars.

Here's a close up of the bow. The metal flower came from a Michael's Christmas ornament kit, and I just added a jeweled brad to it.

I wanted more of the digital dp to show on the inside (check out the link below--it's a free dp!), so I made the sentiment layer fairly small, tilted it, and added another silver embossed image in the lower right corner. Here's a better few of that image:

The embossing powder was a little too chunky for the detailed image, which is actually a pocketwatch, so I stamped over the glitter with a black ink. In person, you can see the detail a little better, but not much, however, it's very sparkly, and looks very pretty in person.

I hope you'll join us this week. The judged challenge is always fun! So, head over to the Tuesday Morning Sketches blog, get yourself super inspired by the DT, and create something marvy! I can't wait to see your interpretation of the sketch and "twist!"

I'll be entering this card in the following challenges:

Thanks for stopping by, and have a great week!

~Hugs,
 
Stamps: Vintage Traveler (Our Craft Lounge); Daisy Bouquet (Taylored Expressions)
Paper: Vintage Wallpaper--FREE Digi Paper (Lost & Taken)
Ink: Distress Ink; Memento
Dies: Fleur de Lis Rectangles (Spellbinders)
Accessories: Silver glitter embossing powder (Zing); seam binding (Hug Snug); metal flower; jeweled brad; Stickles; Enamel Accents; sewing thread; Distrezz-It-All
Size: A2 (4.25" x 5.5")
Thanks for visiting my blog!
To have Ink Up delivered to your inbox,
subscribe in the box at the top right of the page.

Kaleidoscope Father's Day

Sunday, June 10, 2012

Hi Friends! Hope you are having a wonderful weekend! I have a quick Father's Day card to share with you today. Flourishes is having a Gimme Ten (minute)! challenge, and even though I usually take hours to make a card, I thought I'd give it a try. And, I used this week's Play Date Cafe Color Challenge for my color palette:

I mentioned, in my last post, that I wanted to take a photo of my home library and try to come up with my own personal designer paper. I had already made almost a dozen versions of the photo, using different effects to make the photo more abstract. But, my library is mostly dark cherry wood, and most of the books in the photo I wanted to use are leather-bound in rich reds, browns, and blacks--no where near copasetic for the color challenge--so I used my photo program to make a few more changes.

I used the tiled and kaleidoscope version of the photo, and simply adjusted the colors until they fit the color challenge. Easy peasy! Now, thinking about the design of this card took a long time, but finally putting it together was a snap. I printed the kaleidoscope design to the size I needed, cut it out, punched the corners, inked the edges a little, then heat embossed the sentiment. Then, I glued everything together. Metal accents are glued to each corner.

Finally, I added Stickles to the design. Even close up, you can't tell that this design was originally a photo of a library. I love the kaleidoscope effect feature in my photo program!

On the inside, I thought about adding some kind of sentiment, but decided to just stamp a light motif as a background. I'll add a personal sentiment before I give it to my husband.

And, that's it--quick and easy! Well, quick, after I figured out what I wanted to do. ;)

I'll be entering this card in the following challenges:

Thanks for stopping by today, and I hope the rest of your weekend is fabulous!

~Hugs!
 
Stamps: A Guiding Light (Flourishes); Motif (Inkadinkadoo)
Paper: My Library in Kaleidoscope Digi Paper (Personal)
Ink: Distress Ink; Clear embossing ink
Accessories: Morocco Lace Edger (EK Success); white embossing powder; metal accents (K&Co); Stickles; Distress Stickles; sewing thread
Size: A2 (5.5" x 4.25")
Thanks for visiting my blog!
To have Ink Up delivered to your inbox,
subscribe in the box at the top right of the page.

TMS #149: There Is No Try

Tuesday, June 5, 2012

Hi Friends! I hope you had a good weekend. My DD and I were able to visit one of my oldest (in time, not age ;) ), and dearest friends, who lives in Midland, Texas, this past weekend, so it was a very special time for me. I haven't seen Carolyn in about ten years. So much changes in even a short time! She had never met my DD, and we got to meet her entire sweet family, including all five of her grandchildren! I think my DD has made a lifelong friend of one of them. They were inseparable, and I have never heard my DD laugh so much as these past four days! She talked and giggled so much, she came home hoarse! :) I should probably be hoarse, too, because Carolyn and I stayed up late every night catching up on the years, talking and giggling, ourselves. :D  Carolyn, get ready...we'll be back soon!

But, on to business. It's time for the newest Tuesday Morning Sketch Challenge, and Melissa has given us a great sketch to work with this week. Also, Bugaboo Digi Stamps is our fab sponsor and they sent me an adorably funny digi stamp, called 
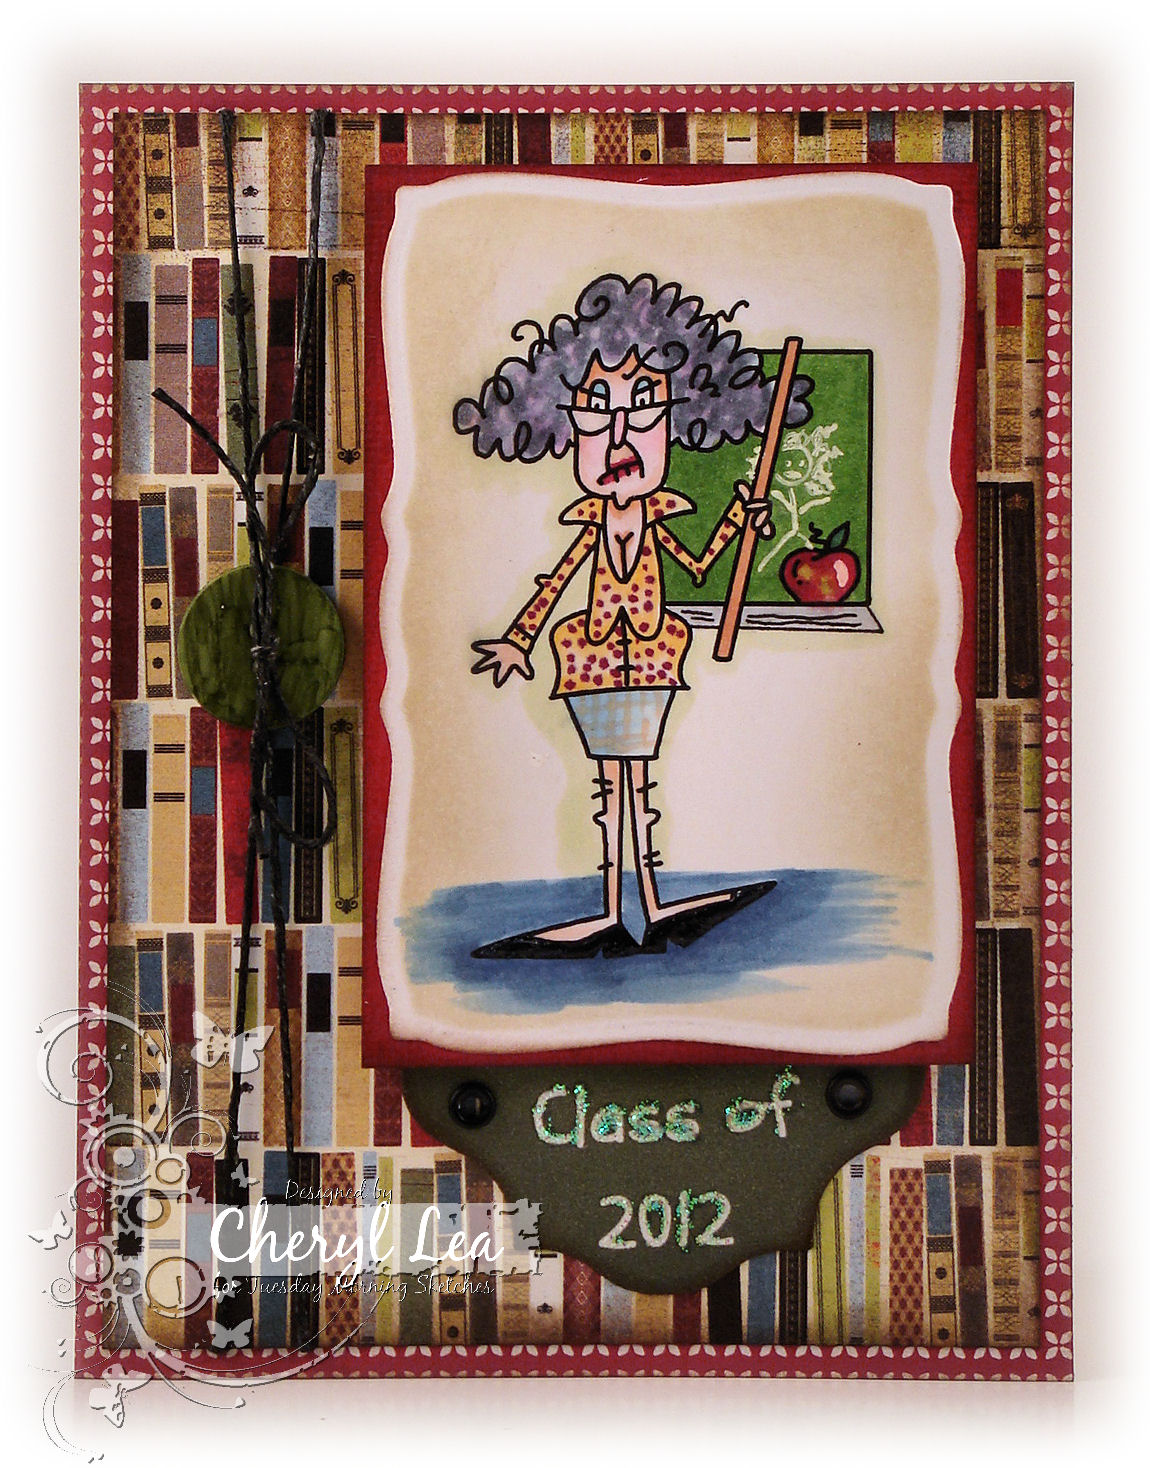
Stella Calendar Months-September, that is perfect for all the graduations going on right now.


Here's what I did with it:
Don't you just love that book dp? Reminds me of my own little personal library. Hmmm... maybe I should photograph my library shelves, do some creative editing in my photo program and make my own personal dp? I think I will! I'll post the result when I'm done.

In the meantime, for this card, I colored Stella with Copics, giving her a polka dot shirt and plaid skirt. I drew the tray under the chalkboard and added the stick figure "chalk" drawing on the chalkboard with a white gel pen. Stella is, of course, wearing patent leather pumps, so I used Glossy Accents on them, as well as her glasses. I couldn't resist adding blue eye shadow and bright red lipstick. This image SO reminds me of my second grade teacher!

I made the Class of 2012 sentiment in Word. It was easy to do. I made a text box with the words in it, filled the box with my color and change the text to white. I made sure the box was large enough to be able to use my desired die to cut it out. I added Stickles to the text, which looks great in person, but it didn't photograph so well.

The button was originally lime green, but I used a Copic to color and add a textured look to it.

This card is for a friend's son, for his high school graduation, and I wanted a light-hearted message inside. The Stella image comes with a fantastic sentiment, but it didn't really work in this situation, so I searched the internet until I came up with the perfect one--a quote from the ever-wise Yoda. It took me a couple of reads to understand it, but once I did, I knew this was the one. I sponged Distress Ink inside the die, and while the die was still in place, added the black faux stitching. Then, I printed the sentiment onto a transparency to make my own rub-on. This was a super fun card to make!

So, are you all revved up to join us this week at Tuesday Morning Sketches? Well, get your bad self over there, check out the rest of the DT cards and visit their blogs for some spectacular inspiration, then get busy! You've got until Sunday at 8 PM to link up.

Also, Melissa is having her first ever DT call, so you'll want to check the deets out on that, too. The DT call deadline is June 9, so you still have a few days, if you are interested in applying for the team!!!

I'll be entering this card in the following challenge:
Simon Says Stamp: Anything Goes

Thanks for stopping by today! I hope this week holds something wonderful for you!

~Hugs,
 
Stamps: Stella Calendar Months-September (Bugaboo Digi Stamps)
Paper: Tea for Two (Cosmo Cricket); Oxford (Basic Grey)
Ink: Distress Ink; Copic markers; white gel pen; black Micron pen
Dies: Curved Rectangles, Labels 13 (Spellbinders)
Accessories: Postage Stamp edge punch (EK Success); waxed linen thread; button; eyelets; Glossy Accents; Stickles; foam dots
Size: A2 (4.25" x 5.5")
Thanks for visiting my blog!
To have Ink Up delivered to your inbox,
subscribe in the box at the top right of the page.