Vintage Thank You

Saturday, February 23, 2013

This card is for the L.O.V.E. Challenge (the "A" challenge) in the Love Fest Member Company Challenge at Splitcoaststampers. For this challenge, you have to incorporate items into your card that begin with the letters, L, O, V, and E. I started my card with the sketch from Viva la Verve February 2013 Week 2, then used these "L.O.V.E." elements:

L = Lace, Lattice punch
O = Oval, Orange
V = Vintage, Velvet
E = Embossing, Eyelets
When I first looked at this challenge, I thought it would be difficult, then I ended up with two elements for each letter. Go figure! :)

Being a vintage card, I did a lot of distressing. I used a Distrezz-it-All on the edges of the dp, as well as the embossed center panel, and sponged Distress Ink along the edges, also. For that center panel, I was going for a leathery look, which I initially achieved, but sometimes I like to pull out different things and give them a try to see what I can come up with, and this panel ended up looking like old metal instead, which I loved! To get the look, I first used an embossing folder on kraft cs, then inked the entire panel with Versamark ink and heat embossed it with clear embossing powder. Then I did it a second time, but that time I also sprinkled a little orange embossing powder in a few spots, then heated it. I added a few swipes from a purple acrylic paint dauber, dried it with a heat gun, then used a white acrylic paint dauber. It has so much product applied to it, when you rub your finger over it, it actually feels like rusty metal!

The sentiment was stamped with Memento ink on white cs and sponged over with Milled Lavender Distress Ink. I colored around the oval with a lavender Copic, then used Copper, Lavender, and Diamond Stickles to give it some sparkle.

The swirl on the right side of the card is a flourish die cut from a thin sheet of cork that I sponged with Seedless Preserves Distress Ink.
Inside, I used a Deco Corner Chomper on the corners of the brown dp, sponged inside the die cut panel with Distress Ink, then using the negative from the cork die cut as a stencil, I stenciled the swirl with Scattered Straw Distress Ink.

There are going to be 11 member company challenges in all, in the Love Fest Challenge at SCS, and I'm getting a late start (this is just my second card), but I'm going to give it my best shot. If you're up for a "challenging" challenge, check it out. Each of the member companies has a different type of challenge, and they all look like fun.

Thanks for stopping by, and have a great weekend!

I'm entering this card in the following challenges:
Viva la Verve February 2013 Week 2 (VLVFEB2013)
Splitcoaststampers Love Fest Challenge: LOVEFEST2013A (L.O.V.E. challenge--see above for the elements I used.)
Simon Says Stamp & Show Challenge: Metal-ology

~Hugs,

 
Stamps: Sweet Treats (Verve)
Paper: Timeless Type Stack (DCWV); kraft
Ink: Versamark; Distress Ink; Memento; Copic marker
Dies: Elegant Flourishes (Sizzix); Labels 18 (Spellbinders)
Accessories: Arch Lattice Edge Punch (Martha Stewart); Tropical Paisley embossing folder (Sizzix); Clear embossing powder, Orange embossing powder (Zing); lace; velvet ribbon; cork; Deco Corner Chomper; acrylic paint; eyelets; Stickles; Sewing Thread; Foam Dots
Size: A2 (4.25" x 5.5")
Thanks for visiting my blog!
To have Ink Up delivered to your inbox,
subscribe in the box at the top right of the page.

Red Roses

Thursday, February 21, 2013

Hi All! I'm anxiously looking forward to my Copic Certification classes in April, and in the meantime, I've been practicing.

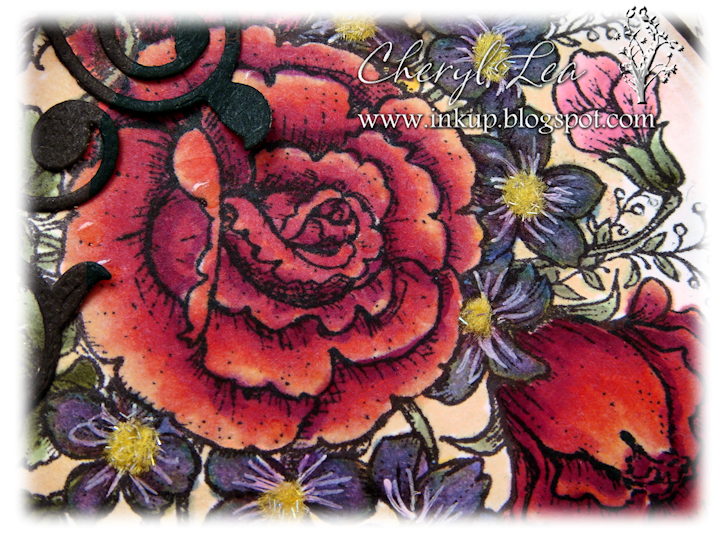
This beautiful rose stamp is from the Roses Are Red stamp set by Flourishes, which I won during their release week extravaganza, which makes it even nicer. ;) It's colored with Copics, and I randomly sponged Fired Brick and Tea Dye Distress Ink along the edge of the oval die cut as well as in some of the white areas between the flowers. Yellow Sparkly Fluff is in the centers of the blue violets, and the white lines on the petals were drawn with a white gel pen. I distressed both the dp's with ink and with my Distrezz-It-All, sewed them to mats of black cs, then added a little more Distress Ink to the stitches.

I'm entering this card into a sketch challenge for one of the SCS Love Fest challenges, and it calls for two flags across the bottom of the oval, but I couldn't bear to cover up that much of the image after I spent so much time coloring it, so I opted to use a delicate flourish die cut instead.

The bow is made from ivory seam binding, which I dyed with Distress Reinkers. After it was dry, I stamped a script text on it, then tied it into a big bow. It looked a little naked just sitting there all plain, so I added a crocheted flower and jeweled brad to gussy it up. :)

When I had finished dying the ribbon, my palms were completely covered in red ink, which wouldn't wash off. I was worried that if the bow wasn't completely dry it might stain the card, too, but then I had a lightbulb moment. This card is supposed to look distressed and aged! So, I helped it along by sponging Fired Brick Distress Ink underneath the bow.

The upper left corner needed something, but I definitely didn't want anything shiny, so I adhered two yellow pearls that I colored with a Copic marker (E87-Fig). They still looked too new, so I dabbed some black marker on them, making them just right.

For the sentiment panel on the inside of the card, I used a Romantic Rectangle die to cut the black cs, then used that same die to cut out the white cs, using a craft knife and cutting along the inside of the die. I wanted a little bit of red inside the card, so after I distressed the white cs, I added the single rose stamp from the Roses Are Red set, then used a brown Copic to shade it just a little bit. I am leaving the inside sentiment-free for now, until I decide who I want to send it to. :)

Thanks so much for stopping by my blog today. I hope you have a great day!

I'll be entering this card in the following challenges:
Flourishes Timeless Tuesday Challenge FTTC208: I'm Seeing Red
Splitcoaststampers LoveFest Challenge: LOVEFEST2013B (A sketch challenge)

~Hugs,

 
Stamps: Roses Are Red (Flourishes); Distressing--stamp used on ribbon (Glitz)
Paper: The Timeless Stack (DCWV); Picket Fence (Lily Bee Designs)
Ink: Copics; Distress Ink & Reinkers; Memento; White Gel Pen
Dies: Classic Ovals Lg, Fantastic Flourish One, Romantic Rectangles, A2 Matting Basics (Spellbinders)
Accessories: Seam Binding (Hug Snug); crochet flower; Sparkly Fluff (Our Craft Lounge); pearls; jeweled brad; Glossy Accents; sewing thread
Size: A2 (5.5" x 4.25")
Thanks for visiting my blog!
To have Ink Up delivered to your inbox,
subscribe in the box at the top right of the page.

Messy Valentine Cards

Thursday, February 14, 2013

Hi Friends! I know I said I had made my last Valentine card, but I have two quick ones that I hadn't intended to put on my blog until I saw the Simon Says Stamp and Show challenge to Make Something Messy. I saw some really cute cards on someone's blog, I think, and she used Dylusions Ink Sprays to create beautiful little cards. I used that idea here. (If you are the person I'm CASing, let me know so I can give you credit, 'k?) These card were fun and fairly quick to make, but they were crazy messy. I love Dylusions Ink Sprays...they are beautiful, and I walk around with stained hands for days and feel like a real artist. ;)
Both these cards are for my daughter to give to two of her friends--a brother and sister. This first one is obviously for the brother. To make it, I first spritzed a square of white cardstock with water, then used several colors of Dylusions Ink Sprays to color it. I dried it with my heat gun, but didn't blot it dry at all, and it left it looking a bit grungy--perfect for a boy. I then used a cotton swab to apply bleach to a big lace heart stamp (I sure hope it didn't ruin it, I love that stamp), then I stamped it over the dried Dylusions. I walked away to wash my stamp and was gone maybe a minute or two. When I returned, all the detail of the stamp was gone and I was left with a large white space where the bleach completely ate away the ink. So, I spritzed a turquoise color spray over the white spot, dried it again, then stamped the heart stamp again over that using white pigment ink. The "You Rock" sentiment was wet embossed with black embossing powder. I wrapped twine a couple of times around the square, sponged the edges of the card base front and the edges of the colored square with blue Distress Ink, then adhered the square to the base. Inside it simply says Happy Valentine's Day. The Blue paper under the card is actually the envelope I made for it.

To make this stamp for the sister, I went through the same process, except I did blot the ink off the cardstock before drying it with my heat gun. That gave it a softer look. Then I stamped butterflies in white pigment ink, and little hearts in red ink. I sponged pink ink along the edges, wrapped the twine, and adhered the square to the card. The card is sitting on top of the envelope I made for it.

And, that's all there was to it...easy peasy. Now I just need to check up on how to use bleach safely in the craft room.

Hope you are having a wonderful Valentine's Day! Thanks for stopping by!!!

I'll be entering these cards in the following challenge:
Simon Says Stamp and Show Challenge: Something Messy

~Hugs,

 
Stamps: Blue Skies, Sweet Treats (Verve); Valentine Sayings (Hero Arts); Lace Heart (Inkadinkadoo)
Paper: White card stock for cards; Colorbok for envelopes
Ink: Dylusions Ink Sprays; Distress Ink
Accessories: Embossing powders--pink and black; twine (The Twinery) bleach; Corner Chompers
Size: 4" square
Thanks for visiting my blog!
To have Ink Up delivered to your inbox,
subscribe in the box at the top right of the page.

Hearts, Hearts, and More Hearts

Wednesday, February 13, 2013

Hi Friends. Whew! This is the last Valentine's card I have to make. Good thing I don't have to mail it, or it would be so late. ;)

This is the Valentine-iest card I've ever made--a zillion hearts, sparkle, and pink and red out the wazoo! But, I know my daughter is going to love it! She is as girly as they come. :)

The layout is from Viva la Verve's February 2013 Week 1 sketch, and it was perfect for this card. Did you notice the progression of hearts in the dp's? The teeny little hearts are on the back layer, on the next layer the hearts are just a little bit bigger, the long horizontal layer is ever bigger, and it's topped off with that pretty lattice heart--kind of symbolic of how my love has grown for my daughter over the years.

I did some distressing, and that was a good thing because my sewing machine went a little bonkers for a few minutes. All that bizarre zig zag stitching was not intentional, but it added to the distressed look, so I kept it in.

I used Corner Chompers to create the Deco and rounded corners, and added eyelets to the middle layer so that I could add a twine bow there. The bow is topped with a button and rhinestone.

I got the idea for the peek-a-boo corner from Kathy at The Daily Marker. She comes up with so many fun ideas! Behind the rolled back corner, I stamped a little "From the heart" stamp, and added Glossy Accents to the heart there.

The lattice heart is backed with a solid heart cut from the bg polka dot dp, and I glued 3 layers of the lattice hearts together for added dimension. Those cute little pink pearls are a Pearl Pen. It always amazes me when they dry in a round shape instead of flattening out.

I used the Photo Cut Corner Chomper to create the photo corners on the inside of the card. On the sentiment panel, I sponged Picked Raspberry and Spun Sugar Distress Ink along the inside of the die and drew red faux stitches, then I printed the sentiment directly to the cs. I normally would have printed the sentiment onto a transparency and rubbed it on, and I did try that, but had a little trouble with the red not showing up clearly with that method.

The large die cut heart was cut from white cs. I sponged several pink and red Distress Inks over it, then spread glitter glue over the heart, leaving the edges clean.

Well, I think that will do it for me and Valentine's cards this year. I better get going on Easter cards or I'll be doing the last minute thing all over again!!!

I'll be entering this card in the following challenges:
Viva la Verve Sketch Challenge: VLVFeb2013 Week 1
Flourishes Timeless Tuesday #207: Put Your Heart On It!

Thanks for stopping by, and Happy Valentine's Day!

~Hugs,
 
Stamps: Tiny Flowers & Tags (Flourishes)
Paper: Sweet Cakes (Doodlebug Designs)
Ink: Distress Ink, Colorbox, Sharpie Marker 
Dies: Labels Twenty-Five, Classic Hearts (Spellbinders); Timeless Amour (Spellbinders for Heartfelt Creations)
Accessories: Crop-a-Dile Corner Chompers (Deco, 1/2" rounded, Photo Cut); white embossing powder; rhinestones; eyelets; button; acrylic paint; sewing thread; twine (The Twinery); foam dots; Glossy Accents; Stickles; Pearl Pen; sentiment created in Word
Size: A2 (5.5" x 4.25")
Thanks for visiting my blog!
To have Ink Up delivered to your inbox,
subscribe in the box at the top right of the page.

Roses are...Pink

Hi Friends! Only one more day until Valentine's Day, and I'm still making Valentine's cards! Nothing like waiting until the last minute. :)
For this card, I used the layout (3rd layout, turned sideways), color scheme (Colors 1), and choice of embellishment (satin/silk) from the Flourishes' Pick 1 Challenge. The prize is the entire February stamp release, and even though I won the January stamp release (the rose on this card is from one of those stamp sets), I'm giving it a shot again. ;)

Isn't this image beautiful! I love that all their images are so detailed. It makes them much easier to color. I used Copics to color this, then shaded the background with Antique Linen Distress Ink while it was still in the die. (I'm finally going to take the Copic certification classes in April, so I'm hoping my coloring skills will be much improved after that.)

Every now and then I try out a new stitch on my sewing machine. The heart stitch was the perfect accent for this card. And, I usually use some kind of bow maker to make my bows, but they often look stiff when I'm done, so I used Heather Jensen's bow tutorial when I tied this bow, to get a softer look. I obviously need to practice to get a bow as beautiful as Heather's, but this one isn't bad. ;)

The inside has a couple of dp's that I used on the front, and the sentiment is from the same stamp set as the rose.

I still have one or two Valentine cards to make today, so I better get busy!

I'll be entering this card in the following challenge:
Flourishes Pick 1 Challenge-FLLCFEB13

Thanks for stopping by, and have a fab day!

~Hugs,
 
Stamps: Roses are Red (Flourishes)
Paper: Watercolor Bouquet (K&Co); Antique Flower Stall-Country Rose Digi Paper by Jenni Schoenberger, Embrace Digi Paper Collection by Diane Rooney (Design House Digital)
Ink: Copics; Memento; Distress Ink
Dies: Romantic Rectangles, A2 Matting Basics, Classic Squares Small, Marvelous Squares (Spellbinders)
Accessories: Ribbon; rhinestones; Corner Chomper; sewing thread
Size: A2 (5.5" x 4.25")
Thanks for visiting my blog!
To have Ink Up delivered to your inbox,
subscribe in the box at the top right of the page.