Timeless Tuesday #231: Old, New, Borrowed, & Blue

Tuesday, July 30, 2013

Hi there! Time for this week's Flourishes Timeless Tuesday Challenge! Allison is our hostess, and, as we're right in the throws of wedding season, her challenge is:

Old, New, Borrowed & Blue


All you have to do is create a card or project where you use something:
   OLD - something older from your product stash
   NEW - the newest stamp that your just acquired
   BORROWED - scraplift a "design" from our Flourishes Gallery (please link the project inspiration piece from our gallery)
   BLUE - add something blue on it!

PS:  It does NOT have to be a wedding themed project!  :)

These are the Old, New, Borrowed & Blue items I used:
   OLD - Stickles
   NEW - Garden Fairies Stamp Set
   BORROWED - Cindy Lawrence's Gorgeous Happy Birthday Jan Marie card
   BLUE - The Fairy's dress
I started by stamping a Garden Fairies image onto Flourishes Classic White Cardstock. Then, I colored it with Copics, cut it with a Spellbinders die, then sponged Peeled Paint Distress Ink along the lower portion of the die cut and Tumbled Glass Distress Ink on the upper portion. The wings got their sparkle from Stickles. I did little sewing, then added a piece of lace, pompom trim, and velvet ribbon. The sentiment is stamped on a Spellbinders die cut and I used Spun Sugar Distress Ink over it.
Inside the card, I used a zig zag punch to cut out a black and a white zig zag, then placed them on a strip of the purple paper from the front of the card so that there is a purple zig zag, too. :)

I hope you'll play along with us this week! And, remember, you don't have to use Flourishes stamps, but if you do, you get two ballots toward the weekly prize! You can find all the details for the challenge here.

Be sure to visit all our designers' blogs and leave some love for them, too! :)
Thanks for stopping by, and have a wonderful week!

I'm entering this in the following challenge:
Simon Says Stamp Monday Challenge: Ode to Sunshine

~Hugs,

Supplies Used:


Thanks for visiting my blog!
To have Ink Up delivered to your inbox,
subscribe in the box at the top right of the page.

Timeless Tuesday #230: Christmas in July

Tuesday, July 23, 2013

Hi there! How's the weather in your neck of the woods? Here in the deep South, it's hot and humid. We could use some cooler temperatures!


So, Katie, a fellow Southerner, has come up with a fantastic challenge that just might give you a virtual cold front: Christmas in July! But, there's a catch...your card needs to be semi flat for mailing, so no big bows or lumpy, bumpy envelopes here! Now, let's get a head start on our Christmas cards!
For my card, I inked up the kissing ball from the Meet Me Under the Mistletoe set, stamped it on Flourishes Classic White Cardstock, and colored it with Copics. I added some gold highlights to the bow to give the appearance of an iridescent ribbon. (I added a little sparkle with a Spica pen, too, but you can't see it in the photo). I used Spellbinders dies for the die cuts, and for the gold background, sponged Scattered Straw Distress Ink around the image while it was still in the die. My sweet friend, Jane, recently gifted me with the "Charles" Embossing Folder (thank you, Jane!), which I used on the red base layer that peeks out from beneath the curved scalloped border layer. I did a bit of sewing, sponged the edges of the layers, and added Pearl Pen pearls, and even though I lifted the image die cut slightly with layers of crimped cs, I was still able to keep the card flat enough for mailing!
For the sentiment, I heat embossed a red Ranger Embossing Tinsel.
With all the busy patterns on the front of the card, I thought it'd be a good idea to give the recipient's eyes a rest on the inside with a simple design. Don't you just love using this sentiment paired with the kissing ball image! Flourishes always has the perfect sentiments to go with their images!

So, now it's your turn! Turn up the air conditioning, crank up the Christmas carols, ink up the Christmas stamps, and play along! You'll get a jump on this year's Christmas cards, and have a chance to win a prize from the Flourishes Boutique, too! And, remember, you don't have to use Flourishes stamps, but if you do, you get two ballots toward the weekly prize! You can find all the details for the challenge here. And, don't forget that Flourishes is celebrating Christmas in July by offering 25% off ALL Christmas stamp sets, until July 31st! Find the details for the sale here.

Take a moment to be inspired by all our designers' blogs, as well as this month's Guest Designer, Margaret Gilmer, and be sure to leave some love for them, too! :)
Thanks for stopping by, and have a cool week!

~Hugs,

Supplies Used:


Thanks for visiting my blog!
To have Ink Up delivered to your inbox,
subscribe in the box at the top right of the page.

Timeless Tuesday #229: Make It Mini!

Tuesday, July 16, 2013

Happy, Happy Tuesday! And, Welcome to another Timeless Tuesday Challenge

Jenny is our hostess this week, and she has a simple and FUN challenge for us--Make it Mini!  Create three miniature cards sized 3" x 3" or close to it... just smaller than your typical A2.  Ooooo, I just love making mini card sets! 
This is a photo-heavy post, so, as difficult as it is for me, I'll try to keep my words short. ;) 
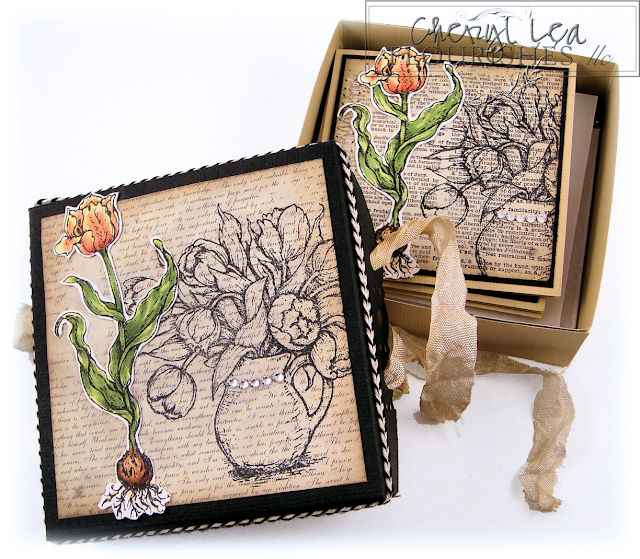
When I make a set of cards, I almost always make some kind of container for them. I went with a very simple box for this set, because I wanted the gorgeous images to take center stage. The box measures 3.5" square, and is 1.25" high. The images here are both from the Tulips for Friends stamp set. I used Copics to color the single tulip on Flourishes Classic White Card Stock, and the vase of tulips was stamped with Memento Tuxedo Black ink on script text dp. The edges were sponged with Frayed Burlap Distress Ink. The bling on the vase are Swarovski crystals.
The box stays closed just fine without any kind of tie, but I wanted a soft bow on it somewhere and didn't want to cover any of the top up, so I punched the center of each side of the box top with a Footlights Martha Stewart punch and threaded seam binding through the two outer holes on both sides. The ivory seam binding, which I crinkled and dyed with Antique Linen and Frayed Burlap Distress Ink Reinkers, runs under the bottom of the box, and secures the top beautifully. 

The cards are 3" x 3", so it may look like the box is too wide, but I wanted to include envelopes, too. Since the cards are smaller than the top of the box, I made the single, colored tulip just a little bit shorter by clipping the stem slightly below the flower and moving the flower down, closer to the first leaf. It's barely noticeable!

Did you think all the cards were going to look the same? No way! Flourishes has so many beautiful floral stamps, it was easy to choose several for this set. I love that so many of their sets have large floral images and accompanying smaller images, also. I especially like the ones that include the bulbs. 

Here's a closer look at each individual card:
This is the Tulips for Friends stamp set. To mix things up a little, I used dictionary print dp instead of the script dp I used on the box top. I did just a little zigzag sewing along the left edge of each card. My machine did something wonky on this one, but since it's distressed, I felt that it just added to the look I was going for. :)
This is from the Old Tea Rose stamp set. Being botanically illiterate, I didn't know what the smaller image was, so I did a little research and found out that it's a rose hip. I like learning new stuff. ;) This image didn't have a bulb attached, but I think the bulb shape of the rose hip worked well for the set. I added a few Swarovski crystals to each card.
And, finally, this is from the Paperwhites stamp set. I sure did enjoy coloring all these pretty images!
I usually make vellum envelopes for 3x3 cards. Since they won't be mailed, the front can stay clean, and I like that the recipient can get a peek at the front of the card before they even take it out. 

I used a Spellbinder Medallion Two die to cut the sentiment panel for the inside of the cards, and sponged Frayed Burlap around the edges.

Whew! Thanks for hanging in there with me! I hope I have inspired you to make your own mini card set, and I can't wait to see what you create! Then, link up your own mini card set on the Flourishes' blog for a chance to win! You can find all the details here. Be sure to check out the beautiful mini sets from my teammates, too!
Thanks for stopping by, and have a wonderful week!

~Hugs,
 
Supplies: 


Plus these additional Copics: R21, R22, YG00, YG01, YG03, B39, B41, E23, C2, C4

Thanks for visiting my blog!
To have Ink Up delivered to your inbox,
subscribe in the box at the top right of the page.